2 Ways On How To ADD Your Sub-Menu(Sub-Page) under a Main Menu Page


Published on October 22, 2014
Published on Wealthy Affiliate — a platform for building real online businesses with modern training and AI.
This is a guide in response to a question on how to ADD a Sub-menu under a Main Menu tab or page. Here are 2 OPTIONS on HOW to ADD SUB-MENU under a Page in your Main Menu.
OPTION 1: IN EDIT PAGE MODE
ASSUMPTIONS:
1. You are already logged in your website.
2. You have already added your intended main(parent) page.
3. You have already added the page(s) intended to be part of your sub-menu.
STEPS:
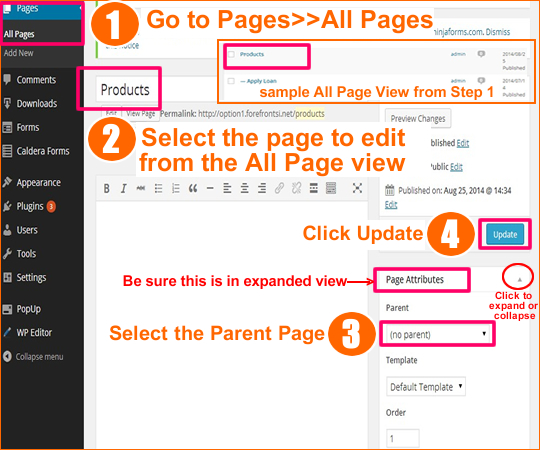
- Go to Pages>>All Pages
- Select the page(intended to be part of the sub-menu) to edit from the ALL Page View.
- Select the parent page from the drop-down list.
- Click Update.
SCREEN SHOT:
------------------------------------------------------------------------------------------------------------
OPTION 2: MENU CONTROL
Ready to put this into action?
Start your free journey today — no credit card required.
ASSUMPTIONS:
1. You are already logged in your website.
2. You have already added your intended main(parent) page.
3. You have already added the page(s) intended to be part of your sub-menu.
STEPS:
- Go to Appearance>>Menus
- Select the page or pages (intended to be part of the sub-menu) by ticking its corresponding check box from the list of pages under View All tab.
- Click Add to Menu.
- Drag and drop the page, placing it under its intended Parent Page and indented. For an example, please refer to the screenshot - Vitamins is dragged and dropped under Products and indented.
Repeat STEP 4 until the other sub-menu pages are placed under its Parent Page. - Click Save Menu.

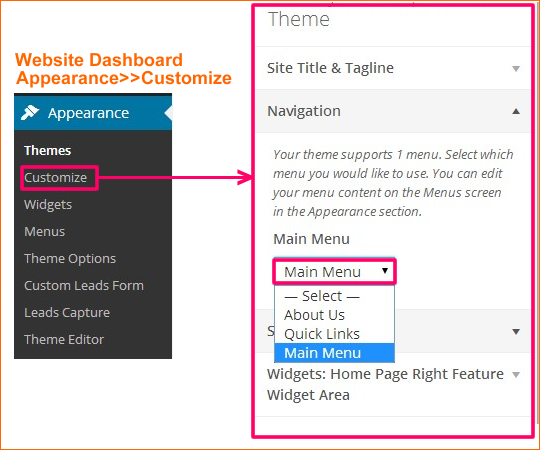
NOTE: Please make sure that you have selected the correct MAIN MENU in Appearance>>Customize>>Navigation
SCREENSHOT:
The Better Option?
Considering the ease of control and the early stage of website setup in LIVE MODE, OPTION 2 is better than OPTION 1.
Reasons:
1. HIERARCHY: The MENU CONTROL(Option 2) in Appearance>>Menus supersedes the behavior of parent page assignment in Page Attributes(Option 1).
2. WEBSITE SETUP PROGRESS: As you progress with the courses, you will be needing to ADD some more contents in pages including those that are unintentionally published that will definitely affect the behavior of your website already in LIVE MODE if you are NOT controlling your MENU using Option 2. With that, we can prevent the unintentionally published pages with too roughly drafted contents from displaying automatically with the help of MENU CONTROL in Option 2. :)
Hope this helps.
All the best,
Jhen
Share this insight
This conversation is happening inside the community.
Join free to continue it.The Internet Changed. Now It Is Time to Build Differently.
If this article resonated, the next step is learning how to apply it. Inside Wealthy Affiliate, we break this down into practical steps you can use to build a real online business.
No credit card. Instant access.