How To Insert An Image Into A WA Blog Post


Here's how to insert an image into your Wealthy Affiliate blog post.
1. Have your cursor where you want to locate the inserted image.
2. Click the image icon as shown.

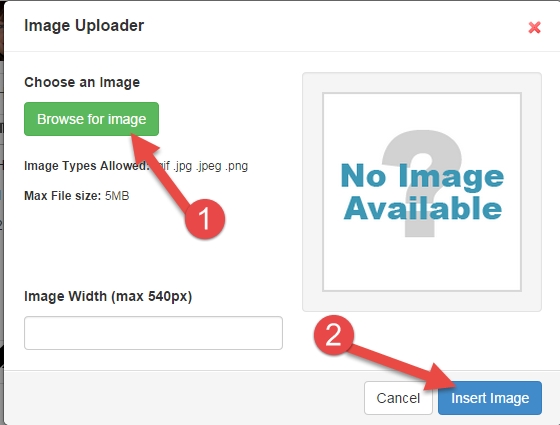
3. Browse for image (fig.1) Insert image (fig.2)
4. Resize the image by dragging the corner of the box outwards and click 'done' when you are satisfied with image resize.
5. To center the image use the "Outdent" and "Indent" tabs as shown below. Have the cursor sitting adjacent to the picture otherwise your text will indent also.

To re-size an image see this post
https://my.wealthyaffiliate.com/janicebowles/blog/how-to-re-size-an-image-using-paint-tool
If you have any questions please leave them for me below - thanks!
Janice :)
Join FREE & Launch Your Business!
Exclusive Bonus - Offer Ends at Midnight Today
00
Hours
:
00
Minutes
:
00
Seconds
2,000 AI Credits Worth $10 USD
Build a Logo + Website That Attracts Customers
400 Credits
Discover Hot Niches with AI Market Research
100 Credits
Create SEO Content That Ranks & Converts
800 Credits
Find Affiliate Offers Up to $500/Sale
10 Credits
Access a Community of 2.9M+ Members
Recent Comments
34


Many thanks Janice. I will bookmark this for future reference.
I am in the process of adding photos to my website pages, a bit fiddly as they don't always appear where you expect, when inserting them in the edit page mode. It's getting there though.
All the best,
Brandon
Hi Brandon, A few tips on inserting pictures to your wordPress blog. *Place your cursor where you want the top edge of picture to sit.
*When you want to wrap text around it have the cursor at the beginning of the line of text where you want to the top of picture to be.
*If you want to have a picture on the same line as an "H" tag (a heading H1, H2, H3 etc.) then insert the picture before adding the tag, that way you get it where you want it to be!
*Also when you have uploaded a picture check your options before clicking insert... either right, center or left. However you can easily change it afterwards by clicking on the picture and clicking on the "pen" icon in the top left corner. :)

And if you're using safari, don't use it to upload your images at WA, it will not work. Use chrome or firefox.

From this post I learned a very important lesson. Some things may seem so trivial to me or you that you think it never needs a tutorial. Yet there are always those who come from different background and still need tutorials like this one here.
Sometimes when I read other blogs the authors say something like: Do this or that. They don't explain how to do that as it's so trivial for them. But not for ME. At least not yet.
Exactly Egon and I remember how I struggled to do the things that now seem so simple, but when you are learning all these little things can create overwhelm for some people. I guess I want to help people move forward and not become stuck on these technicalities. :)


Wow, I wish I had found this when I first joined, you know, forever ago. :D Which is how long it took to figure out how to add images. Yup, color me with no brain. :/
Great tutorial, thanks for sharing. Cheers
I think the icon was not there at those times. The option was added only later. WA platform is constantly improving so sometimes it may happen like that. :)
Ah well Egon knows more about that than I for I've been here six months! I remember looking at the dashboard of WordPress for the first time and wondering how I was ever going to make head or tail of it! So it isn't about 'no brain' it's about learning a new skill! :) Glad to be of help, I appreciate you took the time to comment.

Great job Janice, will really help the newcomers. I do a great deal of photo and slideshow projects so that one was a no brainer...Lol.
Kim
Indeed Kim, for the newcomers these things are baffling but once you get past being afraid to hit a few buttons and see what happens, confidence grows. It is for this group of people that I intend to offer help and aren't we lucky that we can now do these things in our sleep so to speak! :)
So right Janice, anything to help. I add my assistance where I can.
Have a great weekend! :)

Janice, you are just a wealth of information. Thank you so much for all the time you take to teach!
See more comments
Join FREE & Launch Your Business!
Exclusive Bonus - Offer Ends at Midnight Today
00
Hours
:
00
Minutes
:
00
Seconds
2,000 AI Credits Worth $10 USD
Build a Logo + Website That Attracts Customers
400 Credits
Discover Hot Niches with AI Market Research
100 Credits
Create SEO Content That Ranks & Converts
800 Credits
Find Affiliate Offers Up to $500/Sale
10 Credits
Access a Community of 2.9M+ Members
Cool information... Now, I am going to give it a try and see what happens lol.
Thanks AW
SMILE ;)...!
Thank you Arlene... hope you got the result you wanted lol. :D