Before we go any further I want to teach you how to figure out how many columns and rows you will need in your table when doing it manually. In our example we are going to be submitting 34 items in our table and we have a full page (no side bars) our images have all been cropped to 150 pixels wide so we take 1200 pixels minus 155 pixels per image and the space between the columns this calculates out that we can have 6 columns at 930 pixels we have to remember to allow for the indention off the edge of both sides of the page in the themes formatting this is normally 250 to 300 pixels and this is theme dependent.
I like to go with 300 its better that they all fit than to have to go back over everything to get it correctly. If you know how to do code you can go into CSS and adjust the page so that you can squeeze that last column in if you really think it is worth all the hassle of doing that.
I would just put one less column because I like to keep it simple and I personally don’t like messing around in the CSS code formatting unless I absolutely have to. So with all the calculations done we figure out we can put 5 columns in a full page and only 4 for a web page that has a single side bar (either side left or right), there are some themes that have dual side bars in those themes I would not suggest using TablePress style plug ins for those themes either that or utilize the slide bar.
Instruction 4
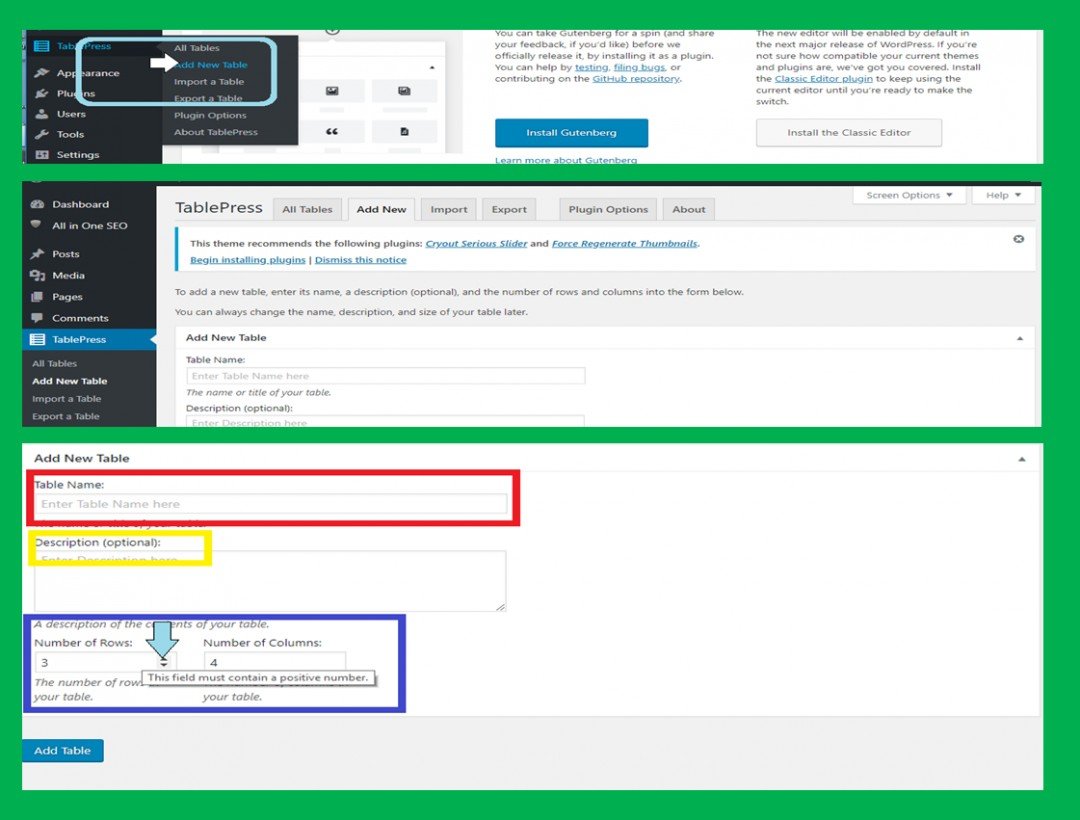
In the pop up drop down menu click “Add New Table” as shown in the top screen shot of image 4, then the TablePress add new table editing page will open you will see a bunch of advanced tabs along the top menu but we are just going to concentrate on the “Add New Table” window that opens under the TablePress windows menu bar as shown in the middle screen shot in image 4.
Then in the bottom screen shot we are going to start to make a new table. First the red square is where we will give our table a name, then if we want to we can enter a brief description in the yellow outlined box, and last we can determine how many rows we want in our table and this is done by clicking the down arrow or up arrow shown by the blue curser so you can adjust the table to the amount of rows (are the horizontal lines going across the table) you want in your table.
Instruction 5
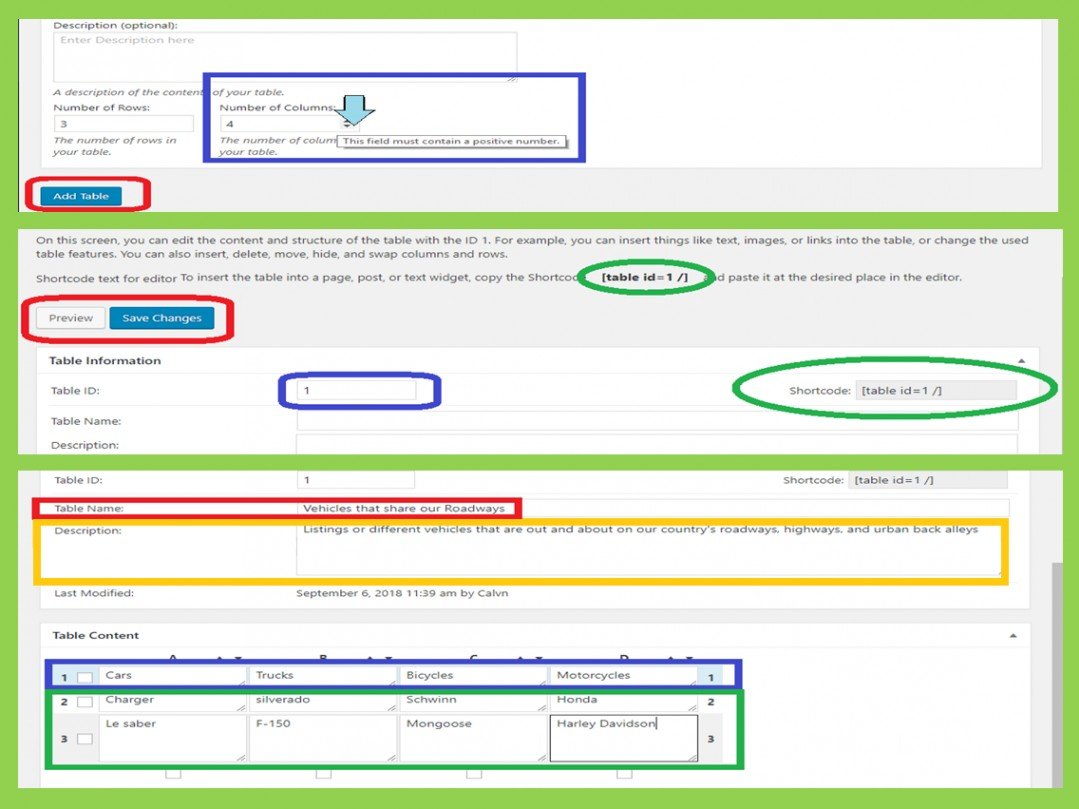
Then in the top screen shot of image five shows us the same control set up for the number of columns (are the vertical listing of items in the table one on top of the next in a stack) we want going across the page once we have that adjusted to the number we want then we click the “add table” button just below it and circled in red.
After clicking on the add table button the new table will appear in a new window which is the TablePress table editing window, as in the middle screen shot of image 5. This is one of the places we can get the table’s short code to insert it where ever we want in your pages, posts, or even widgets, it is in the top section of the table’s editing window and both code locations are circled in green.
Circled in red is the preview button which allows for a sneak peek as to what the table will look like, and the save changes button for those long exhausting tables that takes some time to create, but your visitors love, you can save it and come back later to finish it (I like to use it as I finish each row then save it, finish a row then hit save, that way in case something should happen you don’t lose the full table just the last couple on minutes’ worth of work on it.
One final item on this page is the assigned table number, circled in blue, which will be very useful if you create multiple tables for easy navigation throughout your website. The table are list in the all tables page numerically for easy locating (not like post and pages which are list as the most recent published one is on top)
In the bottom screen shot you will see that I added a table name highlighted in red, wrote a brief table description highlighted in orange, and filled in the cells (each box of the table) of our quick demo table.
The cells outlined in blue are the columns headers and the green highlighted cells are the individual listed table items, you see how the far right lower box is outlined in black that is to indicate that is the cell that is currently active or the cell being worked in, and you simply click on the cell you want to work on and it will become active so you can edit, add or delete content, images, and links.
Instruction 6
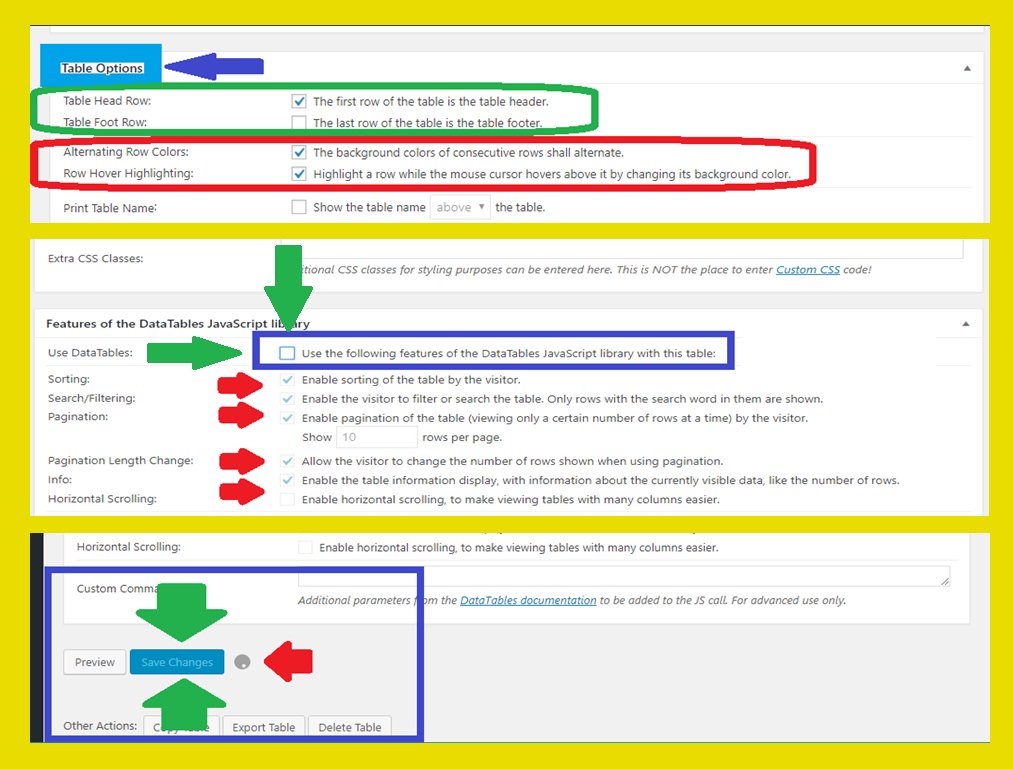
Let’s move on to image 6 and the top screen shot it shows the middle of the TablePress edit page and that’s the different table options most of these are pretty self- explanatory.
These do not change the structuring of the table but rather the components and looks of the table like every other lines being different colors or having headers for each column on top of the table or on the bottom or for really long tables you could have them at the top and bottom or not have column headers at all.
Along with some other options that could make the table look better or more informative to your visitors, like whether to show the table name at the top of the table, at the bottom of the table, or not all.
Moving down to the middle screen shot, of image 6, here we see more settings to choose form, the top control is a master switch it can disable or deactivated (no check mark as shown in the blue square and green arrows pointing at it) all the lower functions will be disable then with it even if they are as indicated with a blue check mark like the boxes below.
But because the master box is not checked it is deactivated so the lower boxes do not work, to use these individual controls you will have to place a blue check mark in the top box outlined in blue and the green arrows are pointing at to activate the control switches of the lower boxes allowing for individual control of each of the settings listed for that particular table.
Then we have the listed multiple different options in the middle screen shot of image 6, that you can offer to your visitors while they are in this particular table portion of your website they are pointed out by the little red arrows. I suggest you play around with these setting, so that you learn what they do and then you can tweak your table best for your visitor’s interaction with it. (Note the bottom switch is for the slide bar when the tale exceeds the webpage’s width)
Lastly, in the bottom screen shot of image 6 we have in the far lower left hand corner of the editing page the preview button on the far left side, and the save changes button just to the right side of it where the green arrow are pointing also I wanted to point out that when the changes are being saved the little spinning dot will appear indicated by the red arrow.
If you made it to this point you should have made your first table congratulations!
Moving right along to inserting the table into posts and pages which ever you want


Janelle

Thanks for this training. This looks like an interesting plug in.
Tried and True
Elaine