Believe it or not you already know how to do this you don’t realize it yet but you really do. But I will walk you through inserting images because there are a couple little minor differences.
So inserting images or links into a table is similar to the process of inserting images and links respectively in posts or pages in your website dash board or site content.
Instruction 12
So looking at the TablePress table editor page in the top screen shot of image 12 the orange arrow is pointing to the “Save Changes” at the top of the page (there is also one at the bottom of the page). The red arrow is pointing to a table cell that is outlined in the red square, we have the blue arrow pointing to the insert link button outlined in the blue box, and finally we have the green arrow pointing to the green box that outlines the insert image button these are the 3 main components of inserting images to tables.
When inserting links it is exactly like inserting a link in site content and the word press post/page editor the only difference one is going in the page/post and here it will go into the table’s cell after you click on the table cell to activate it, then click on insert link then insert the link like you would anywhere else on the word press platform.
The major difference when inserting images into tables is you will be inserting the image into your media library like any other image, but then the plug in enters the image by code to the table cell and not the actual image. So any cropping and adjustments to the image must be done during the uploading process (same as done when inserting images in posts or pages), prior to inserting any image into the table.
This does not change the way we do it. The Table Press plug in just automatically changes the image after we edit the image, during the uploading of the image just like any other image, it’s just the TablePress plug in converts it to code when it appears in the table’s cell in the TablePress table edit mode.
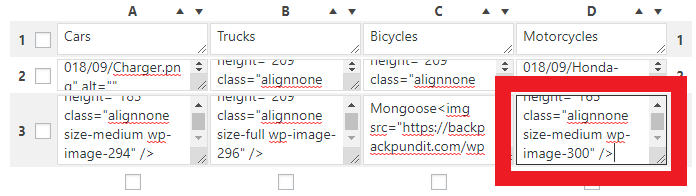
Show in the bottom screen shot of image 12 we click on the table cell in red with a red arrow pointing at one of this tables many cells then we click on the insert image button outlined in green with a green arrow pointing toward it.
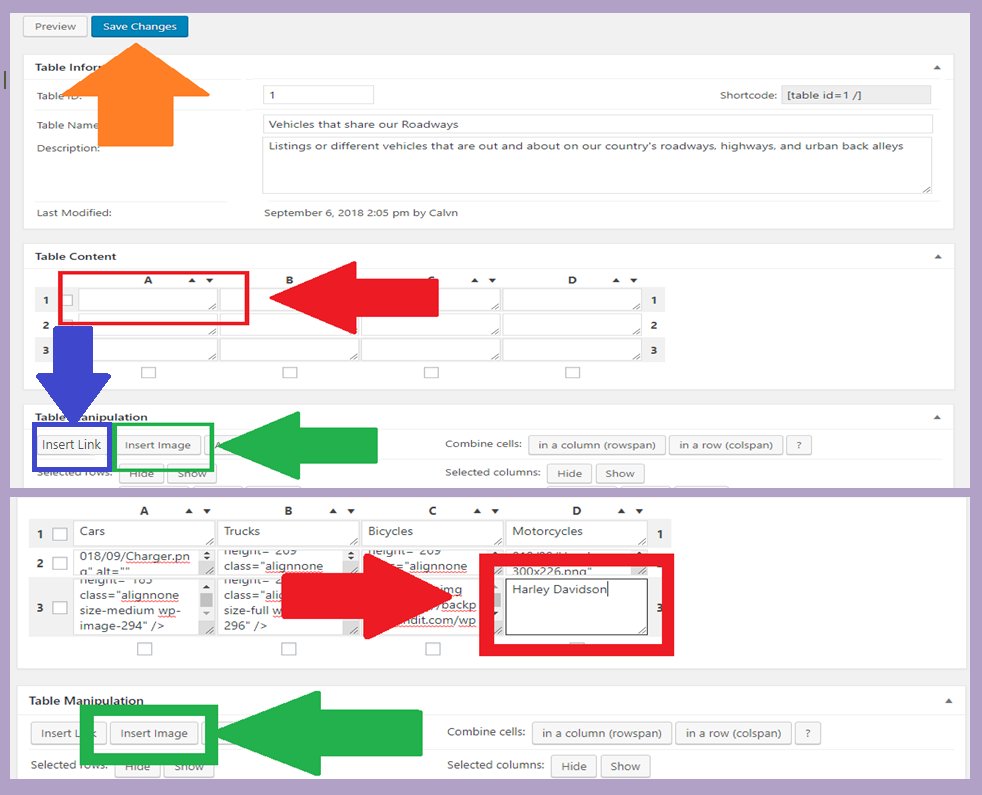
Image 12
Below is a quick screen shot of what the table cell, in the editing mode, will look like when it has an image code inserted into it.
Quick screen shot
Instruction 13
In the top screen shot of image 13 I went and uploaded the images without cropping them first just to show you what would happen if you forgot to resize all your images to the same size, therefore the table appears pretty unorganized and cluttered.
I discussed how to resize and crop images in https://my.wealthyaffiliate.com/training/screen-shots-and-editing-the-easy-way so if you didn’t look through that training it might be a good idea to stop here now and go have a look at it now. The problem with the table in the top screen shot of image 13 is why I created that training to help with this situation right here.
In the bottom left corner of image 13 you can see I make a quick table with all my image sizes that I am going to be inserting into the table and calculate it out to find the image size that will fit the best for the table size I am using this also determines the amount of columns as well.
The bottom right side of image 13 is a screen shot that shows the table again after all the images where deleted from word press resized and then uploaded back into the table again, notice how nice and neat it looks when you take that little extra step to tweak it out some.
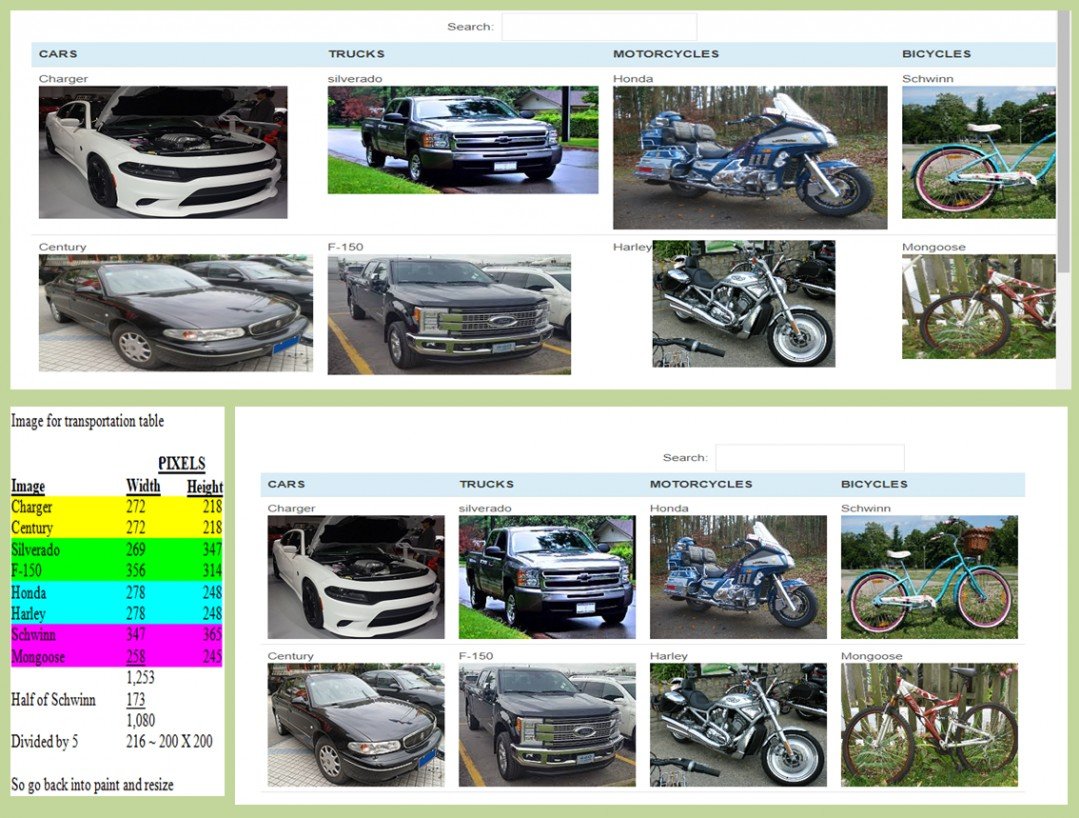
Image 13
Instruction 14
The top screen shot of image 14 shows a table that I added the hyperlink to one of the other pages of this website in the 2 table cells inside the green box, and inside the red box are 2 table cells with image codes inserted (remember the only time you will see the code and not the image is when you are in the TablePress table edit mode).
Meanwhile the bottom screen shot in image 14 shows how the table came out when I did this. If you look at the text it is not justified in both columns: in one it is next to the image in the other it is above the image.
I currently have left a message for the plugin developer to see what needs to be done to prevent this from happening and will update this training as soon as he responds to my message.
I think is it because the cells float according to images or files downloaded so the columns do not automatically adjust to the different sized columns in the manual TablePress table editing mode. Also if you were to create this table with the link codes and image codes inserted into an imported file it will still not correct the textual justification.

Image 14
Instruction 15
You can make a table of contents manually, by going into the TablePress table editing mode then go to the actual table.
Once there click on the boxes under all the columns you want deleted shown by the red circles in the top screen shot of image 15, then click on the delete button indicated by the green arrow. For a table of contents you want to delete all of them except the last column like the example shows.
To add columns, simply put the number of columns you want to add in the box outlined in blue then click the add button with the blue arrow pointed to it. To add rows, simply put the number of columns you want to add in the box outlined in purple then click the add button with the purple arrow pointed to it.
And to delete unwanted rows check the boxes next to the row you want to delete shown over by the light blue circle and then click on the delete button indicated by the orange arrow
Set the features that you don’t have for your table of contents, red arrows pointing to boxes turned off and the green arrows are pointing to the features we want to have in the table of contents, shown in the middle screen shot of image 15
Then in the bottom screen shot of image 15 the orange boxed cell with the orange arrow pointing to it, will be the place we manually and the text and any link codes if we want to put links under them, when can also click on the “Advanced Editor” button outlined in the blue box and the blue arrow pointing to it and will be discussed in 5 images from now I just wanted to point it out for right now.
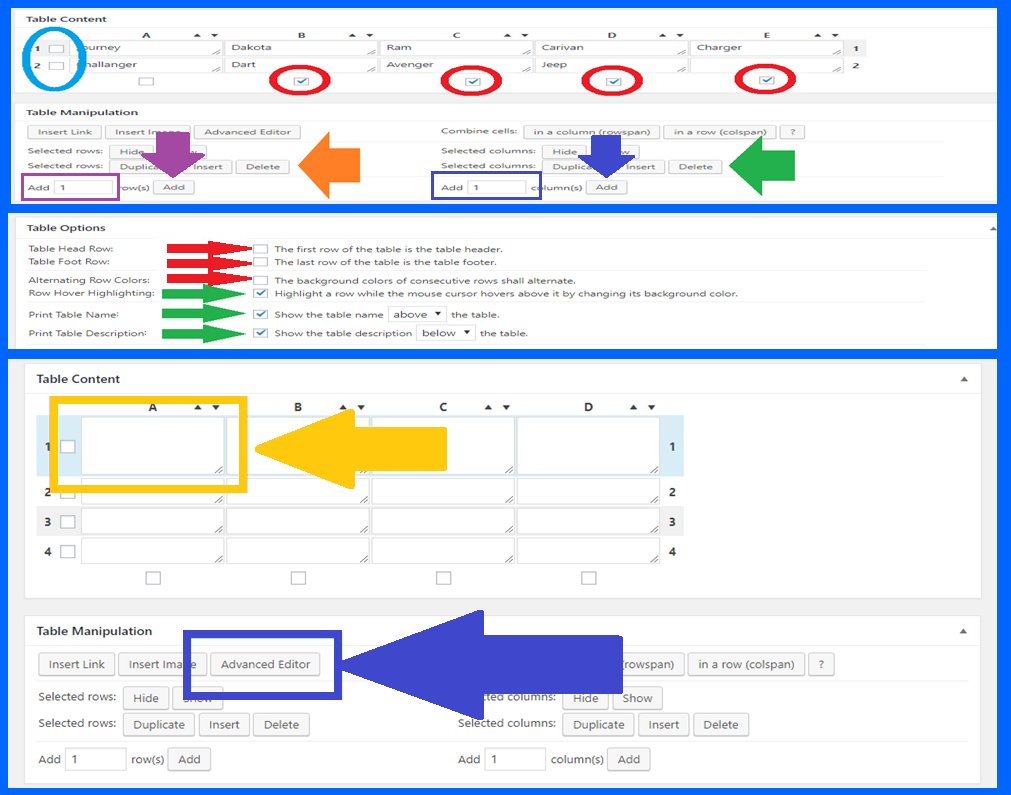
Image 15
Nice and easy right? O f course it was just follow the directions and will get what you want your table or table of contents to look like. Next we're going to move into a more advanced editing, don't know why the creator called it advanced.
I think it makes editing easier then opening the table cell and try to figure out what every thing is in that little itty bitty box. That problem is about to be solved as we proceed to advanced editing


Janelle

Thanks for this training. This looks like an interesting plug in.
Tried and True
Elaine