I read from a current website owner that is using the TablePpress plug in to manage 5 tables of hymns the first four have 7,700 lines to them and the last only has a couple thousand (it is not recommended to go over the 7,700 line maximum suggested amount by the creator Tobias Bathge.
Be warned that tables that size will slow down the load time of your website but after the initial load is done (which did take a little over a minute or two) the website reacted quickly and responsively just like any other website does (Yes, I went snooping),
But if you put the tables on one website (https://yourdomainname2.com) completely off by itself as a storage compartment for your tables that way your visitors could visit your normal website enjoy its content then you could link them over to the tables and forewarn them that it has a slow load time but after that it operates like any normal website will, this way you can still offer the massive amounts of data while not keeping you visitors waiting for your main site to load.
IMPORTING TABLES
Instruction 20
Okay to start this off we are going to click on All Tables, then Add New Table, then we are going to go up in the menu of the TablePress table editing page as shown in the top screen shot of image 20 the blue arrow shows us where to click to begin the importing processes and that is the “Import” tab.
Click the import tab and the import tool window opens up, to import/upload a Windows Excel spread sheet from a computer. We click on the little circle for file upload shown by the red arrow, then click of the “Choose File button” indicated with the big green arrow in the top screen shot of image 20 when it appears. Browser your computer to find the file and click on the file then click on open just like uploading and image file then the files name will appear where the green box is that says “No file chosen”.
In the bottom screen shot it shows that if we want to import the table from an URL such as form Google Sheets you would enter the spread sheets URL into the box outlined in green and the green arrow is pointing to: after clicking on the URL button above indicated by the red arrow in the bottom screen shot of image 20.
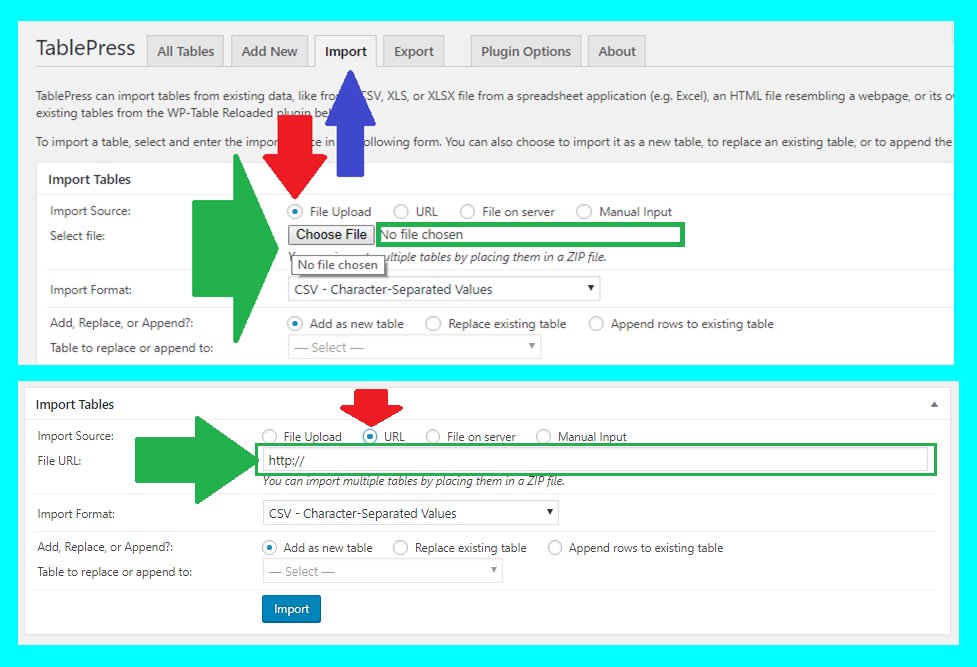
Image 20
Instruction 21
Image 21 below, is the drop down menu that pops up when you click on the file type that you are going to be importing

Image 21
Instruction 22
Once we picked out the file whether it is from our computer or another source we then need to decide if this file is going to be a new table, the button in the top left screen shot in image 22 where the green arrow is pointing, or will it replace an existing table the button where the blue arrow is pointing.
Then the red arrowing is point to the select box which will only appear and be used when you are replacing an existing table other than that the drop down will not function. But when it does appear pick the table you which to replace and click on it and it will stay in the select box where the red arrow is pointing.
Moving our way down to the lower left side screen shot of image 22 we have the completed the tool to import our file the red arrow shows the File Upload button activated then the Windows Excel spread sheet file “Sample for table of contents.xlsx” is outlined in red, then since I have office 2010 I circled the
Then on the screen shot on the right side of image 22 is what the excel file looked like after it was imported in to the TablePress table edit page
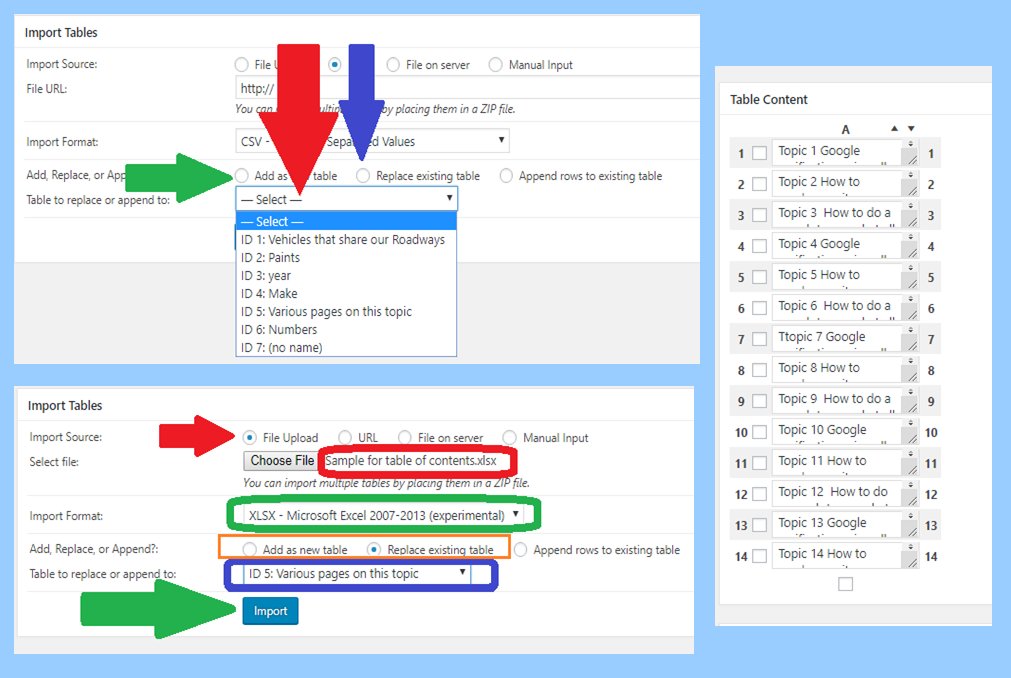
Image 22
Instruction 23
Below in image 23 is what the loaded excel file looks like as a table of contents insert into one of the website’s published pages.
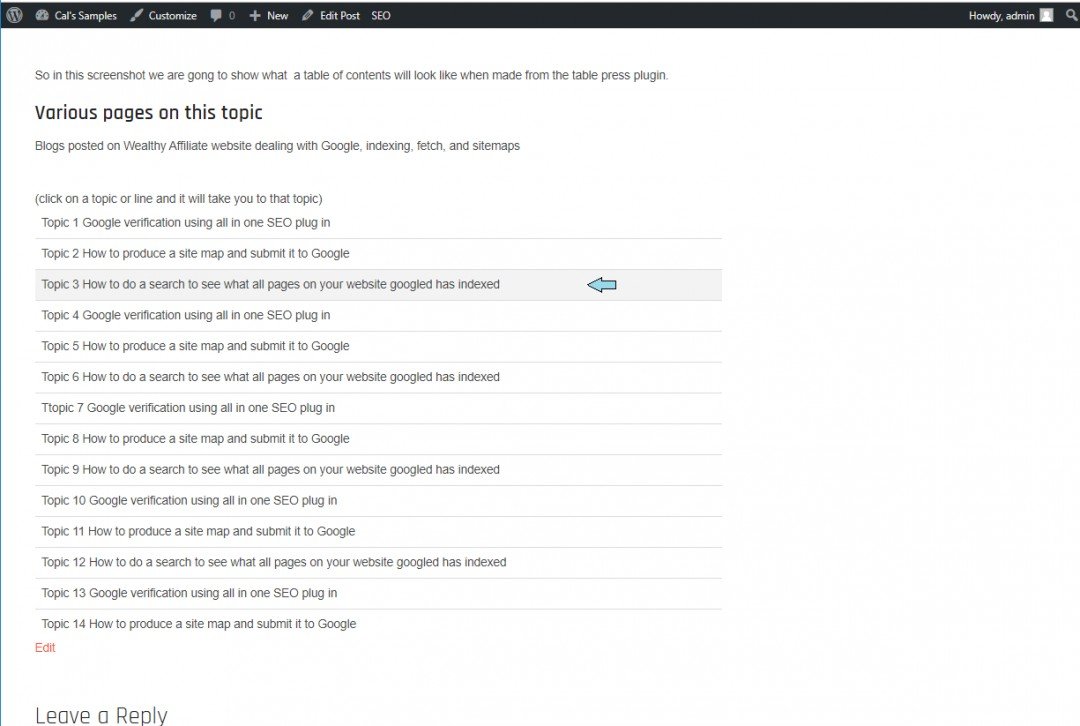
Image 23
Instruction 24
The top screen shot is shoeing the export tab in the TablePress plug ins’ export tool page we simply click on the “Export” where the red arrow is pointing in the top left screen shot of image 24, in the add a new table or by directly clicking the “Export a Table” tab in the main left side menu bar of your website’s dashboard, where the yellow arrow is pointing to in the right side screen shot in image 24.
The bottom screen shot of image 24 shows the square to click if you were going to export all your tables for editing circled in red, and the green arrow is pointing to our table that we have been working on and is the one we will export.
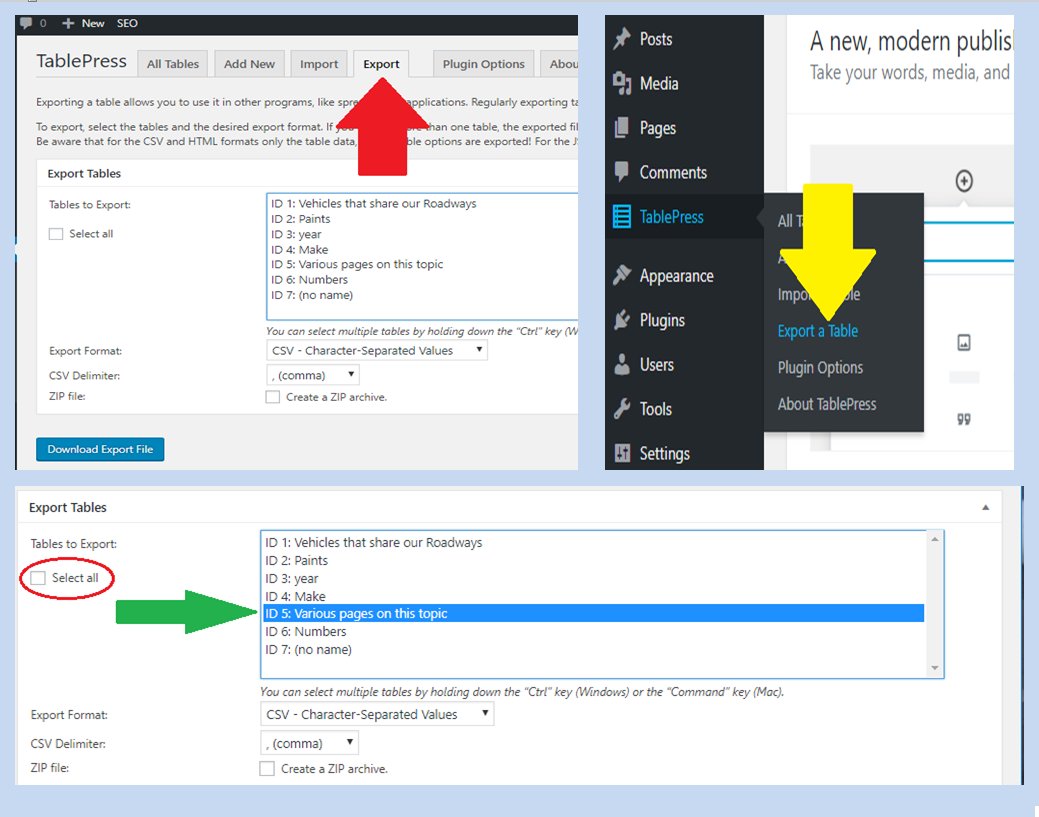
Image 24
Instruction 25
In the top screen shot of image 25 is showing us the table we picked earlier no linger highlighted ion blue but now turned gray outlined in the red rectangle, after it has been registered by the TablePres plug in export tool as the table we picked.
Then we chose the type of download file we want it to before windows users use CSV – Character Separated Values highlighted in blue, when the mouse is hovered on it, is outlined in green box also in the top screen shot of image 25.
The middle screen shot of image 25 is showing the CSV Delimiter choice drop down menu outlined in the red box and the red arrow is pointing to the “Download Export File” which is going to download the file to your designated download file on your computer.
When you pick which CSV Delimiter: ,(comma), ;(semicolon), or /T (tabulator) think of a delimiter as the time gap between letters and words in Morse Code the time gap separate the elements (letters or words) of the code a comma delimiter is used to separate the contents of each cell of the table.
So if we BACK UP TO IMAGE 14 the last row of that table would be written like [Purple/Violet, light purple, brick red, Forrest green, pale green] within the table’s code, so in the code for the row of the table the different cell values are separated with a coma.
So if the text you are entering into the tables cells has comas you do not want to use a comma delimiter, you would want to choose one of the other delimiters.
Finally the bottom screen shot of image 25 shows how the file downloaded on my computer I have the default settings still set for downloads, so it downloaded my file into my “Downloads” file if you have not changed your setting it will do the same if you changed you setting then it will download the file to where ever you chose them to be downloaded to.
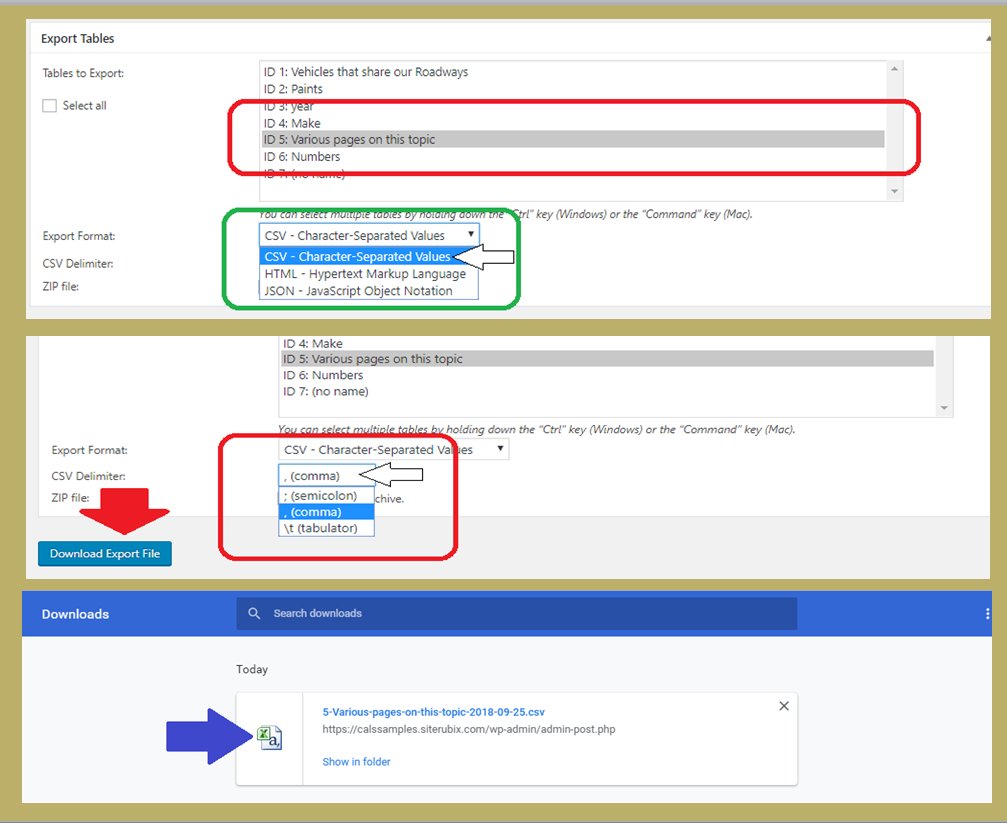
Image 25
Instruction 26
Image 26 shows what the file looked like that was downloaded to my computer note the top of the Windows Excel spread sheet has the default column widths.
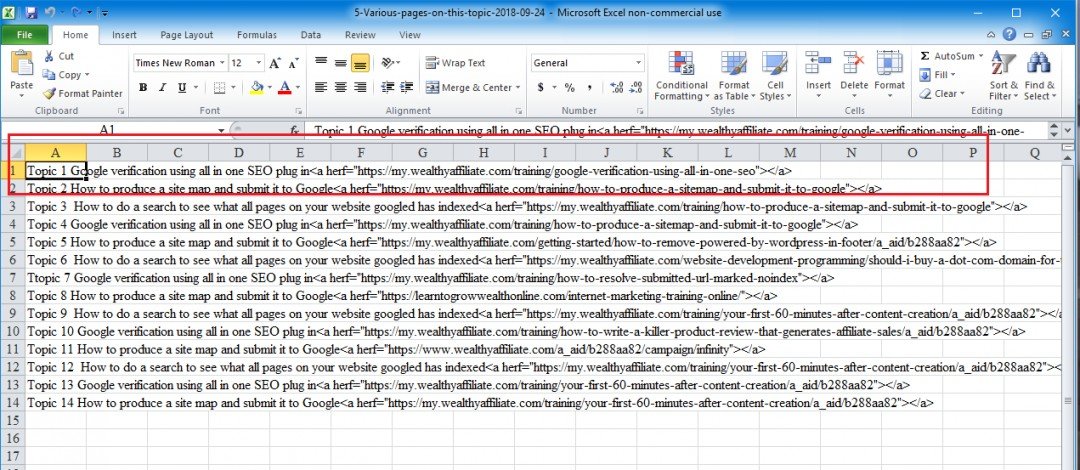
Image 26
Instruction 27
Since I was not sure if the column adjustment would have made a difference to the table after I edited it and Imported by to my website so as a precautionary measure I moved my column width to accommodate the text of the table as shown with a simple click and drag or the column width right side control line shown wwith red arrow inside the red box.. I did not want to take a chance of something this easy to do from causing me a headache later on.
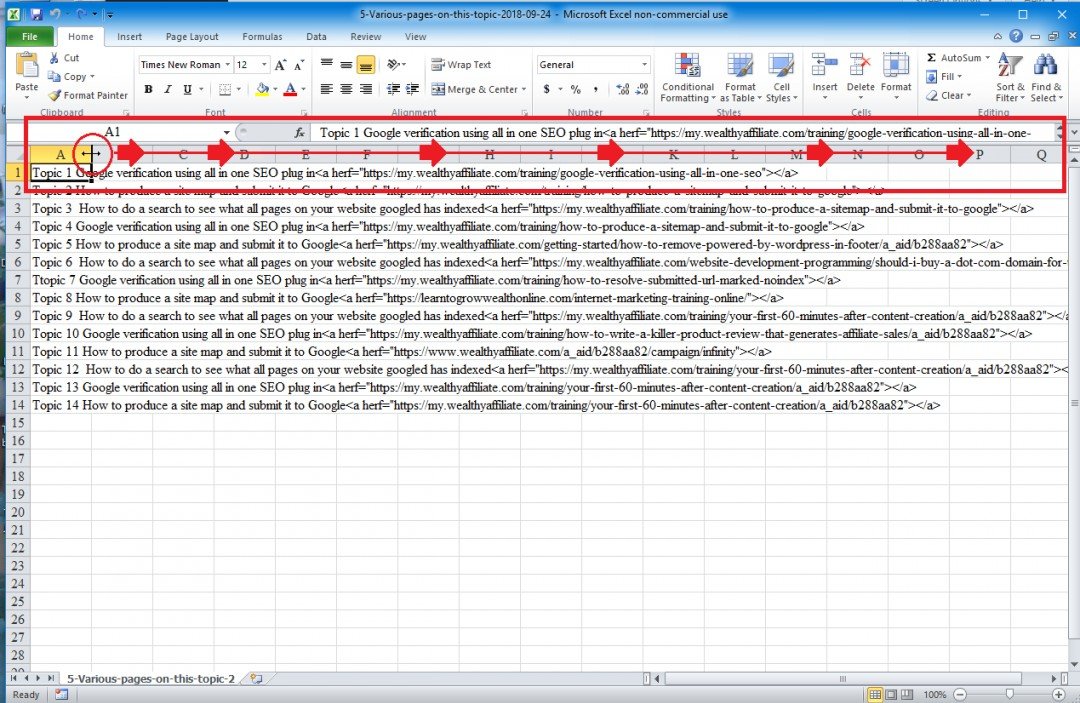
Image 27
If for some reason what I have here and what is actually happening is not the same please let me know so I can correct it as soon as possible. After you have read this training and viewed the images and you just can’t grasp what is going on for if you are trying to do something not covered in the training and need some extra help or guidance.
Please PM me, I will be more than happy to walk you through it. If you are using an OS system other the Windows I will help the best I can but I do not nor have I used any other OS other then Microsoft but I will still be happy to try to walk you through any problems you may have any ways!!
Take care, have fun, and good Luck,
Calvin
Janelle
Thanks for this training. This looks like an interesting plug in.
Tried and True
Elaine


