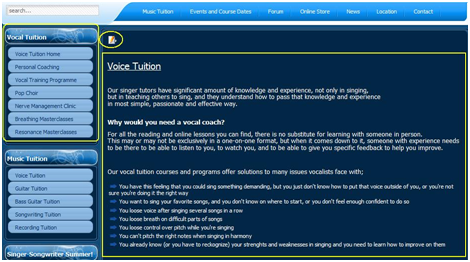
Sections of website that contain main text and images are called ‘Articles’. They’re the rectangle part of the website image below. The square rectangle parts are modules, which you can’t edit in the frontend. If you click on the circled paper and pencil icon, you’ll get to the article editor.
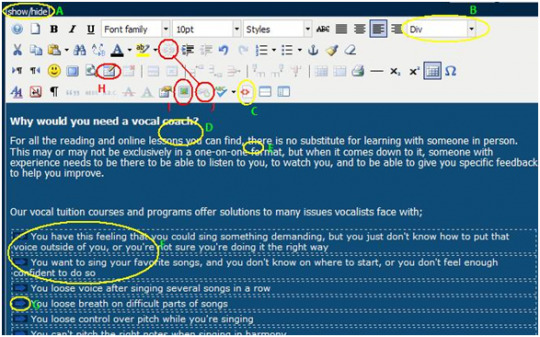
A: show/hide
This refers should the editor show or hide the html code. It might happen that when you open the editor only the html code appears, so to go the actual editor, just click on that button.
B: Formatting
This refers to spacing formatting. If you want a spacing that’s marked with letter D on the image, you should choose ‘Paragraph’ formatting, and if you want a spacing marked with E, you choose ‘Div’ formatting. If you stack up ‘Div’ formatting one of them gets lost when exiting the editor. Play with it a bit, and you’ll see it yourself.
C: HTML code
If you want to edit the HTML code of the article, click on that button.
F: Table
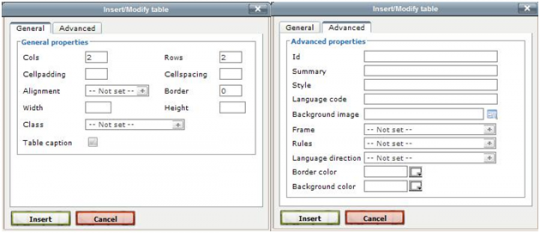
Those dashed lines represent a table. Creating a table helps in customizing the article layout, because it gives you much more control over it. If you want to add a new table, click on the button marked with letter ‘H’. You will have this editor:
It’s pretty simple. You choose how much columns and rows you want, how should they be aligned, etc. And in advanced options you can put a background image, as well as frames, which look really nice if properly placed. If you right-click on the table in the JCE editor, you’ll find options to add new columns and rows there.
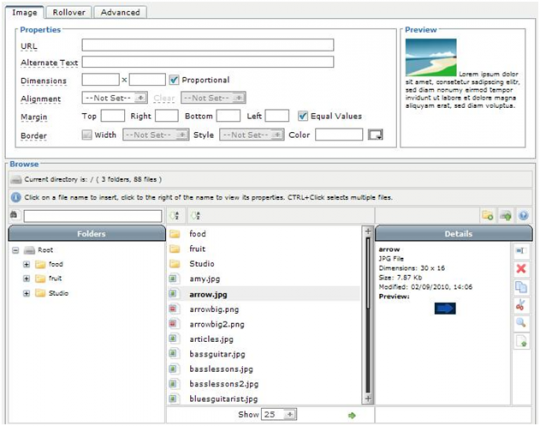
G: Images
You can input any images from your server or your computer in your articles. But make sure you optimize your images before that. They shouldn’t be over 150kB, because they make the page open slower. You can optimize them with image softwares such as IrfanView, Photoshop, etc.
How to add them?
Put a pointer on the article, where you want to insert the image, and click the image button on the editor (marked with letter I). It looks like this:
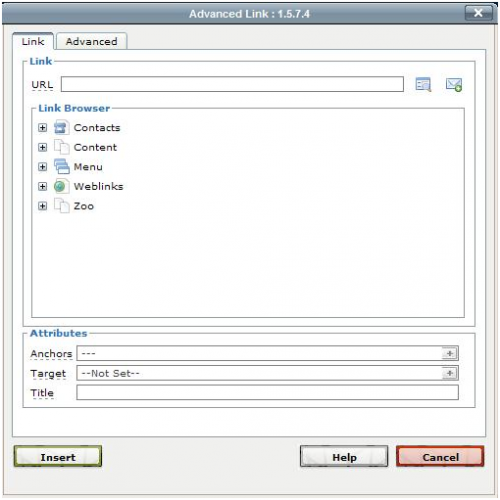
J: Linking
Select the text you want to link, and then click on the button under letter ‘J’ (lower button is for linking, upper button is for unlinking the item). It will open this editor:
JCE Editor offers much more options, but you can feel free to explore them through trial and error. Everything is easy to handle and fix if something happens.
A: show/hide
This refers should the editor show or hide the html code. It might happen that when you open the editor only the html code appears, so to go the actual editor, just click on that button.
B: Formatting
This refers to spacing formatting. If you want a spacing that’s marked with letter D on the image, you should choose ‘Paragraph’ formatting, and if you want a spacing marked with E, you choose ‘Div’ formatting. If you stack up ‘Div’ formatting one of them gets lost when exiting the editor. Play with it a bit, and you’ll see it yourself.
C: HTML code
If you want to edit the HTML code of the article, click on that button.
F: Table
Those dashed lines represent a table. Creating a table helps in customizing the article layout, because it gives you much more control over it. If you want to add a new table, click on the button marked with letter ‘H’. You will have this editor:
It’s pretty simple. You choose how much columns and rows you want, how should they be aligned, etc. And in advanced options you can put a background image, as well as frames, which look really nice if properly placed. If you right-click on the table in the JCE editor, you’ll find options to add new columns and rows there.
G: Images
You can input any images from your server or your computer in your articles. But make sure you optimize your images before that. They shouldn’t be over 150kB, because they make the page open slower. You can optimize them with image softwares such as IrfanView, Photoshop, etc.
How to add them?
Put a pointer on the article, where you want to insert the image, and click the image button on the editor (marked with letter I). It looks like this:
J: Linking
Select the text you want to link, and then click on the button under letter ‘J’ (lower button is for linking, upper button is for unlinking the item). It will open this editor:
JCE Editor offers much more options, but you can feel free to explore them through trial and error. Everything is easy to handle and fix if something happens.
Join the Discussion


mama2karsten
Premium
Very well done jpesut. If anyone needs or wants to know about joomla you did a great job. I like that you included nice screen shots so readers could see visually what you were talking about. Thanks.

Kyle
Premium Plus
Excellent tutorial Josip, just diving into it here and I find it very easy to walk through. It is going to be of great help for anyone who is interested in using a CMS outside of Wordpress here at WA.
There are definitely some great benefits to using Joomla and it is a wonderful Content Management Platform for websites!
There are definitely some great benefits to using Joomla and it is a wonderful Content Management Platform for websites!