When you login to the backend you’ll have a menu there. We won’t go through all the features you have here, because not all of them are easy to handle and some of them mustn’t be altered, for the sake of proper site functionality. We’ll go through those that you’ll actually need to update your website.
1. User management
Go to Site>Users. Here you have all the users registered in your website. You can disable them, block them, change their emails, usernames and passwords. You can also change their permissions by changing their Group. Most users should be only in ‘Registered’ group, because all the other groups have ability to change the content of the site, so be careful what you’re doing here. Note that you can’t change forum permissions for users here. That will be explained further on.
2. Media management
There are 2 options for you to upload, download or edit files that are on your server. One is to go to Site>Media manager, and other is to go to Components>eXtplorer (find the eXtplorer extension and download it, it's free). I strongly suggest you to use eXtplorer only. When you’re opening it I advise to open it in a new tab or window, because it will open totally new application:
We’ve covered most of the things here, but now you have ‘parameters’ editor on the right side.
On article parameters you can choose existing authors or add a new one by typing the name in the author alias field. Access level (if you choose public every visitor will be able to see it, if you choose registered only registered visitors will be able to see it, and if you choose special, only administrators and moderators will be able to see it). Article creation and publishing date as well as if the article will be finished with publishing on a certain date.
In advanced parameters section you can choose which things will be displayed along with an article. Create a test article visible only to special users and test each of things available here, so you know exactly what each option does and how it looks.
And of course, you can edit article metadata on the bottom.
4. Sending newsletter
You can send newsletter to your websites’ registered visitors. Go to Components>AcyMailing (download basic version of AcyMailing system for free, google for it - it's highly recommended, and paid versions of it offer extraordinary newsletter systems). Now the first thing you have to do is make a template for your newsletter. You have 3 of them offered already, but you have to change the pictures there and organize the table in which you’ll input the content according to your needs. It is quite easy to work in the editor of template. You already know how to insert an image and resize it. Play with it a bit and you’ll become familiar with it. Once you’ve completed the template, put it as your default (so it displays when you actually go and write newsletter).
Go to Components>AcyMailing>Newsletter, and create new newsletter. In this editor you’ll be able to alter everything; content, titles, e-mails, attached files, etc. You can even choose between templates on which one to use for this particular newsletter.
5. Creating menus and menu items
You can create menus and assign menu items with various functions to them. Go to Menus>Menu Manager.
All the menus on your website are enlisted here. You can edit their name and order here, or you can create a new one. Make sure you fill all the fields when creating a new one.
To edit menu items, go to Menus> and then choose which menus’ items you’d like to edit. Click on the menu item you wish to edit, or create a new one by clicking the ‘New’ button.
Here you can do many things;
A) Change menu item type
Click on ‘Change Type’ button. Now, here are listed all the features your website has. Feel free to experiment with this, but what you will need most of the time is article display. Meaning, when someone clicks on that menu item, you want it to display certain article, or more articles.
To make it display 1 article, do the following;
- Articles > Article > Article Layout
This will display only 1 article, and you can choose which one it will be
To make it display more articles, you have several options;
- Section Blog
This will display articles of all categories on a specific section.
- Category Blog
This will display all articles on a specific category.
B) Change menu item parameters
You can choose which features will articles of this menu item show, by clicking on Component Parameters. On System Parameters you can choose if the menu item will display a title before the content, or even image.
C) Type-specific features
Edit menu item type-specific features on System Parameters.
D) Menu Item details
On the left side, you can edit menu item details, such as its title, on which menu it will appear, which will be its parent item, will it be published or not, its order, to whom it will be visible (everyone, only registered visitors, or only administrators) and how it will open (in same window, in new window, etc.).
To add the menu to a module position, so it appears on the front end, go to Extensions>Module Manager. There you’ll find the module named after menu. Click on it. Choose on which module position it will appear, to whom it will be visible (everyone, only registered visitors, or only administrators), etc.
6. Creating access restrictions and test pages
As you may have concluded from reading previous topic, you can create access restrictions and test pages by editing access level options.
Public access level allows everyone to see the feature, registered access level allows only logged in visitors to see the feature, and special access level allows only moderators, administrators and superadministrators to see the feature.
So, if you’d like, for example to have only registered visitors see certain content, create a menu item with ‘registered’ access level. That way the visitors are restricted to see what’s under that menu item only if they log in. Same can be done with articles.
Creating test pages is something a bit different, yet working on same principle. You only put the menu item or content you’re trying to test under ‘special’ access level. Also, you can test different templates. Install a new template you’re trying to test. Create a menu item with ‘special’ access level. Now, go to Extensions > Template Manager. Find the template you just installed and click on it. Now, under Menu Assignment options, choose so it appears only on the menu item with ‘special’ access level. That way all other menu items will show current template, while that one you made visible only for yourself, when you log in to the frontend, will show new template you’re testing.
1. User management
Go to Site>Users. Here you have all the users registered in your website. You can disable them, block them, change their emails, usernames and passwords. You can also change their permissions by changing their Group. Most users should be only in ‘Registered’ group, because all the other groups have ability to change the content of the site, so be careful what you’re doing here. Note that you can’t change forum permissions for users here. That will be explained further on.
2. Media management
There are 2 options for you to upload, download or edit files that are on your server. One is to go to Site>Media manager, and other is to go to Components>eXtplorer (find the eXtplorer extension and download it, it's free). I strongly suggest you to use eXtplorer only. When you’re opening it I advise to open it in a new tab or window, because it will open totally new application:
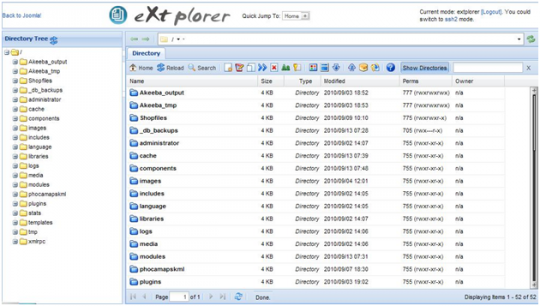
Here you have all the files related to your website. In most cases you’ll want to upload images and videos, and you do that in ‘images’ and ‘media’ folders. Look at the top menu you have and you’ll find ‘upload’ button (up-arrow thing). You can choose the ways to upload files. I almost always use standard upload system. Choose the files from your computer and click Save. If you don’t see the ‘Save’ button, expand the upload window. You can also create new files and folders (directories) if you want and need to. It’s all on the top menu.
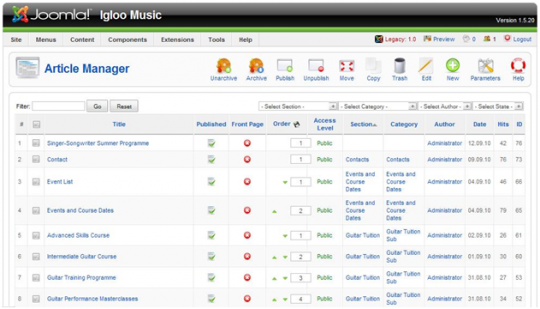
3. Article administration
You have much more options to edit articles in backend than in frontend. Let’s try creating a new article there. Go to Content>Article manager. This will open:
We’ve covered most of the things here, but now you have ‘parameters’ editor on the right side.
On article parameters you can choose existing authors or add a new one by typing the name in the author alias field. Access level (if you choose public every visitor will be able to see it, if you choose registered only registered visitors will be able to see it, and if you choose special, only administrators and moderators will be able to see it). Article creation and publishing date as well as if the article will be finished with publishing on a certain date.
In advanced parameters section you can choose which things will be displayed along with an article. Create a test article visible only to special users and test each of things available here, so you know exactly what each option does and how it looks.
And of course, you can edit article metadata on the bottom.
4. Sending newsletter
You can send newsletter to your websites’ registered visitors. Go to Components>AcyMailing (download basic version of AcyMailing system for free, google for it - it's highly recommended, and paid versions of it offer extraordinary newsletter systems). Now the first thing you have to do is make a template for your newsletter. You have 3 of them offered already, but you have to change the pictures there and organize the table in which you’ll input the content according to your needs. It is quite easy to work in the editor of template. You already know how to insert an image and resize it. Play with it a bit and you’ll become familiar with it. Once you’ve completed the template, put it as your default (so it displays when you actually go and write newsletter).
Go to Components>AcyMailing>Newsletter, and create new newsletter. In this editor you’ll be able to alter everything; content, titles, e-mails, attached files, etc. You can even choose between templates on which one to use for this particular newsletter.
5. Creating menus and menu items
You can create menus and assign menu items with various functions to them. Go to Menus>Menu Manager.
All the menus on your website are enlisted here. You can edit their name and order here, or you can create a new one. Make sure you fill all the fields when creating a new one.
To edit menu items, go to Menus> and then choose which menus’ items you’d like to edit. Click on the menu item you wish to edit, or create a new one by clicking the ‘New’ button.

Here you can do many things;
A) Change menu item type
Click on ‘Change Type’ button. Now, here are listed all the features your website has. Feel free to experiment with this, but what you will need most of the time is article display. Meaning, when someone clicks on that menu item, you want it to display certain article, or more articles.
To make it display 1 article, do the following;
- Articles > Article > Article Layout
This will display only 1 article, and you can choose which one it will be
To make it display more articles, you have several options;
- Section Blog
This will display articles of all categories on a specific section.
- Category Blog
This will display all articles on a specific category.
B) Change menu item parameters
You can choose which features will articles of this menu item show, by clicking on Component Parameters. On System Parameters you can choose if the menu item will display a title before the content, or even image.
C) Type-specific features
Edit menu item type-specific features on System Parameters.
D) Menu Item details
On the left side, you can edit menu item details, such as its title, on which menu it will appear, which will be its parent item, will it be published or not, its order, to whom it will be visible (everyone, only registered visitors, or only administrators) and how it will open (in same window, in new window, etc.).
To add the menu to a module position, so it appears on the front end, go to Extensions>Module Manager. There you’ll find the module named after menu. Click on it. Choose on which module position it will appear, to whom it will be visible (everyone, only registered visitors, or only administrators), etc.
6. Creating access restrictions and test pages
As you may have concluded from reading previous topic, you can create access restrictions and test pages by editing access level options.
Public access level allows everyone to see the feature, registered access level allows only logged in visitors to see the feature, and special access level allows only moderators, administrators and superadministrators to see the feature.
So, if you’d like, for example to have only registered visitors see certain content, create a menu item with ‘registered’ access level. That way the visitors are restricted to see what’s under that menu item only if they log in. Same can be done with articles.
Creating test pages is something a bit different, yet working on same principle. You only put the menu item or content you’re trying to test under ‘special’ access level. Also, you can test different templates. Install a new template you’re trying to test. Create a menu item with ‘special’ access level. Now, go to Extensions > Template Manager. Find the template you just installed and click on it. Now, under Menu Assignment options, choose so it appears only on the menu item with ‘special’ access level. That way all other menu items will show current template, while that one you made visible only for yourself, when you log in to the frontend, will show new template you’re testing.
Join the Discussion


mama2karsten
Premium
Very well done jpesut. If anyone needs or wants to know about joomla you did a great job. I like that you included nice screen shots so readers could see visually what you were talking about. Thanks.

Kyle
Premium Plus
Excellent tutorial Josip, just diving into it here and I find it very easy to walk through. It is going to be of great help for anyone who is interested in using a CMS outside of Wordpress here at WA.
There are definitely some great benefits to using Joomla and it is a wonderful Content Management Platform for websites!
There are definitely some great benefits to using Joomla and it is a wonderful Content Management Platform for websites!