Determining some of the uploaded image's properties
Go to the WordPress Dashboard, then Media, then Library. This shows a list of images that have been uploaded to the WordPress Media Library.
Find and click on the applicable image in the WordPress Media Library. If you completed the previous step successfully, the applicable image will be here. If you cannot find it, simply go back to the previous step and have another go at uploading it.
The screenshot below is part of the Attachment Details screen:
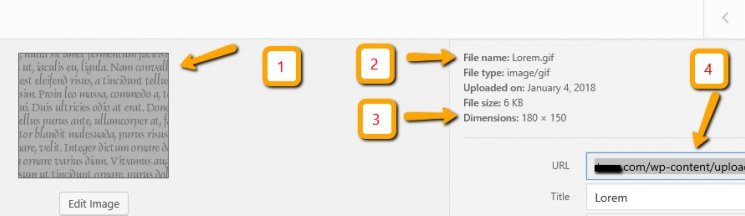
Reference 1 in the image above is the image that is to be inserted into a WordPress Post.
Reference 2 is the file name of the image. Note that the exact name MUST be used in the WordPress Post. It is case sensitive. "Lorem.gif" is correct, "lorem.gif" is incorrect. This is very important in a later step. When I was developing this tutorial, I used lower case L. During my testing stage, no image was shown. The moment I looked at the code, I knew straight away that I should have used an upper case L. This is to remind you that it is very important to test when doing this type of activity.
Reference 3 are the width and height of this image. Note this information down.
Reference 4 is the exact URL for the image. Note this information down. After the dot com bit. We will be using the short form of the full exact URL later that excludes the name of the website domain name.
Depending on how WordPress is configured for your website, the exact URL for the image may or may not include the year as four digits and the month as two digits.
For example, say the file name of the image is "myimage.jpg" and say the image was uploaded to the WordPress Media Library in January 2018, the URL for the image is likely to be one of the following two values:
1) .../wp-content/uploads/2018/01/myimage.jpg
Or
2) .../wp-content/uploads/myimage.jpg
The ... above is the web domain name and can be ignored here because the short form of the URL will be used when inserting this information into the 'code' later.
So be careful when noting down exact details.
I use "copy and paste" when noting down exact details most of the time. When I don't, I sometimes regret it, due to simple typos.


Hopefully many people will tune in to this and grow. Some people don't want to hear the 4 letter word "code" and would prefer to pretend it isn't necessary. Your tutorial is just one example why it is.
Thanks again, peace my friend! :-)