Setting Up OneSignal
Hey WA, I recently heard that some of you need help with this new feature called Push Notifications! I will show you how to install the OneSignal plugin and get it working for your site! But, I will be showing you how to install notifications for Browsers such as Firefox, Chrome and Safari. All of them are easy to set-up but if you're having problems with it Im here to help!
Step .1
Download OneSignal Push Plugin for Wordpress. Then accept to install it. Once that's done go to the Onesignal plugin on the sidebar

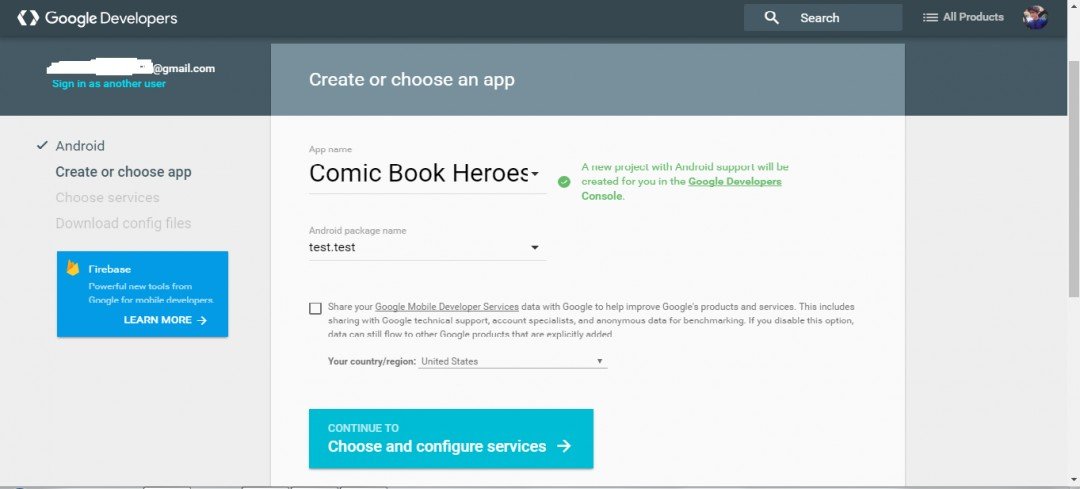
You should now be at the Onesignal plugin page. But before you do anything right click this link and select open in new tab. https://developers.google.com/mobile/add?platform=.... You should be logged in your Google Account and if you don't have one, create one. You should see 2 boxes named "App name" and "Android Package Name". For App name insert your site's name. Mine is Comic Book Heroes so I entered that. For Android package name enter "test.test". This doesn't really matter so just enter it like shown in the setup guide for Onesignal. After you've done that enter your country and you can choose to share your app information with Google. I didn't. Now, click "Choose and configure services". It should look like this.

Now you should have 2 boxes named Server API Key and Sender ID. Save these two in a notepad or copy it somewhere.
Step 2
Now, Open this link in a new tab https://onesignal.com and Create an account. After you have created an account, Click "Add a New App" It will ask you for the App Name so ust add your Site's Name and click Create. Now it will take you to a tab and willl ask you Select One Platform to Configure, Click Website Push and Hit Next. It will ask you if you ant to Configure Chrome and Firefox or Safari. Click Chrome and Firefox and then NEXT.
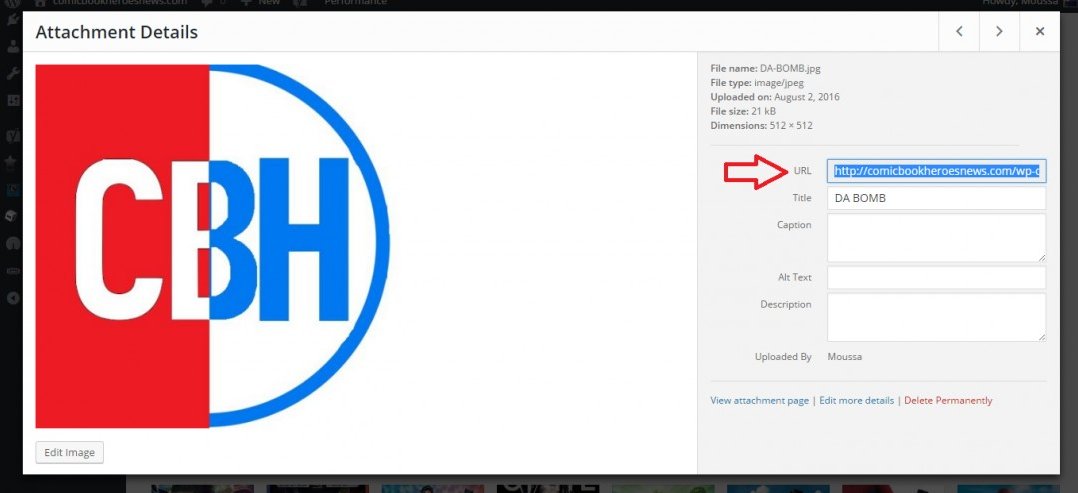
After that it will take you to a new tab where you have to enter information in many tabs. For Site URL, go to your Site's homepage and copy the Domain you will need the http:// or https:// and Be sure to not add a / after .com. After you have done that it will ask you to enter the Google Server API Key. Enter your Server IP Key from Google in Step 1. Now it will ask you for our Notification Icon. This is what you users will see with your new notification! Simply to find out find what you want for your Icon and go to your media library and find your image. Once you have found your image click the copy the URL of that Image and Enter it in the Default Notification Icon Url Box.

Now it will ask you for your Subdomain enter your site name but with no spaces! You can use - or _ but do not leave a space! My site name is Comic Book Heroes so I made the SubDomain Comicbookheroes. Also, be sure to add your SubDomain Name to the Configuration Tab in Onesignal Plugin in Wordpress site. Be sure to just enter the name you chose liek how I did Comicbookheroes so I entered Comicbookheroes. It will also ask for your Google Project Number from the Google Developers set up we did in Step 1. After you are done be sure to Click Save at the bottom of the Configuration Tab.
Step 3
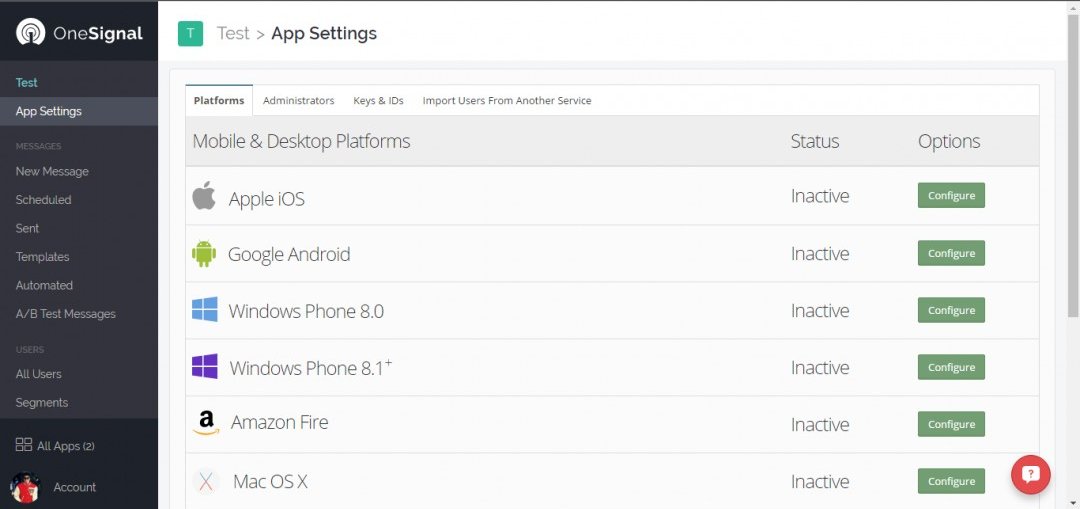
Now, click save and X the tab and click Yes. Now you want to Click app Setting on the Right sidebar of the Onesignal site. You should be on this page.

You should now click on Keys and IDS tab. You should now be on page with 2 boxes titled OneSignal App ID and REST API Key. Copy the Onesignal App ID to the APP ID box in the Configuration Tab of Onesignal's Wordpress Plugin. Copy the REST API Key to the REST API Key in the Configuratin Tab too. After you are done be sure to Click Save at the bottom of the Configuration Tab.
Step 4
Now go to Configuration Tab and scroll down to Sent Notification Settings. You can choose to use the featured image for thepost's featured image instead of your site logo. If ou want you can! For 20 Seconds delay I suggest that you don't check that.For Notification Title you should add your site's name. If you leave it default it will do the same butsomething might appen wrong so I suggest you add your site's name. For send notifications to IOS and Anddroid do not check that since we did not enable mobile notifications.
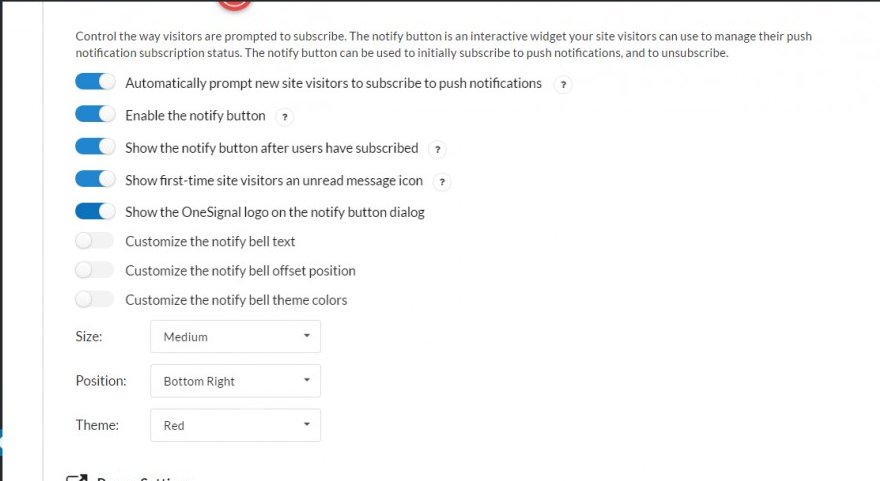
For Prompt and Notiy Settings I reccomend you check the following. But you can choose to Customize the bell text offset position and notify bell theme colors. You can also change the Size Position and Theme if you want to! Be sure to edit the settings below this too! But if you don't it will be default and save you time! After you are done be sure to Click Save at the bottom of the Configuration Tab.

Step 4
After you have done all of that we will enable Safari notificatiosn and don't worry this one is easy! First go to Onesignal and choose your app and go to App Settings. From there find Apple Safari and click Configure. You should be on this page and enter your site's URL and name Be sure to not add a / after .com! Also, check I'd like to uppload my own notification icons or else it will be Onesignal's logo! Make sure the photo you upload is a perfect square or else it will cropped and look bad. Upload the same photo to all the icons and dont worry they are resized! After you have done that click save and then X. You should refresh the page and undder Apple Safari you should see your Web ID. Copy that Web ID and add it to the Safari Web ID of the Configuration Tab of Onesignal's Wordpress plugin. After you have done that go to the bottom of the Configuration Tab and Click Save and your push notificatiosn are set up! Hurray!
To check if it's working go on Icognito Mode or Private Browsing for your Browser. Go to your site and check if it's works Anyways, I'm glad to help and follow me!
Sincerely,
Moussa
Join FREE & Launch Your Business!
Exclusive Bonus - Offer Ends at Midnight Today
00
Hours
:
00
Minutes
:
00
Seconds
2,000 AI Credits Worth $10 USD
Build a Logo + Website That Attracts Customers
400 Credits
Discover Hot Niches with AI Market Research
100 Credits
Create SEO Content That Ranks & Converts
800 Credits
Find Affiliate Offers Up to $500/Sale
10 Credits
Access a Community of 2.9M+ Members
Recent Comments
11
Hi Moussa, I am at the point of choosing the image-icon in step 2. Can this be changed later and how does it appear on the screen of visitors? In other words, how important it is? Is it something they will have in the corner or a full screen in iphone or elsewhere? It seems you are using logo, I do not have any.
It says that url must be https, but our sites are http, there is popup with "you can use Imgur if the site does not serve images with https". Have no idea what this is.
I'm lost at the notification icon part - I've downloaded an icon image from pixabay but how do I get the icon url?
Add it to media library in your site, then it will have its own url. This part I have understood.
Thanks Jovo, I managed to figure that out after a while. Then I got stuck again at the part where OneSignal wanted to test the verification with a subscriber email.
The system just couldn't get any subscriber email to verify & I couldn't proceed to Step 3.
Wasted 2.5 hours on OneSignal & I figured if it was that cumbersome to set up it wasn't worth it. In the end I just deleted the plug-in.
I did it yesterday at my side, deleted everything. Today trying again.
You know what irritates me most in such situations: when I hear 'it is very simple'.
How did you deal with the icon? It says it must be https and not http. I stopped there.
I managed to get the icon url. Yeah, I was stuck at the https bit for about 20 min, then I ticked against the sub domain part & just filled in the name of my website & got through.
If I recall correctly, after that came the verification with a subscriber email part which got me really frustrated with the system. I just gave up & deleted OneSignal after that.
Thank you so much, this will be my next lecture. I appreciate your effort. Pity cannot 'like' it multiple times.
See more comments
Join FREE & Launch Your Business!
Exclusive Bonus - Offer Ends at Midnight Today
00
Hours
:
00
Minutes
:
00
Seconds
2,000 AI Credits Worth $10 USD
Build a Logo + Website That Attracts Customers
400 Credits
Discover Hot Niches with AI Market Research
100 Credits
Create SEO Content That Ranks & Converts
800 Credits
Find Affiliate Offers Up to $500/Sale
10 Credits
Access a Community of 2.9M+ Members
Moussa at the end of step 2, I have what you can see in the image. You did not say what to choose here.
On the other hand, in the plugin part I have 2 numbers so far, from your step 1. But in the plugin it says that App ID is 36 symbols while in fact it is 39.
Then again in the plugin configuration 48 characters Rest API key is needed.
Can you add details in the blog above, this leads nowhere.
The beginning of step 3, no idea how you got this image shown in the blog.
I think I might need to do a Video tutorial
Hey Moussa. Thanks for sharing this with us.
Jovo. Once reaching the step in the image you have attached, you do not select any option. Simply close and move on with the next step in the set up of the plugin directions