Taking a screenshot on Mac is quite similar to the process in Windows. Again there are two options: keyboard shortcuts and a built-in utility, but naturally the terminology is different.
Although I am somewhat of a Mac fan, I do not work on/own a Mac and therefore cannot go into too much detail with... wait for it... screenshots! I will explain the process as best as I can, with resources that I have available. I believe that these methods are for Mac OS X only but there are also further differences and options for different versions of Mac OS X.
The Grab Utility
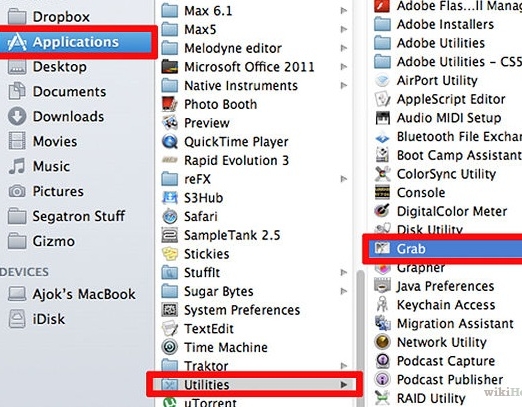
This application is the equivalent of the Snipping Tool in Windows and can be found in the Utilities list:

Once you have opened the Grab utility, you would go to the Capture menu and select the type of screenshot you want:
The Selection option allow you to chose an area of your screen to capture, very much like the snipping Tool in Windows.
The Window option captures one of the open windows. You would need to select the window you want to capture, when choosing this option.
The Screen option captures the entire screen, like with the 'PrtSc' button in Windows.
The Timed Screen option allows you to ready your screen before the capture takes place. So you can move different objects around before the screen is captured. The computer will provide a warning 'ping' just before the screen is captured and a camera shutter sound is played once done, so that you know when the capture is complete.
Keyboard Shortcuts
The keyboard shortcuts work in combination with the Grab utility - selecting a shortcut will execute the relevant Grab utility function. Here are the two main shortcut keys commonly used:
Command+Shift+3 : Takes a screenshot of the entire screen.
Command+Shift+4 : Takes a screenshot of a selected area of your screen.
With the above shortcuts, the file will be saved on the desktop. If you would prefer to copy the screenshot to the clipboard first, include the Control key:
Command+Control+Shift+3
Command+Control+Shift+4
Once the image is copied to the clipboard, you should then be able to paste into into an email, document or any other compatible application. Use Command+V to paste the image or select it from the application menu (Edit > Paste).
There are many other keyboard shortcuts that you can use, as well as screenshot preferences to change - I will those up to you to discover, as the processes are more involved. What I have covered here should suffice for most people.
Also, different versions of Mac OS X have different file formats for screenshots:
- Mac OS X 10.2 (Jaguar): jpg
- Mac OS X 10.3 (Panther): pdf
- Mac OS X 10.4 (Tiger) and later: png
For more detailed information (with screenshots!) on the Mac process and features, I suggest this link. Although, if you are a Mac user, the above should help :) Feel free to add your comments below.
For more features and functionality with Mac screenshots, have a look at Snapz Pro X.
When I do a screenshot, its usually to email it right away to one person. So the quicker the better. The prntScr option in Windows just takes so many steps and reveals everything on my screen at the time, unless I take further time and curate it.
I use the Snipping tool . Easier, I think, and right to the point.
I'll try hyperdesktop today and see if I like it.
Nice to know alternatives.


