Custom Image Graphics - Finishing Touches
Okay, so using the steps provided thus far - including opening an image as a layer for both option 1 and option 2 - Text Image AND Pixlr text, we now have something similar to this:

Additionally, you can Google some "Arrow" images (again looking for PNG so they have the transparent background) and resize them to open them as an additional layer.
So, you might have something like this:

Okay, so it's coming together and looks pretty good, right?
Well, let's say you want to kick it up a notch! (Sorry, Emril Lagasse - borrowing that phrase!)
Let's talk about layers again. As you have learned, layers can be manipulated separately. Let's take another look ....
Layer Styles
There's a really cool option with layer styles that is my favorite and it's called "Drop Shadow". This can give your text OR your image some relief and sort of a 3-D look to it.
So, let's take a look at the Pixlr text layer we added:

I called this layerRecommended. We're going to adjust it a bit.
Within the Layer pull downmenu, you may have noticed several other options.
The one I want to bring to your attention is Layer Styles as shown here:
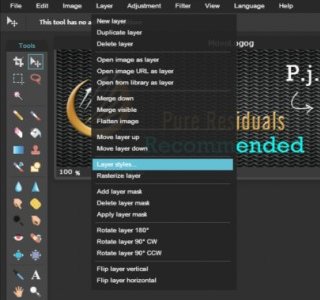
When you select this you will be presented with the Layer Styles dialog window with the following options:
- Drop Shadow
- Inner Shadow
- Bevel
- Outer Glow
- Inner Glow

As you can see, I selected Drop Shadow and Outer Glow
This will yield a really cool look when finished.
Saving Your Final Image
Okay, let's save the image for final use!
Within your Pixlr screen, in the upper left corner,click the File menu option.
SelectSave...
You'll be presented with the Save dialog window as such:

You will notice a Quality slider option. If this is to be included within your post, below the "fold" I would go for 100% quality. Keep in mind the higher the quality of the image, sure the better it looks, but the more it will decrease page load speed. Play with this and find your comfort zone here.
Click the OK button to save the image to your computer for use in WordPress!
Okay, one final note. When creating your components for this type of custom image graphics project, you'll need to know how to RESIZE your components! I had to tweak sizes a bit prior to creating this training. So, the final segment of this training will be about sizing.