GeneratePress Basics (Part 2) - How to Customize Site Identity (Free vs Premium)


Published on May 8, 2020
Published on Wealthy Affiliate — a platform for building real online businesses with modern training and AI.

I'm continuing my discussion about GeneratePress and on the menu today is customization option 1 - Site Identity and the difference between the free and premium version.
This post is part of a series of posts about GeneratePress and I recommend you first have at a look at my previous posts:
- This is Why I Love the GeneratePress WordPress Theme
- GeneratePress Basics (Part 1) - Where to Customize Theme, Example Website and Intro to the Options
A Suggestion for You
If you want to follow my series of GeneratePress posts and really see and learn the differences and how to's, I suggest you create yourself a test website with the free siterubix subdomain option in SiteBuilder and practice on that before you start making changes to your main website/s. (Install the GeneratePress theme).
Here are my links to my free GeneratePress test websites:
Free GeneratePress Theme Sample Website
Premium GeneratePress Theme Sample Website
Free vs Premium - Main Option Differences
The only difference between the free and premium on the main customization option layout is Background Images (see the image below). This means the free version does not have any background image options.
How important are background images to you? I personally think it is a nice option to have, but not that important. I prefer to keep my site simplistic and not add anything unnecessary that might affect site speed.
This is definitely NOT the only difference between free and premium. The other differences are located in the sub-options and I will start with the first option (Site Identity).
Let's see what are the differences for "Site Identity", if any.

Option 1 - Site Identity (free vs premium)
This is what you'll initially see and it seems like the Logo Width is NOT available in the free version, but it is.
There are some hidden options available under "Logo" for free and premium both, but you can only see it after uploading a logo.
NOT A TRUE REFLECTION
This is what you see when you select "Site Identity", but it's not a true reflection. See my summary below this image for the extra options.

Site Identity Summary
1.1. Site Title
1.2 Tagline
1.3 Logo
1.4 Retina Logo (not visible in above image, but available to free and premium)
1.5 Logo Width (not visible in free option image above, but is available to free as well)
1.6 Site Icon
BEFORE and AFTER Site Identity Changes
My sample website before and after I made changes to the site's identity. Keep in mind there are more changes available for your header under other options. Will get to that as we make progress.


What did I do?
Ready to put this into action?
Start your free journey today — no credit card required.
- I've changed the tagline from "just another WordPress site", to my own line;
- added a logo,
- added a retina logo (cannot see it here)
- changed the size of the logo
- changed the location of the logo
- added a site icon
1.1 Site Title
This is where you can change your website name to whatever you want. My site title is "Free GeneratePress Theme"
Please note this does not change the domain name. Domain names cannot be changed unless you buy a new domain with the name you prefer (if it's available).
TIPS:
Did you know some companies' website name and domain name are different? Can you think of a reason why?
1.1.1 Hide site title
You can use this if you only want to display your logo and tagline or just your logo. 1.2 below has an option to hide the tagline as well.
1.2 Tagline
A tagline is a brief description of what your site is about and why it exists. My tagline is "Lightning fast and mobile responsive"
1.2.1 Hide site tagline
You can hide your tagline if you want to.
EXAMPLE 1: LOGO WITH TAGLINE, NO SITE TITLE

EXAMPLE 2: LOGO ONLY, NO TAGLINE, NO SITE TITLE
EXAMPLE 3: LOGO WITH SITE TITLE, NO TAGLINE
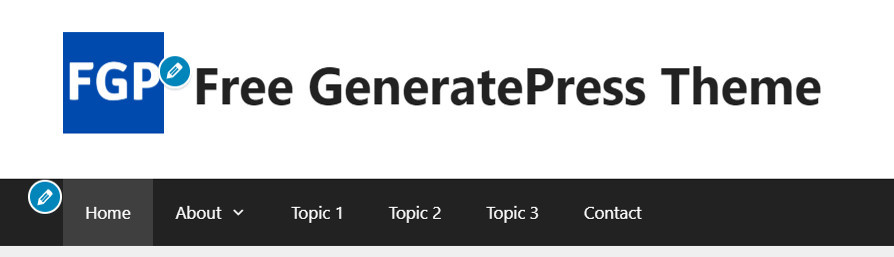
1.3 Logo
The image below shows what you'll see in both the free and premium versions after uploading a logo.

The suggested size is 350 x 70 pixels, but I prefer square logos and designed mine at 100 x 100 pixels.
Keep as close as possible to the pixel size to ensure it's not going to affect site speed and how it looks on all devices.

1.4 Retina Logo
Do you know what a retina logo is? I didn't until I used the GeneratePress theme.
Here is what Wikipedia says: Retina Display
Some newer devices come with "Retina Display" which, thanks to its high pixel density screen, will make content look sharper and more clear. To ensure your logo has a retina-ready version, you can add one to your GeneratePress theme.
A retina logo image is the same as the normal logo image, though twice the size. For example, if one's regular logo image is 100x100 pixels in size, the retina logo image would need to be 200x200 pixels in size.
1.5 Logo Width
This is a bit misleading. It should've said "Logo Size", because it changes the width as well as the height of your logo while keeping the aspect ratio.
I've changed my logo size to 90.
1.6 Site Icon
It's also known as a "favicon". Site Icons are the little piece of graphic that represents your brand on browser tabs, bookmark lists, search history, search ads and even search results. It's important for SEO as well.

The recommended size for site icons is at least 512 x 512 pixels and must be squared.
In the image below you can see I've created a site icon for the one website but not the other (still got the WordPress icon)

What are the Free vs Premium Differences for the Site Identify Option
There are no differences. What's available in Premium is also available in Free.
Upcoming!
I will discuss the free and premium options available for the Layout of Containers in my next post.
Here are my links to my sample websites. One for free and one for premium:
Free GeneratePress Theme Sample Website
Premium GeneratePress Theme Sample Website
Thats all for today.
If you have any questions regarding GeneratePress please ask away and I will try to answer to the best of my abilities.
Thanks for reading.
Have a great and safe day!
Rika
Related Topics to My GenereratePress Series
Share this insight
This conversation is happening inside the community.
Join free to continue it.The Internet Changed. Now It Is Time to Build Differently.
If this article resonated, the next step is learning how to apply it. Inside Wealthy Affiliate, we break this down into practical steps you can use to build a real online business.
No credit card. Instant access.