After you create your blog, you will be taken to your Blog Details page. Here you will find all the information you need to set-up your blog, including your WP Admin and Password, DNS Settings, links, and your...
Follow-up Emails!
These are emails that have been precreated and tested by us. They are not 100% your voice because they were written in a generic format, but they will automatically insert your name and domain within the signature of the emails. In addition, these emails are "aweber ready", meaning you can copy and paste them direction into Aweber.
Here is a screenshot of the emails I am referring to:

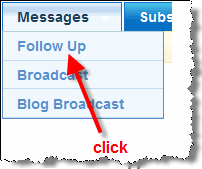
There you will see an entire sequence of emails you can add. What you will now want to do is log into your Aweber account so you can add your list. The first thing you will want to do is go to the Follow-up Email section as indicated below.

Click this link. You will then be granted the option to add a message (below).

Click the Add New Follow Up Message link. This brings us to a web form where we can now add our follow-up message that was given to us on the details page. We are going to add a the first email from the details page which you can access from the View Details link (beside your blog you set-up) on thefollowing page:

Here is quick breakdown of each email:

The email # is the email location within the sequence, in this case it is the FIRST email to go out. The next item is the subject line. This is what you will add as the subject link within Aweber. Then you have the "when to send it field". In this case the email will naturally go out right away (cannot set your first email time interval), however the others will go out on a predefined schedule (determined by you...but we provide guidelines).
Upon clicking the email link, a window will open with the email. Copy and paste the email content within that email. You will now want to flip back over to your aweber form and paste that same email within the form. You will also need to make sure that you link up the links within the emails in your HTML message.

Then you need to copy and paste the same message into the Text Message box. The reason for this is that not all email clients accept HTML...in which case a text version will be sent to them. Make sure you choose Wrap Long Lines within the text message as well.

Cool. Now it is time to set the Interval. In this case it is the first email, so this will automatically be set to "immediately", however you will get to choose the length of days for all your other emails. You will also want to make sure that the "Track Clicks?" checkbox is checked. This will provide you email tracking of the links within your email.

Click Save! Cool...we are done here and your first follow-up message is saved (as denoted below).

Now do the same for the remaining emails in the Follow Up Sequence.


