Let's fill in our table data into the Table Content area!
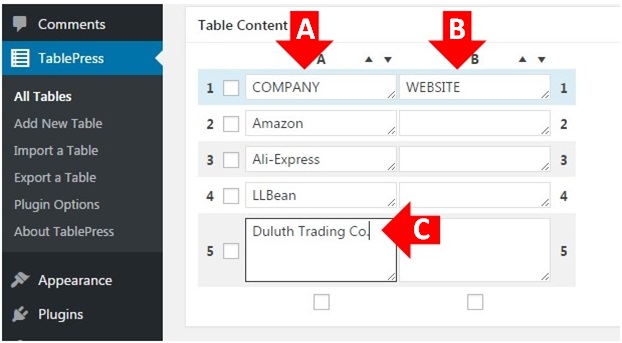
Step 9A (see example below): In our simple example, we want to offer our audience a list of places to shop online. Earlier in the settings, we chose to make our top row a heading, and in this case we simply type in the left column heading: COMPANY.
Step 9B: In the right column heading we type in: WEBSITE.
Step 9C: Down the left hand column in spaces 2-5, we will type in the names of the companies we want from our list. Although you can certainly create your tables completely "on-the-fly", I prefer to make a special folder in my computer documents for that table and collect together all the components ahead of time: text to be used, a list of links to be used, images to be used, etc.
If you do the prep work, then you won't end up making so many "adjustments" during the table building process. It is especially helpful if you get interrupted and have to come back to it later, everything is neatly organized where you can find it...less forgetting about where you left off.
We will make a couple of adjustments to the left-hand column in a little bit, just to give you an idea of what is possible, but this text will serve as a handy "place holder" for now.
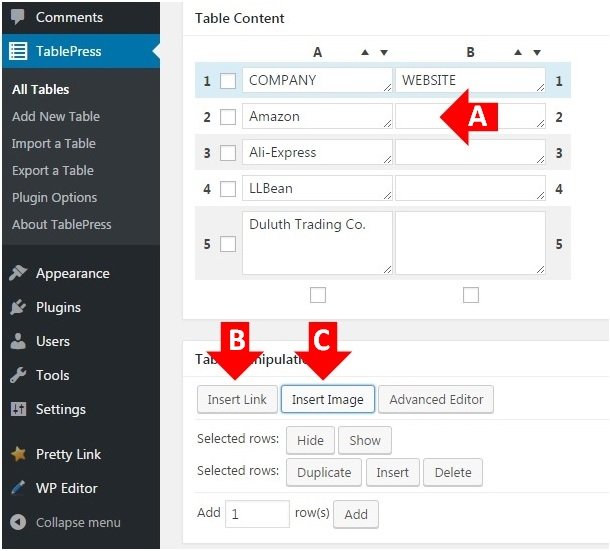
Step 10A (see example below): Next we will begin adding our website links to the right hand column for each of our companies. To do that let's look at the Insert Link and the Insert Image options.
Step10B: If we wanted to do a straight link, then we could simply type in whatever text we wished to link in right-hand column and select the "Insert Link" option and follow the prompts, but I thought it would be a better illustration of what TablePress can do if instead I placed images in the right hand column and then linked those to each of the companies listed on the left.
It's as easy as placing images in your pages and posts. Not only that, but it really makes your tables "pop"! :)
Step 10C: Click on the "Insert Image" option a prompt box will appear asking you to next click on the Table Content area where you want the image to go...so, click in column B2, the empty box to the right of "Amazon" (arrow A).
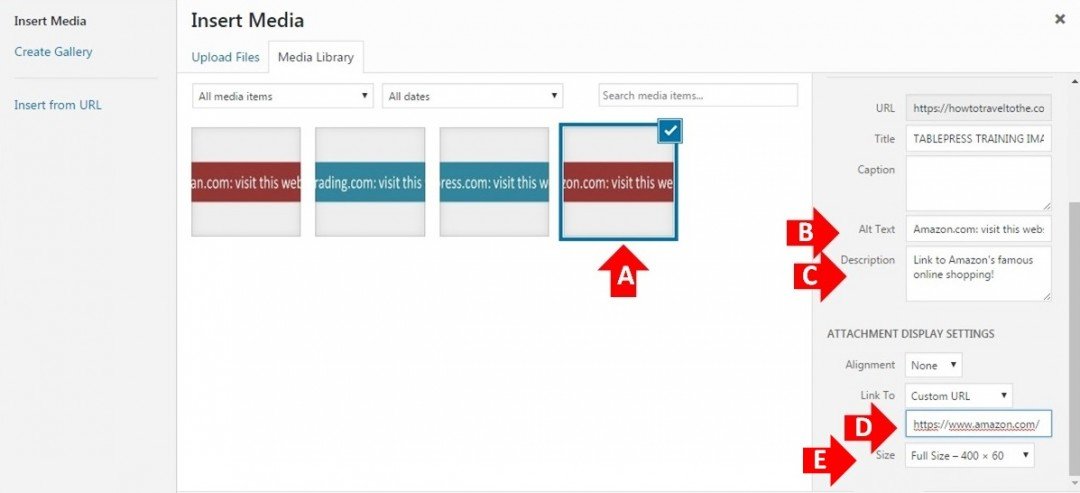
Step 11A (see example below): Once selected, a very familiar screen will appear...the Word Press Insert Media screen. At this point you will either have to upload the images you want, or as part of your table preparation folder you would have already gathered the images and uploaded them to your WP media library ahead of time.
In this example, I have created images in the form of link buttons. You could use logos, photos, whatever you like. I do recommend you decide ahead of time what size you want the images to be and edit them to the same uniform size before uploading them into the media library. It reduces the hassles later.
The images I'm using were created using the Power Point and Paint tools that are standard on most versions of windows, but there are hundreds of free and paid tools out there to create with. The saved file format is jpg or jpeg.
Step 11B: Don't forget your good SEO practices...add your "Alt Text".
Step 11C: Don't forget your good SEO practices...add your image "Description".
Forget the image "Caption" option, as your table really never needs that.
Step 11D: Select "Custom URL" and paste in your full http:// link, just like adding a linked image to your Word Press page or post.
Step 11E: Make sure you are set to the correct image size (uniform size) and click the Add Image button to place the image in the table.
NOTE: Determining the image size is not only a function of how many columns your table has (more columns means narrower images), but also based on whether you are using a full page format or a narrow page format. It is also a matter of tastes...what you think looks good and works with the rest of your site's layout.
I use a typical 2/3 width page, with a right-hand column, on my website and these button images were all sized to 400w x 60h pixals and that works well for me.
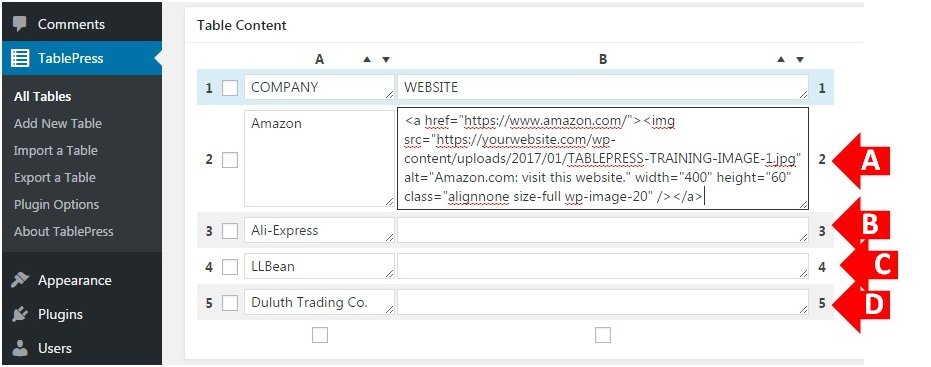
Step 12A see example below): When the image is placed, then the media library screen disappears and you once again are looking at the Table Content area, you will not see your image in the table, but instead you will see the html code for the image and the corresponding link.
Step 12B: Repeat steps 10C and 11A-E for the 2nd row, selecting the planned image and link for the item begin featured in that particular row.
Step 12C: Repeat steps 10C and 11A-E for the 3rd row, selecting the planned image and link for the item begin featured in that particular row.
Step 12D: Repeat steps 10C and 11A-E for the 4th row, selecting the planned image and link for the item being featured in that particular row.
Step 13A (see example below): This is a good time to save, so let's select the "Save Changes" button.

At this point our table is basically complete. We could just dump the [table code] for this table into the desired post and publish it, but there are 2 little tricks I like to use, which will make creating tables easier and give you better results.
First, all plug-ins now matter how good, have their issues. The TablePress preview button doesn't work very well. It doesn't know whether you are using a narrow page or a full width page, so as a result it displays a preview that gives you little clue as to what the table will really look like on your pages.
Here is how I fix that:
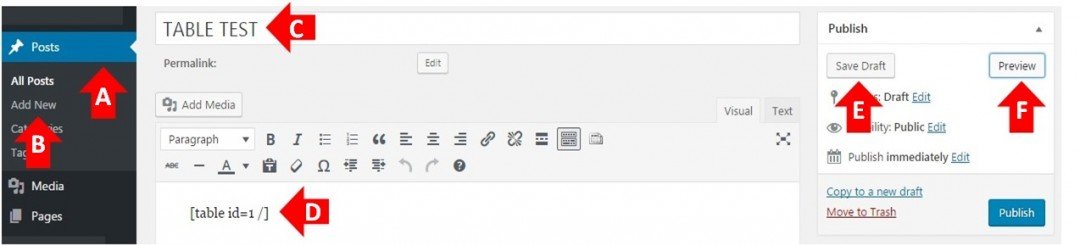
Step 14A (see example below): Right click on "Posts" and open it in a new tab or window (your choice).
Step 14B: In the new window, select "Add New" to create a new blank post.
Step 14C: Type in TABLE TEST.
Step 14D: Bring up the old tab or window where TablePress is; highlight, right click and copy the [table code for your recently created table] including the brackets [ ]. Then, back at the new tab, or window, paste the code, brackets and all, into the body of your new TABLE TEST post.
Step 14E: Save as a "Draft".
Step 14F: Select the "Preview" button.
This will give you an accurate preview of what your table looks like with your theme and settings.
The next little trick is how to make easy adjustments using just a tiny bit of simple HTML code to make your tables look their best. In our example, I referred to typing in the names of the companies as "placeholders". We need to replace them with something better in order to have a really sharp looking table.
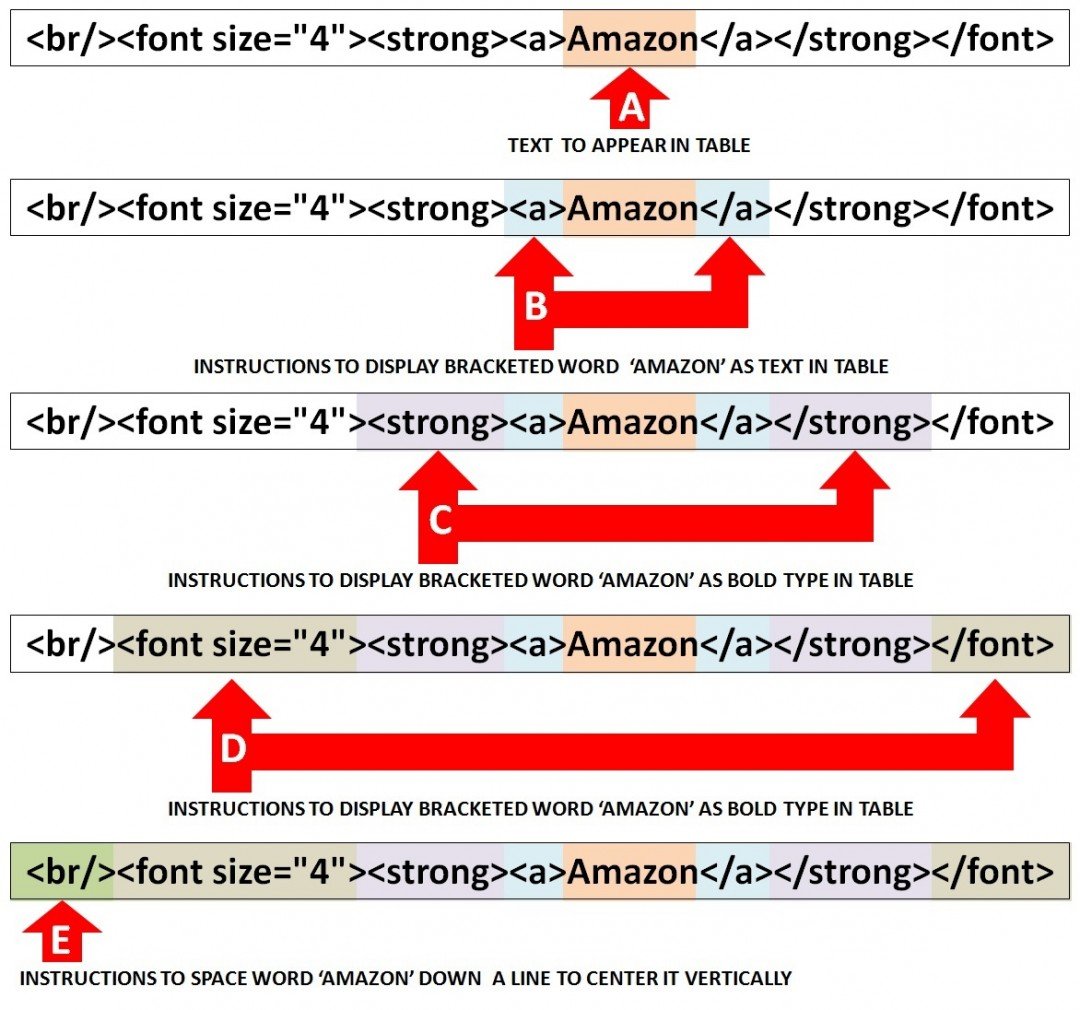
To do this, we need to bold the type, increase the font size and center the names vertically within their respective boxes on the table. To do this, we simply replace the place holder name, Amazon, with:
<br/><font size="4"><strong><a>Amazon</a></strong></font>
Weird and complicated? Not really...it's simple when you break it down and look at it...you'll be doing simple HTML before you know it! :)
Step 15A (see example below): We begin with the text we want to have appear printed in the table. In this case it is Amazon.
Step 15B: Next we "sandwich" the text with an anchor, that's what the "a" means. An anchor isn't absolutely necessary unless the text might have a link added to it in the future, so I added it just in case. Notice how each opening instruction is to the left of Amazon and each closing instruction is to the right and has a / mark added.
Step 15C: Then, we sandwich that with instructions to show the text in bold print.
Step 15D: The final instructions on how to display the text is then added to increase the font size, in this case to font size 4.
Step 15E: Last, we add an instruction before all of this to tell Word Press to move the text down a line in order for it to be vertically centered within that cell on the table. Notice here how it contains a / mark indicating that instruction is finished before the instructions to print the text begin.
We can also center the heading for our columns by simply adding a little bit of HTML code to them as well: COMPANY becomes <center>COMPANY</center> while WEBSITE becomes <center>WEBSITE</center>.
See...that wasn't really all that painful. :) Now, we simply repeat Steps 15A-E for each company listed in the first column of our table and "Save Changes".

The cool thing about this is whenever you update (Save Changes) on a given table, those changes go into effect wherever you are using that table and have placed the [table code] for it. No searching for all the places you used it! :)
Also, once you have your first table how you want it, it is easy to duplicate it (clone it) and use it for a template to make other tables. Simply change out the info, images and links and you're a "Table Pro"!
Here are the last steps we will be doing for this tutorial:
Step 16A: In the Table Test post, repeat Step 14E: "Save Draft".
Step 16B: In the Table Test post, repeat Step 14F: "Preview".
Here's what the final preview looks like:
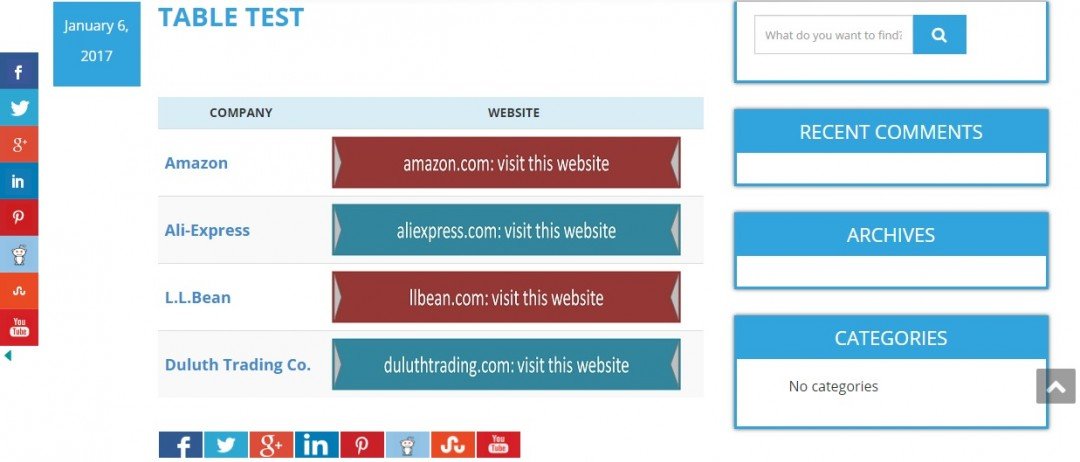
Be sure to note the image sizes as well as font types and sizes you used to get the look you wanted, so that you can easily and quickly duplicate/clone your efforts as needed.
If you found this tutorial helpful, please click the green "like" button at the bottom of the tutorial. I appreciate any comments or suggestions you have about this tutorial or perhaps a tutorial subject you would like to see covered.
Thanks for taking the time and as always: I'm following you all the way to success! :)
JChrisA


Thanks, Chris for sharing this training.