DIY Images Method 1


Published on December 18, 2013
Published on Wealthy Affiliate — a platform for building real online businesses with modern training and AI.
Taking your own quality images.
Due to increasing demand from Wealthy Affiliate users wanting a cheap, easy and effective way to get images for their posts and websites, in conjunction with canuck ( Alex ), I want to give you some Do It Yourself projects to making your own images more simple and professional looking.
Firstly it is paramount that no matter what you do, before the image enters your computer for editing that what goes in must be of the highest quality. If you have ever tried to clean up an audio file or a recording from a concert or old record you will understand that no matter how powerful your editing software there are just some things that you just can't get right. So achieving the best image quality at the start will hugely cut down your precious time in front of the computer monitor. We will tackle editing at a later date.
Right on with our projects firstly there are a few methods to try here but the first two I want to share involve a humble cardboard box.
Ready to put this into action?
Start your free journey today — no credit card required.
Equipment and materials required for Method 1 include:
- An empty cardboard box around 15" x 15"
- A ruler and marker pen
- A craft knife
- A roll of wide aluminium foil
- A roll of wide baking paper or tracing paper ( 20" is preferable )
- Bristol board (heavyweight drawing paper .006" thick) available from art shops (optional)
- Strong tape like Duct (Gaffa) Tape
- Masking Tape
- Spring Clamp or weighty Household items
- A window with lots of natural light
- A flat table or bench that is slightly higher than your window sill
Method 1: Using Natural Light
Natural light is going to give you the best results as it "naturally" contains all the wavelengths of light providing an untainted colour cast on your subjects.
Please excuse the crude drawings below but if you follow the steps below I'm sure you will get the idea.
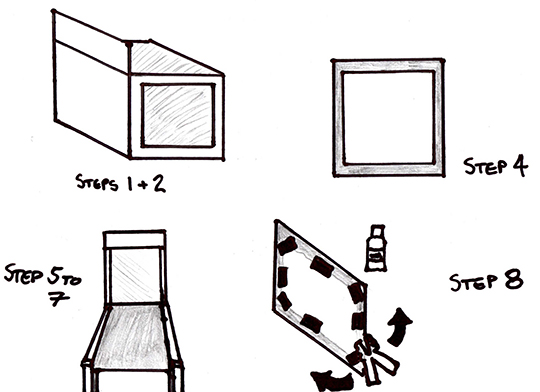
- Draw out outlines on the outside of your box allowing 2" from the edge. Do this on all four sides to create a cut-out outline for each side.
- Cut out the outlines carefully with a sharp craft knife round all four sides and cut off the flaps at the top of the box. Do not touch the base leave this intact.
- Put your holed box to the side we will use this in our next project.
- Now with the pieces of cardboard you have cut out, get some wide aluminium foil and with the dull side facing up towards you carefully cover the cut outs, fold over and tape to the back with duct tape. Make sure the surface is as smooth as possible and repeat with another cut out. These are your reflectors.
- Next you need to set up your table, bench, desk or whatever provides a clean flat surface next to a window that receives plenty of natural light. Try to ensure that the surface is higher than the window sill and your window is relatively clean and move the table as close as possible to the window.
- Now using masking tape, attach a piece of baking or even better, tracing paper high on the window to below the edge of the table. This provides a diffused light that is perfect for your background and reduces the harsh light from the window.
- On your table roll out either some white Bristol board or the dull side of the foil along the length of the table folding it over the edge to ensure it is as smooth as possible. Using the foil will give you a reflective image as if your subject were floating on water whereas the Bristol board ensures a total white out.
- Place your subject in an area that is receiving the most light and use either one or both of the reflectors to provide even lighting around the subject. This may take a bit of trial and error as you find the sweet spots but also trying not to let the reflectors be reflected themselves on the subject. Use weighty household items like jars or bottles or even better a spring clamp to angle and support your reflector.
- Now it's time to take your pictures, if you have a tripod I would strongly suggest you use it. Take pictures from several angles and if you have the ability on your camera to adjust exposure try taking bright and dark shots too. The key is to take a lot of shots so you can determine what are the best angles and what are the best settings on your camera.
So that is method one if you have given this a shot (no pun intended) please let me know how it went and if you need any help. And remember don't throw out that holed box as we can use that in our next project for when you don't have natural light available to you.
Share this insight
This conversation is happening inside the community.
Join free to continue it.The Internet Changed. Now It Is Time to Build Differently.
If this article resonated, the next step is learning how to apply it. Inside Wealthy Affiliate, we break this down into practical steps you can use to build a real online business.
No credit card. Instant access.