Adding Text
In the same way as last time, click on Tools > Annotate then scroll down to Text.
Immediately a text box will open on your image.
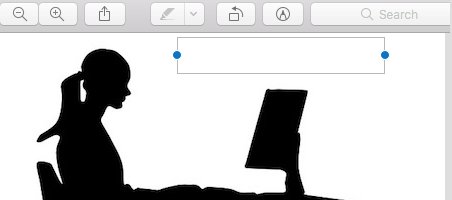
Anything which has those blue dots at each end can be moved round and adjusted in size.
So you can then move the text box to where you want it and adjust the size of it.
In the image below, I have completed my text.
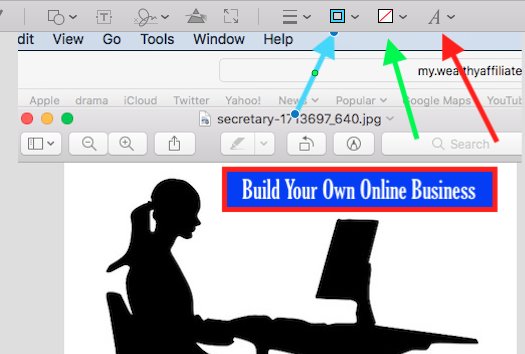
On Preview the text is always in white, but you can change the background colour and give it a coloured border in order to make it stand out.
The blue arrow above is where you can choose a colour for your border if you wish to have one, but you may choose not to have one of course.
The green arrow is where you can choose the colour for the text background.
Click on the A where the red arrow is pointing and the following box will appear.
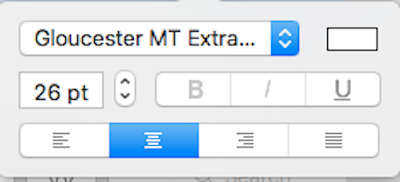
Now you can choose your font style and size.
You will obviously have to delete the word "text" before beginning to write. If you decide to change your style and size whist you are writing you can do so, and you will immediately see how it looks.
When you are happy with your text box, click away from it and it will save. Be sure not to click away from it until you have finished with it.
Speech Bubble
You can make a Speech Bubble in the same way.
When you click on Speech Bubble you can then move it around, and alter the shape of it by clicking on one of the blue dots which are at intervals around the speech bubble.
You cannot see the blue dots in the image below, as I had to click away from it in order to add the text box.

You can then add a text box to it in the same way as described above, and again be sure not to click away from it until you are happy with it.
Next up: Conclusion


You are the member that informed us of the Magnifying glass on iPhone as well, also cool! Lol
Have a great day!
Wayne