Arrows and Lines
As you can see in the image below, there are several ways that you can annotate your images.
When you are more familiar with Preview, you can play around with the various Tools and see just what they can do.
But for now I am going to show you how to add Arrows, Lines and Text to your image.

Click on Tools, then scroll down to Annotate (red arrow) then scroll across to Arrow or Line (green arrow)
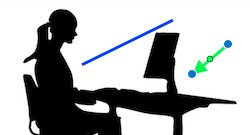
When you click on Arrow or Line, it will immediately appear in your image, as shown below.
You can then move it to where you want it, and adjust the length of it, and also change the colour.
If you make a mistake, just hit delete. But be sure not to click anywhere else in the meantime, or you will not be able to delete it nor edit it further in any way.
In the image above, the green arrow has blue dots at either end of it. That means that it is still in editing mode, and I could move it, adjust its size or change its colour if I wished.
The blue line however, no longer has the blue dots at either end, so I can no longer edit that.
It is important to remember that that rue applies to whatever you are annotating on Preview - if you click away from what you are doing then you will not be able to change it in any way.
Obviously the image which I was using for demonstration purposes does not need arrows or lines - I just wanted to illustrate to you how to add them.
Next up: How To Add Text To Your Image.
I hope that you are enjoying this tutorial. If you do Like it please give me a like below :)


You are the member that informed us of the Magnifying glass on iPhone as well, also cool! Lol
Have a great day!
Wayne