The first step to making your Table of Contents functional is creating the unique anchor tag for each topic.
Below is a screenshot of a Table of Contents that I've created.
You can see that I typed this TOC into my post using Site Content, and I'm now in Edit mode. For illustration purposes I have already added the first 3 links: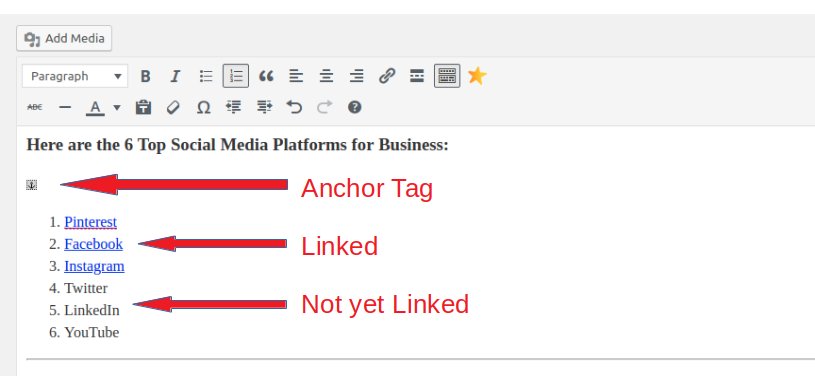
So, you can see my first anchor tag. You can see that my first three topics ARE linked. My last three topics are NOT yet linked.
Why is that anchor tag placed where it is?
Because each anchor tag needs SPACE!
Pinterest is my first listed topic, which means that my content about Pinterest will follow directly under my Table of Contents. I've placed my anchor tag above my Table of Contents to give enough space to show my Pinterest title and content when the Pinterest link is clicked.
If you're feeling a little lost, that's okay. It will make better sense when we create the next link together!
Follow along as I place the next anchor tag, for Twitter.
First, in Visual Edit mode, I'm going to scroll down my post to my Twitter section, and I'm going to look at the spacing to see where I might want to place my anchor tag...

There's my page. (I know it's small. All you need to see here is my Twitter title!)
As you can see I'm using a line to separate my sections, so there is already a small space created above my title. Because I like my title to show when my readers click to a specific section, I'm going to go back a little bit further than that with my anchor tag.
(Have you ever clicked on a link to take you to a specific page spot, and then you have to scroll back a bit because you can't see the title? I hate that! So I play around with my placing a little to ensure that when my reader clicks to that section, they see the title first, not just the starting paragraph)
In this situation, I'm going to place my anchor tag at the end of the previous section, right at the end of the last sentence.
To do this, I place the cursorat the end of the sentence (after the word 'budget' in this case), and I switch from Visual mode to Text mode (upper right corner of your edit screen or use your hamburger dropdown and select 'text')
Now we see the HTML side of things, and in this world is where the anchor tags live.
Click on Next Page...

Thanks so much for sharing!
Wish you much success!
Bob