* If you've found this page and it doesn't make sense, please go to the beginning of this tutorial and follow through the entire lesson!
How to Adjust Anchor Tag Placement
On the previous pages, we completed the 2 steps of adding an anchor tag, or jump link, to create a Table of Contents, and we 'Updated' our Post.
The next step is to 'View Post' to test the link and see how it works.
Here is the Updated view of my post, where you can see that "Twitter" is now showing as an active link in my Table of Contents:

Now, let's see where the"Twitter" jump link takes me when I click on it:

Hmmmmm. Not quite what I was looking for.
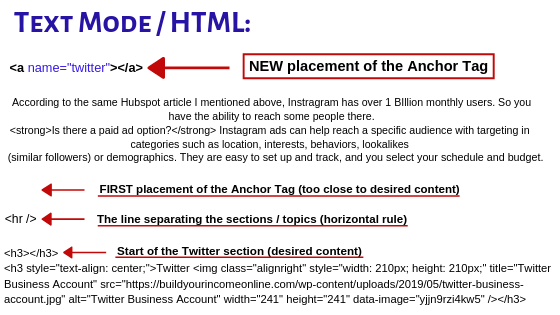
Remember when I said that it's best to place your anchor tag with enough space that when your reader clicks on your jump link, it takes them to the Title, or start, of that section so they have confirmation that they've been sent to the desired information.
In the image above, I can not see the Title, and the Twitter image has been cutoff at the top. What this tells me is that I have to go back in to Edit TEXT mode, cut my anchor tag and paste it higher (farther back in my post - maybe a couple sentences).
You may need to adjust the placement a couple, or few, times before you see your desired outcome.
My adjustment:
And the outcome after I Update post and re-test the Twitter link: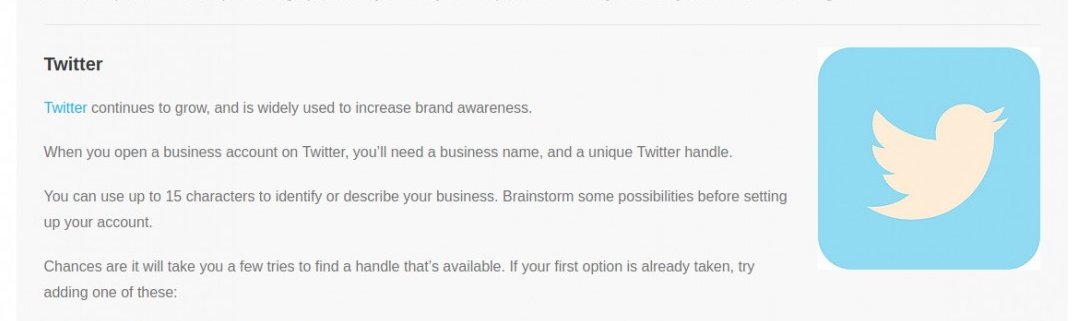
Perfect!
By moving the anchor tag up on the post (farther back from the desired content), I have given enough room so that when I click on the jump link it goes to the correct place allowing me to see the Title and complete Twitter image.
This is what I want the reader to see when they click on "Twitter" in my Table of Contents.
To finish the Table of Contents, simply go back to Page 1 and repeat these steps for each topic that you want to link to a specific place in the post!
I hope this screenshot lesson was helpful!
Don't be afraid to create your own functional Table of Contents!
It may seem like a lot, but after you complete a couple of links, the process becomes VERY EASY to accomplish on any post you want to have a Table of Contents, and you don't need to use a Plugin!
I intentionally made a placement error with my first anchor tag so that I could include the direction on how to adjust it. Sometimes, people give this a try, and succeed, but the link doesn't lead to quite the right spot, so they think they've done it wrong.
Honestly, after going through this process and learning the general necessary space, you'll find that you pick the right anchor spot quite often on the first try!
Please leave your comments or questions below!
Cris

Thanks so much for sharing!
Wish you much success!
Bob