This is the last tutorial in this 'Getting Started with Canva' series. Call-to-action or CTA buttons are very important to an online marketer as they are used to funnel a visitor to where you want them to go. Now not all visitors will click these buttons but the ones that do are getting closer to purchasing, maybe several times.
Button dimensions vary so the custom dimensions option in Canva is ideal. Once the CTA buttons are downloaded from Canva, you just have to add the links to the buttons before publishing.
You can be creative as you want in your designs, but keeping it simple for CTAs is best. The following 'Get Started Now button' was made with a custom dimension of 250 x 50 pixels.

Here are the steps
1. At the top right hand corner of your Canva dashboard, click Create a design button.
2. Then click Custom Dimensions to enter the dimensions you want to use.
3. Click Create new design button - this will open the Canva design interface and the dimensions area will display as an off-white almost light grey area.
4. Click this off-white area and the background colour icon will appear at the top left next to the search bar to go ahead and click a background colour for your button.
5. On the left of your screen in the menu area, click the Elements menu to open. Search a keyword within this menu, such as arrow, to find a selection of items to browse.
6. Drag and drop the arrow element into the off-white area and resize and position it.
7. Click Text menu and drag or clcik a text style to the button and edit the text to suit.
8. Clcik the text or element frame to change the colours.
The Second CTA Example
The dimensions for the following CTA button is 400 x 400 pixels. So, slightly bigger than the previous design and the dimensions are easy to do using the Custom Dimensions feature at the top right of your Canva dashboard. This call to action button below works well in the main body of your website and also the side menu.
A few more elements have been used on this CTA button. The red dots and the yellow bottton were both chosen from Elements and while in elements you can search for specific catergories.
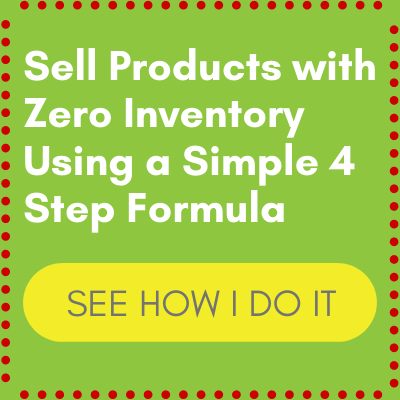
I searched 'lines' to find the red dot boarder which was inserted individually to each side of the green square. After a little resizing and manouvering, this is what the final CTA button looks like.
Canva is very versitile and you don't need to have design or graphics experience or even a lot of time. All of these graphics took just a few minutes to create in Canva.
So there you go! This series is done but I will be adding another soon.
Good day to you
Rina :-)

Great job on the Canva training! Very informative and step by step for each type of graphic needed on a blog. Thanks for sharing!
Best wishes :) ~ Sherry

Again thank you and happy new year!