How To Make Google Crawl and Index Your Website Instantly


Published on April 21, 2022
Published on Wealthy Affiliate — a platform for building real online businesses with modern training and AI.


Before diving into this method, it is good to explain what indexing is and why it is so important.
If you already know how indexing and page crawling work, you can skip the introduction part and move directly to the explanation of the technique.
If you create a post on your blog or website and you realize Google doesn't index it, this means your page will not show up in search results, and therefore users will not be able to find your page on google search results anytime they search about your website or page.
So Once you have created your web page, it is the best moment to give it the visibility on the internet that it deserves.
Why should your website appear on Google?Google is the most important source of organic traffic for most websites. It doesn't matter if you developed a personal blog or corporate website for your SME. Being present on Google should interest you in both cases to find new sales opportunities and for your potential customers to find you.
As I said before, there is a quick and easy way to get your website listed on Google.
Rank faster – Let's get started
Step 1: Install Instant Indexing for Google
Login to your WordPress dashboard and Install Instant Indexing for Google

Step 2: Go to Google Cloud Platform
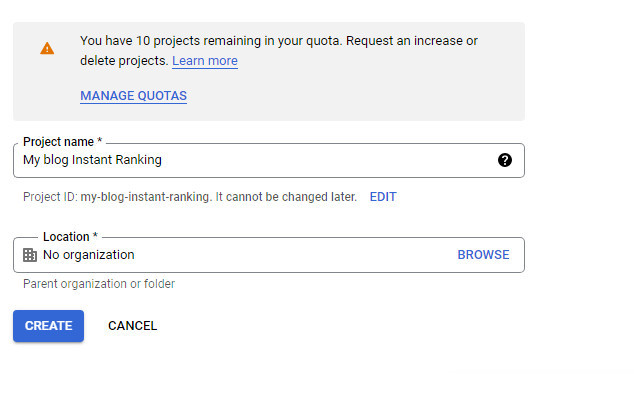
Step 3: Create a new project

On the next window that appeared, Enter your project name which you can recognize later. then click Create.
Step 4: Enable Access to API
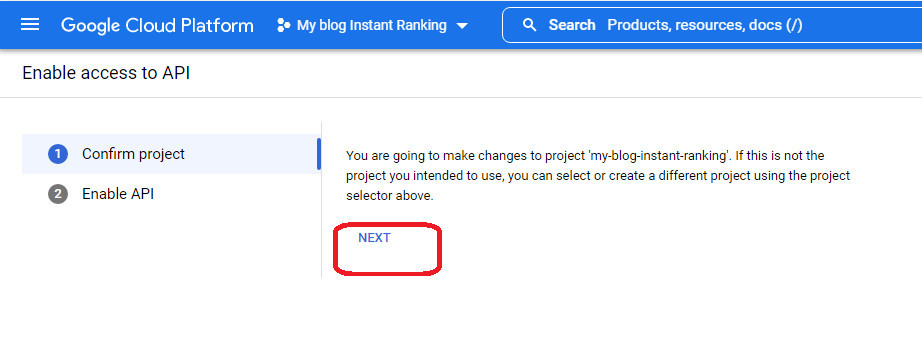
After you successfully create the project, what is next now is to enable your project to have access to the API. as shown in the image below to enable the API.

After you have enabled it, you can now close the tab.
Step 5: Creating a Service Account
After the previous step, you need now to create a service account by opening the service accounts page.
Step 6: Create Service Account
Select the PROJECT we create earlier

After you have selected the PROJECT you want to create a service account for, you will be taken to another page as shown on the image below, then click on Create Service Account

Step 7
After creating a service account, fill in your project information, then Select and copy down the whole Service Account ID (this looks like an email address) it will be needed later.

Click Create and continue
Ready to put this into action?
Start your free journey today — no credit card required.
Grant this service account access to the project

Choose Owner under Role

Click Done
Step 8: Time to Manage Keys for Service Account

Mange Key

Step 9: Now Create New JSON Key for Service Account
After completing the manage key, You will be taken to the following page where you will be able to add a new Key, click Add key, and select the Create new key option
Select JSON

Immediately you click to create a new key, the JSON file will be automatically downloaded to your device.
Step 10: Add the Service Account created as an Owner of Your Google Search Console Property
To add the service, create a search console account and verify your domain property, if you already have a search console with your domain verified, skip this and log in to your search console account then follow the next step to continue.
Step 11: Navigate to Users and Permissions in Google Search Console Settings

Locate this at the left side corner of the search console page
Now click Users and Permissions.

Click add user

Step 12: Assign Service Account ID as Owner
After clicking on add user, another page will appear. Enter the Service account ID (the one you copied on step 7) in the Email address field. Make sure you have provided Owner level Permission, and then click Add.

Step 13: Time to Configure Install Instant Indexing Plugin
Now, go back to word press dashboard and configure Install Instant Indexing Plugin that we installed earlier in step 1.

Under the Google API settings tab

upload the JSON file we downloaded on step 9 or copy JSON file content into the box and save settings.
Step. 14
You can now use Google’s indexing API to get any post or page on your site indexed almost instantly.
Now go back to console

Click send to API, you will receive a Success message
Now Enter a URL (or more) in the Instant Indexing section, and choose the Action as Google: Publish/update URL. Then, click the Send to API button.

You can also update the index from the post section by Selectin the Posts where you want the Indexing API to ping Google to crawl your website as soon as a post is published, updated, or deleted, and click on Save Changes.
By Using this method, With good planning and a constant optimization system, you will be able to see results in the visibility of all your current content. also read about mining CARDONA ADA coin on PC or Laptop or Laptop
Make sure you leave your comment
Share this insight
This conversation is happening inside the community.
Join free to continue it.The Internet Changed. Now It Is Time to Build Differently.
If this article resonated, the next step is learning how to apply it. Inside Wealthy Affiliate, we break this down into practical steps you can use to build a real online business.
No credit card. Instant access.