Using the Pretty Links Wordpress plugin


"In the Affiliate Bootcamp, Phase 2 : Lesson 2 of 10, "Properly Using Affiliate Links," Kyle walks us through how to turn our ugly-looking, way-to-long-to-remember affilate links into short and neat links that you can customize to go well with your niche website.
Essentially, through a bit of back-end magic you can turn something like this:
https:// www. amazon. com/ gp/offer-listing/1585169420/ref=as_li_tl ?ie=UTF8&camp=1789&creative=9325 &creativeASIN=1585169420&linkCode=am2 &tag=prov1022-20&linkId= 6e4ed4b199acfa038f23413659d4ba37
into something like this:
https:// www. yernichewebsite. com/awesomeproduct
What is Pretty Links?
The Wordpress plugin that Kyle talks about is called Pretty Links and it's free. There's a pro version too but there's really no need to upgrade for our purposes right now (ever?). According to their website, "Pretty Links is a WordPress plugin that helps you to shrink, cloak, track, organize, and share short links using your domain name and brand."


If you've been on Wealthy Affilate for a little while or even if you're still on your free test drive, you should already know how to install and activate new plugins... so, I won't be covering that here.
Once you've installed and activated the Pretty Links plugin, you can start creating your "branded links" from the Wordpress sidebar menu > Pretty Links > Add New Link or from this URL yernichewebsite. com /wp-admin/admin.php?page=add-new-pretty-link right away.
The Pretty Links dashboard you'll see next should look something like this:

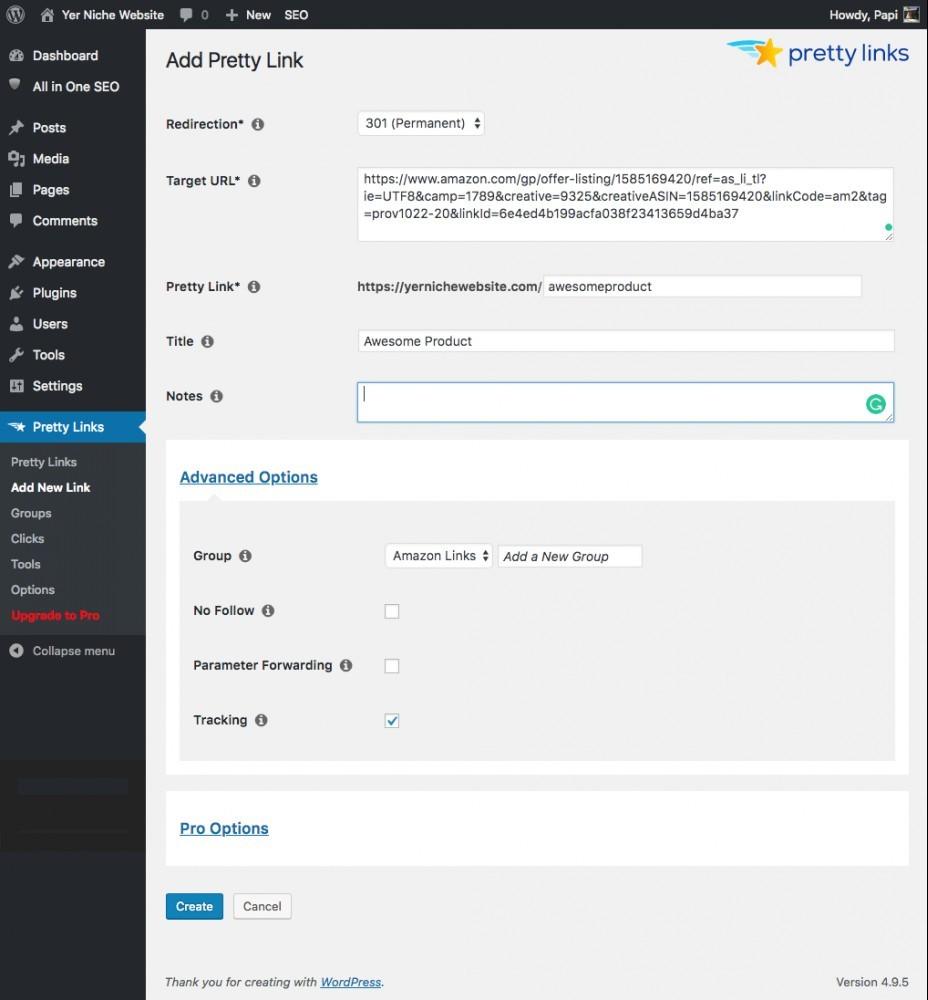
Creating a Pretty Link
As you can see, I've already pre-filled all the fields that I'll need for my new link:
1. Redirection
The the option you would generally choose by default for this is "301 (Permanent)." This tells search engines like Google that you only want them to remember the new, pretty link and not the old, ugly one. The other two "temporary" options are if you know that you may be changing the target URL in the future and it sort of gives the search engines a heads up to come back and check again later.
2. Target URL
Here you can copy and paste the ugly-looking-way-to-long-to-remember affiliate link (from amazon.com, for example). This could also be one of your Wealthy Affiliate links that you just want to shorten. I've created a pretty link for each of my Wealthy Affiliate promo links so I always have them available to share and cn easily remember them.
3. Pretty Link
This is where you add the link that you want to use. Notice that your domain name is already there so you don't have to worry about accidently changing it. It also gives you an idea of what it will look/sound like. Generally, I say it out loud just make sure it has a nice ring to it. It's up to you if you want onelongname or a name-with-dashes as long as you don't use spaces. You can even use CamelCase or under_scores or even_Mix-themAll--up – just no spaces!
4. Title
You don't need to add a title. But if you want to, this is the place for you to add it. It's just a nice thing for your users to see the little title pop up when they hover their mouse over your link. Here, spaces are allowed.
5. Notes
This is a field lets you enter any notes that you want to keep about this particular link and anything you write in here will not be shown anywhere anywhere else on the webite.
Advanced Options
If you've gone through steps 1-5, you're actually ready to hit that save button and your link is ready to go. However, when you click on the Advanced Options title, you get a few additional things that you can do to your new link.
Group
Grouping your pretty links is a nice way for you to keep all your similar links in one place. It's kind of like using Buckets with SiteContent. If you don't have a group to add your link to yet, you can create a new group for it by selecting the "None" option from the dropdown and then typing in the new group name into the "Add a New Group" field. You must hit the enter key to create the new group or else the group will not be created!
No Follow
According to Wikipedia, "nofollow is a value that can be assigned to the rel attribute of an HTML element to instruct some search engines that the hyperlink should not influence the ranking of the link's target in the search engine's index." And "The noindex value of an HTML robots meta tag requests that automated Internet bots avoid indexing a web page."
Since you are creating internal links that point to another page or post on your niche website, it's best to leave this box unchecked. This will, if anything, add more value to your new link in search engine rankings, rather than take any away.
Parameter Forwarding
Checking this box is not necessary since you're not actually passing any parameters. What actually makes the ugly links so ugly is the parameters. For example, when you see something like "?a_aid=ff7376e5" in an affiliate link, that's just one parameter. The "?" basically tells the target website/server that parameters are coming. You may have seen links that have lots of parameters, like "?roses=red&violets=blue&icanwrite=poetry&howabout=you" etc. The whole thing including the "?" is called a "query string" but that's another subject for another day.
Tracking
This box is checked by default and lets you see how your pretty links are doing within the Pretty Links dashboard. I would leave it on because it's always better to have it and barely use it than want to use it and not have it. Further down the road, when your niche wbsite has already had quite a bit of interaction with users, this will come in handy to see which links are doing well and which ones are not, as well as testing.
Done
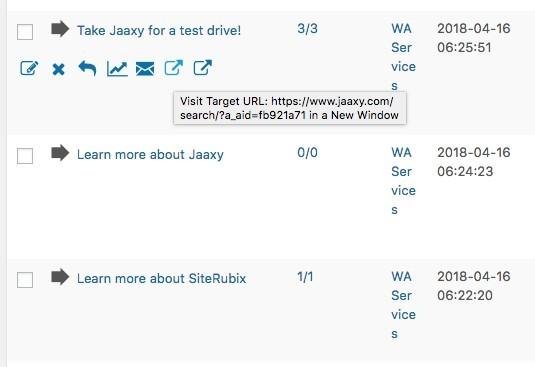
Unless you have a pro account, which I'm not covering in this post, this is when you can finally click that "Create" button. Once created, the page will direct you to the Pretty Links dashboard where you can see all your other links, edit, delete and create new ones. This is also where you will find all your link stats if you kep that "Tracking" box checked.

Feedback
Please feel free to ask if you have any questions about using Pretty Links, using the comments below, you're welcome to add your own experiences, add something that I may have missed, or even if you just wanted to stop by and say hi. I welcome any feedback and I will get back to use as soon as I get a chance.


Recent Comments
5


Haven't got that far yet, but it sounds like a good idea. Saves doing all the work yourself to make a pretty link.
See more comments
Nice training Papi! I have one suggestion if I may?
Your training falls a little bit short because you didn't tell folks what they should do with the pretty link after they created it! That just stands out to me because I had so much problem with it! LOL!
Oh, ok. Thanks for letting me know. Well, I did reference the training which covers that but maybe I can also add a sentence or two about it. Thanks for looking out for me :-)
You are quite welcome, but I should be thanking you!
I was thinking that because I had so much problem with getting the information from the video and had to keep watching over and over that some others are probably having the same problem.
You have a knack for explaining things so they are easily understood.
Thanks again.