Retargeting Ultimate 2016 Guide To Remarketing Campaigns


Published on February 25, 2016
Published on Wealthy Affiliate — a platform for building real online businesses with modern training and AI.
Retargeting is becoming a more and more popular way of advertising.
It's still amazing to me, however, how few take advantage of it!
In this post, not only will I teach you what retargeting is but how to implement it into your business right now.
Plus at the end of this post I share some pretty ninja tactics to increase your ROI even further with retargeting.

What is Retargeting?
Retargeting, which is also known as remarketing, is a form of advertising to visitors that have otherwise already left your site. Most sites are only able to convert 2% of their visitors on average. With retargeting however you're able to keep the interest of the other 98%.
Retargeting works by placing a cookie on a users browser. This cookie allows marketers to anonymously 'follow' their audience around the web.
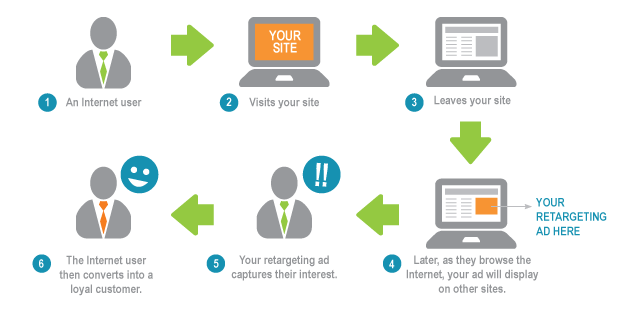 Image Source Econsultancy.com
If a visitor comes to your website, a small piece of code known as a pixel, drops an anonymous browser cookie. Later, while the vistor browses the web, the cookie will let the retargeting provider know when to serve ads. This ensures that your retargeting ads are only shown to vistors who have been on your site in the past.
Why Does Retargeting Work?Retargeting is so effective because it allows you to focuses your advertising spend on people who have already been introduced to your brand.
This makes your product more trustworthy which is the reason most marketers see a much higher ROI on retargeting than other marketing channels.
Compared to standard display advertising where CTR's are usually between .05 - 0.1% retargeting campaigns are double with an average of .2%.
Mean while the conversion rate for many of my clients went from 2 - 5% on typical display inventory while going all the way up to 30-50% on retargeted traffic. These results are not uncommon especially when you start to use dynamic creatives.
How To Build Your Retargeting ListThe first thing you want to do when setting up a retargeting campaign, is choosing which paid traffic sources you want to use for retargeting.
Personally I suggest up all the most common sources: Google Adwords, Facebook Ads & Twitter.
Regardless if you plan on setting up a retargeting campaign on all three I suggest creating a list as early as possible, so if you decide to run a retargeting campaign you already have the data.
![]()
Setting Up Google Adwords Retargeting
Google calls their retargeting - remarketing don't get confused because it's the same thing.
To take advantage of Adwords retargeting you'll first want to login to your Adwords account.
Once inside your main dashboard you'll want to click on "Shared Library" on the bottom-left of your screen.
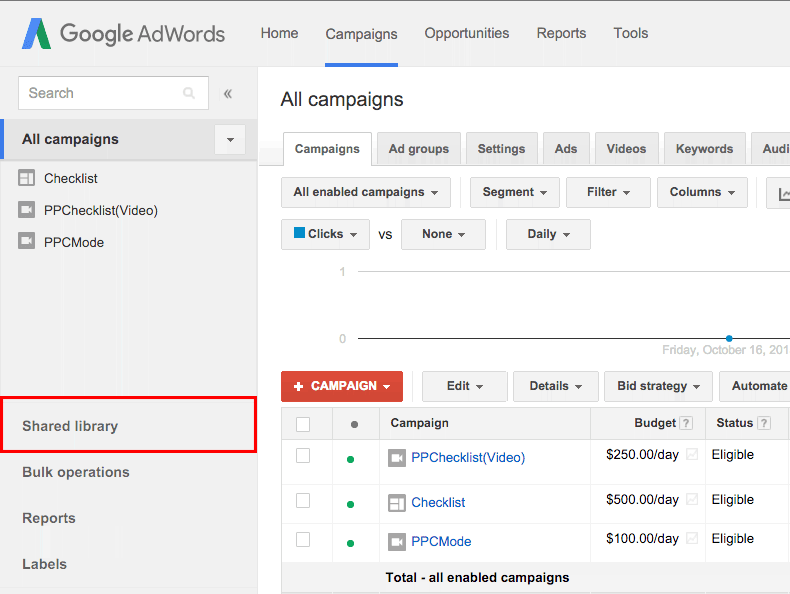
Once you click on Shared Library, you have access to a brand new menu of options.
Next you'll want to click on Audiences as shown in the red box below.
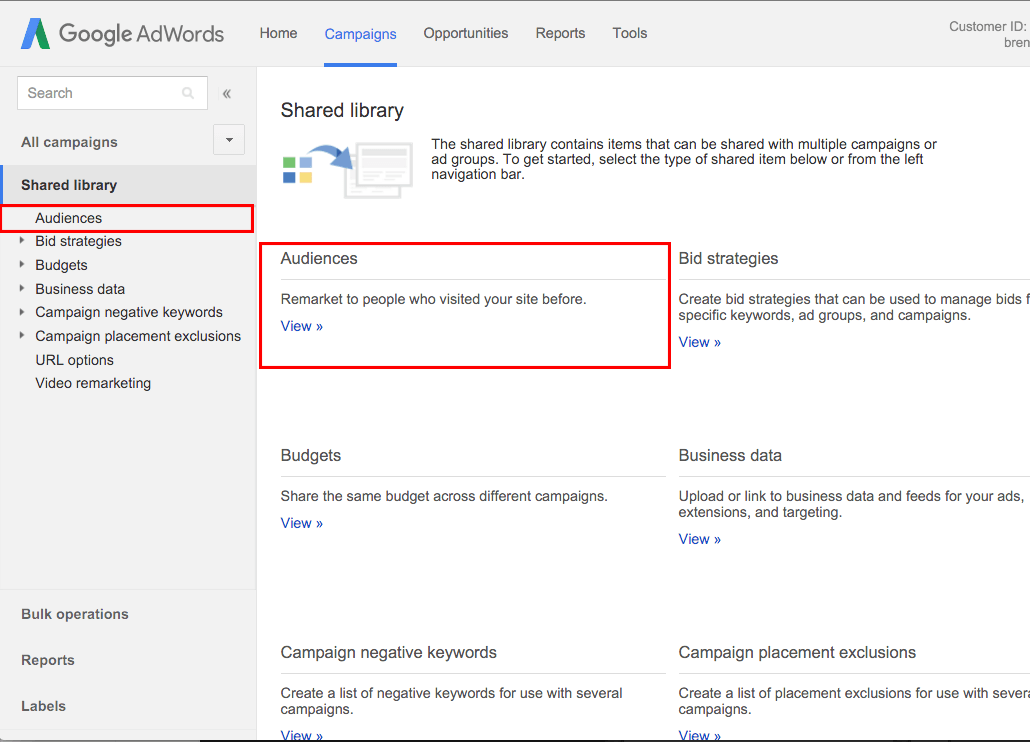
Once inside your Shared Library > Audiences tab, you'll be able to view more details about any current lists you have or create a new list.
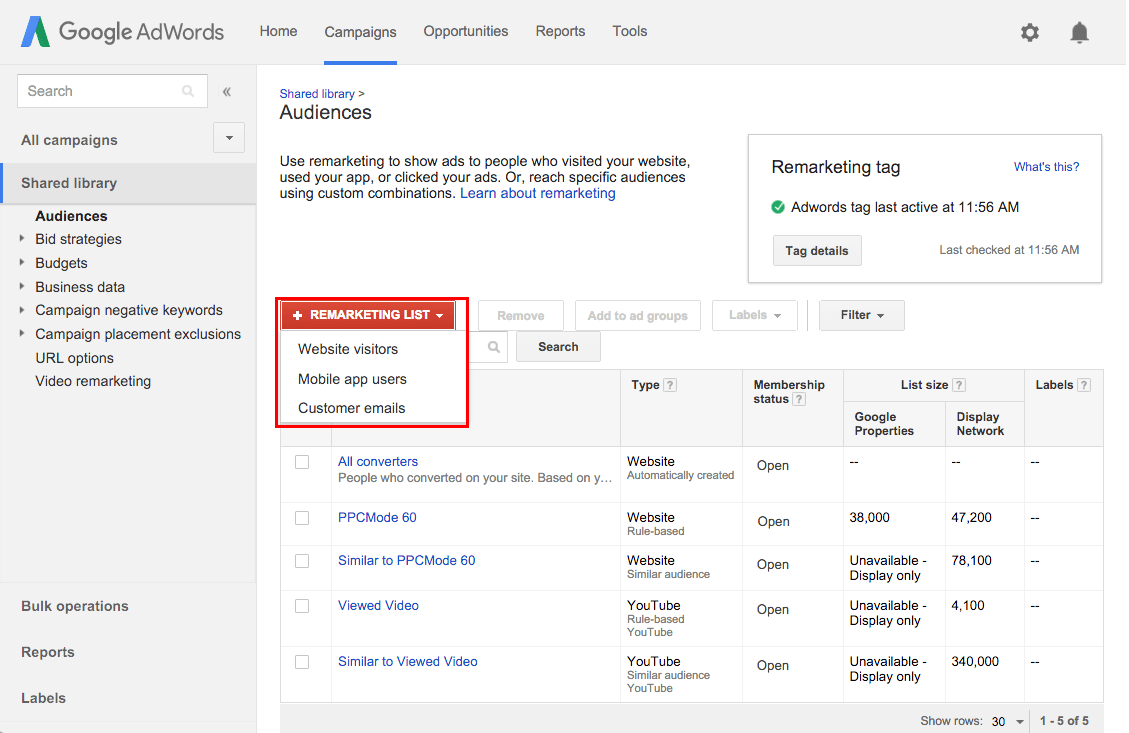
To create a new list, click on the Remarketing List button. Which will drop down a menu showing three new options:
- Website Visitors - Allows you to create a list based on where you place a retargeting pixel
- Mobile App Users - Retarget users who have installed your mobile app.
- Customer Emails - You can upload your email list & Google creates a list based on this data
For this example, we'll be setting up Website Visitors.
After selecting the website visitors button, we'll be taken to the New Remarketing List sections.
- Name your remarketing list. This is for your eyes only so make it descriptive.
- Click on Vistors of a page button to bring down a new box.
- If you already have Google Analytics tags on your website & connected it to Adwords, you can use the page rules instead.
- Click on Vistors of a page with a specific tag.
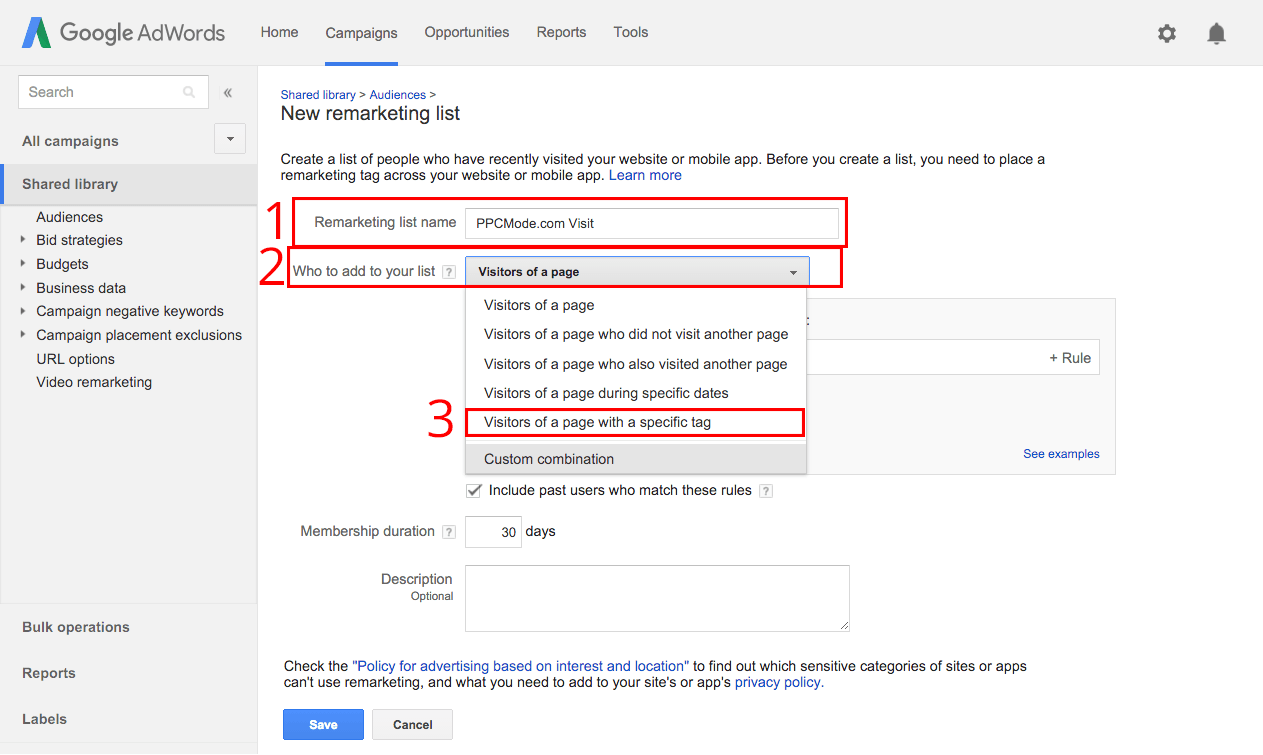
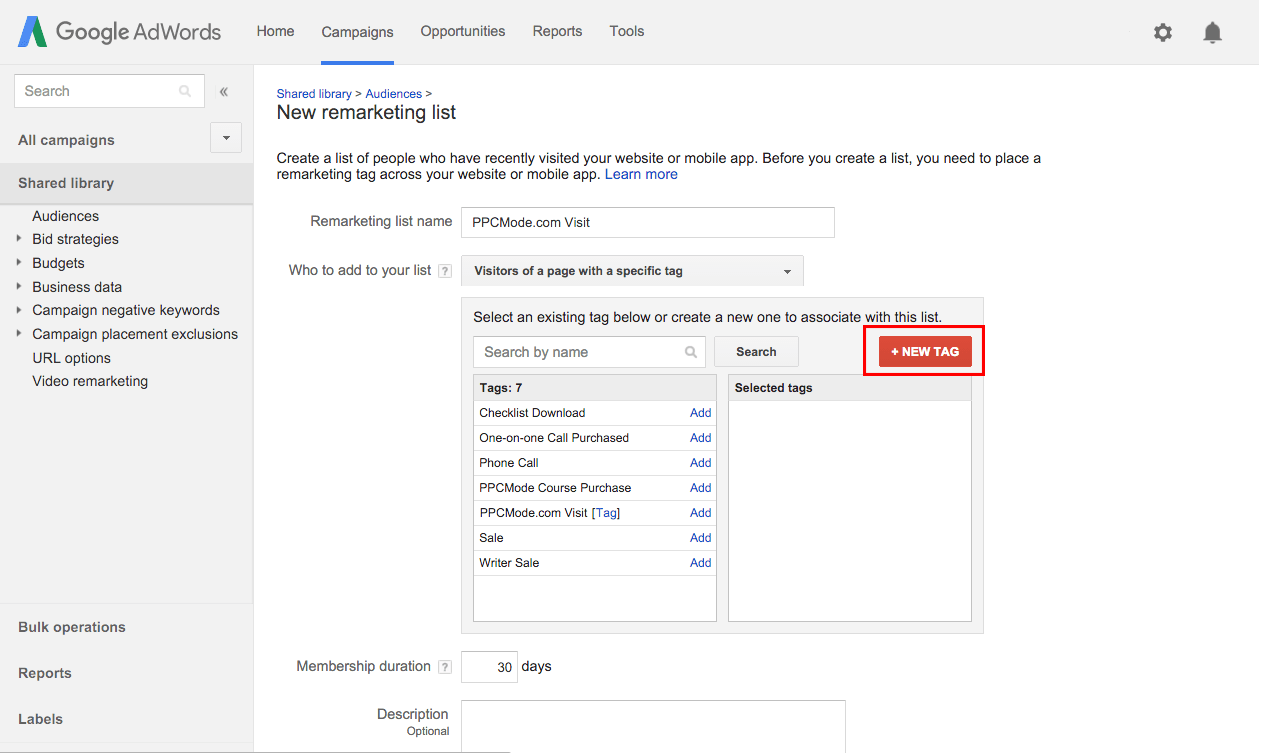
Now you'll be able to select various tags (Conversion pixels) that are already in your Adwords account.
However, we'll be creating a new tag so click on New Tag.
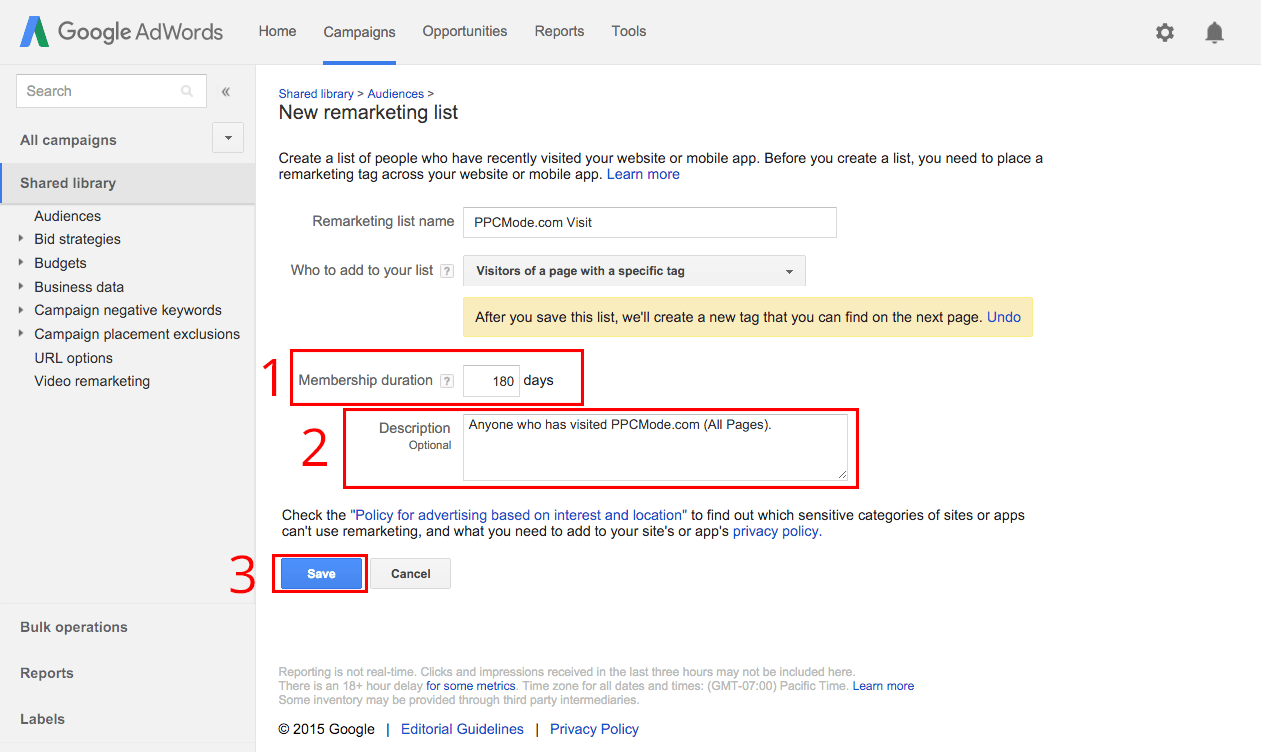
The final thing we need to do is fill out the membership duration & description.
- Personally I always select 180 Days which is the max someone can be on a list. If you have time-sensitive advertisements you can select a much lower timeframe. After the 180 days is up the person will be removed from your list. *If you plane to only use Display Ads you can set this to 540 Days.
- Fill out a description about the new list. This is for your eyes only & is helpful for remembering what each list does.
- Finally, click Save create your list.
Now simply add your remarketing code to your site or landing page.
If you need more help on adding your tag check out Adwords help.
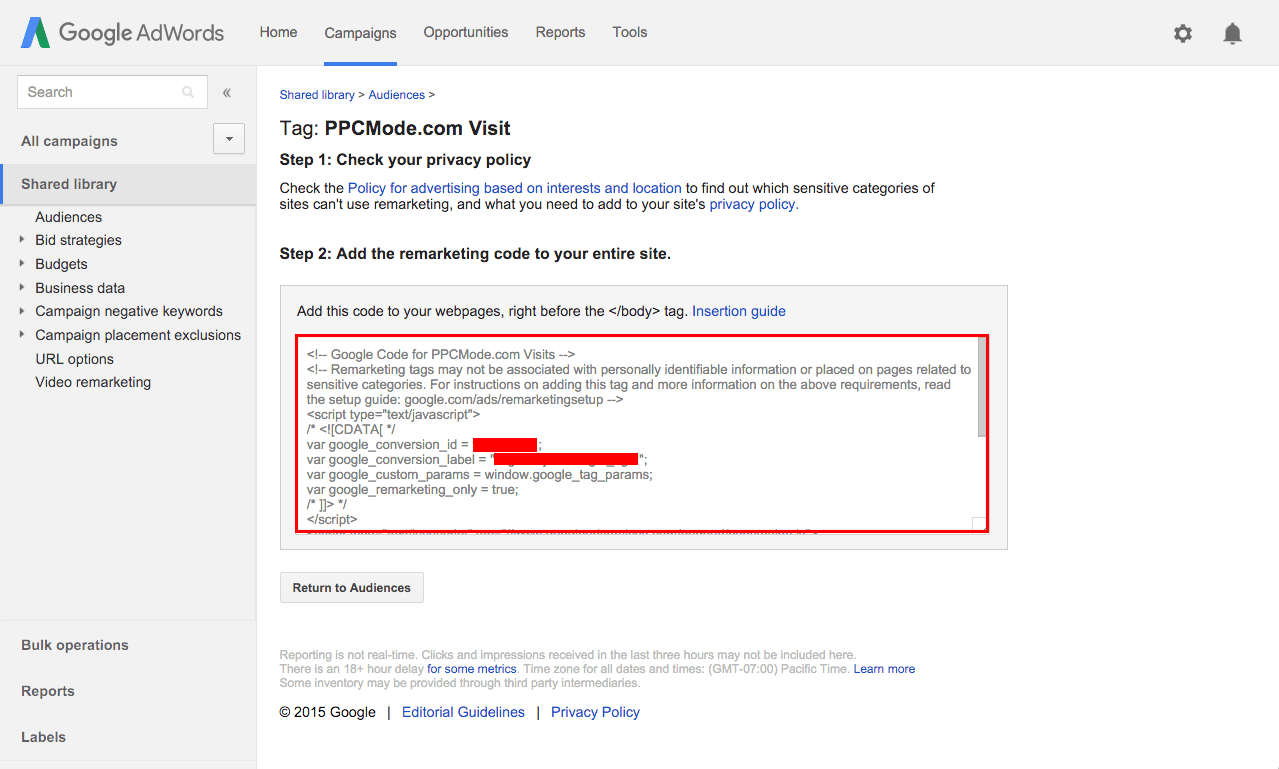
Once your pixel is placed on your website, your list will start to grow.

Setting Up Facebook Ads Retargeting
To use Facebooks retargeting known as Audiences, you must have a Facebook Ads account.
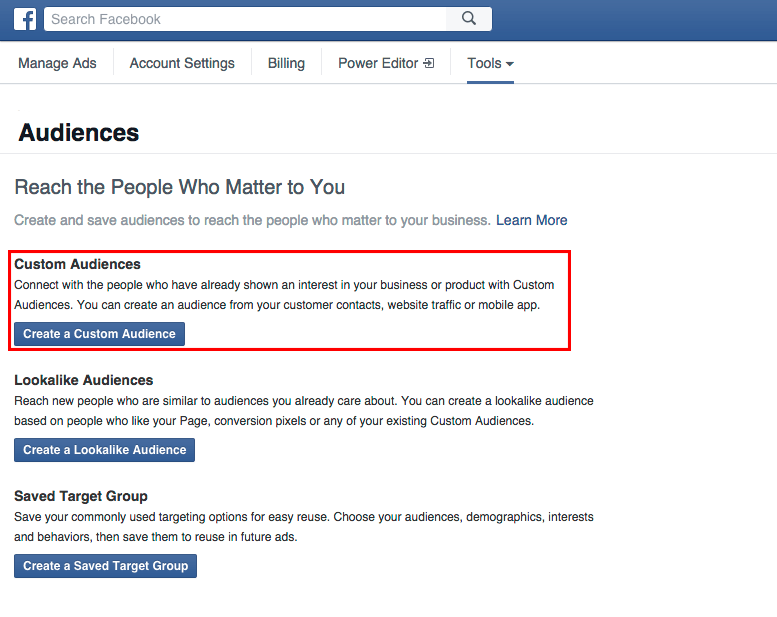
Once logged into your Facebook Ads account go to the Tools > Audiences tab in the main menu.
- Click on Create Audience
You then see three options:
- Custom Audience - Allows you to make retargeting
- Lookalike Audience - Once you have a retargeting list, this allows you to create a new audience based on the demographics from your custom audience. (A really badass feature)
- Saved Audience - Lets you create an audience based on Facebook targeting, similar to when you setup a Facebook Ad
For now select Custom Audience. (2)
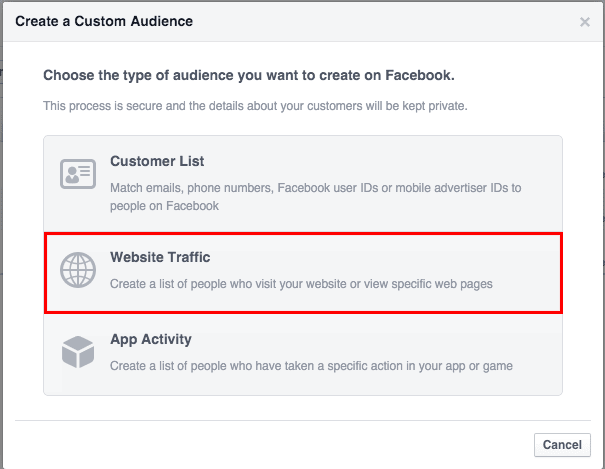
We are now given three new options:
- Customer List - Allows us to upload a list of emails or phone numbers and Facebook then attempts to match their data & build your list.
- Website Traffic - Create a list of people based on if they've visited our website.
- App Activity - Create a list based on who's used your app or game.
Go ahead and click on Website Traffic.
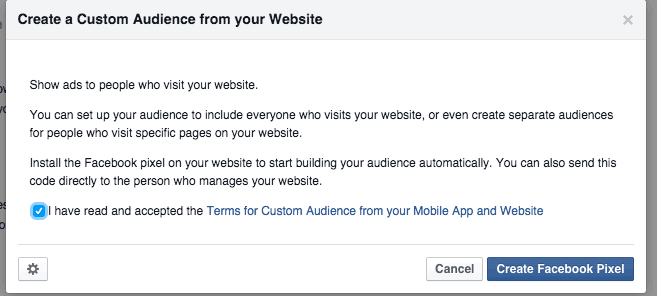
If it's your first time creating a pixel on Facebook, it'll require you to accept their TOS.
After accepting the TOS click on Create Facebook Pixel.
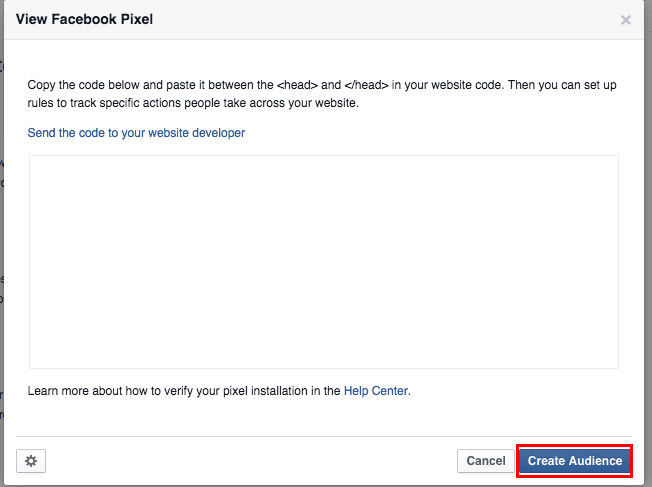
Now you have created your Facebook Pixel, be sure to place this code any landing pages or websites you want the pixel to fire.
Once you've saved your Facebook pixel, click Create Audience.
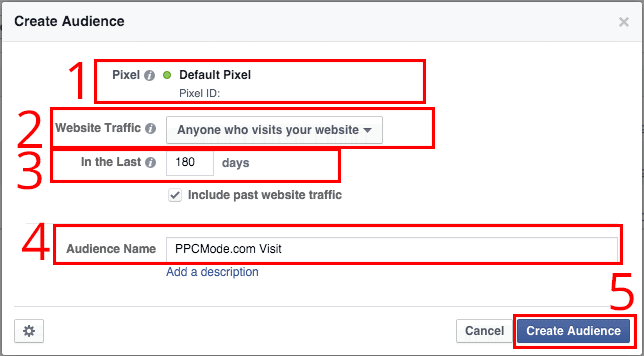
Now we're able to add the settings for our new Audience:
- If your pixel is live on your site & working properly it should show as green. If you're seeing a red circle be sure to double check that your pixel has been setup properly.
- You can leave this as the default option Anyone who visits your website.
- I keep this to 180 days which is the max Facebook allows for people to stay on your list.
- Name your audience, this is only for you to see.
- Once you've set everything up click on Create Audience
Ready to put this into action?
Start your free journey today — no credit card required.
That's it! You've created your first Facebook audience.
![]()
Setting Up Twitter Ads Retargeting
To build a Twitter Retargeting Audience, you'll need a Twitter Ads account.
Once logged into your Twitter Ads account go to the Tools > Audience Manager tab in the main menu.
Click on Create new audience and a new drop down will appear.
- Upload your own list - Allows you to upload your own list of emails, phone numbers or Twitter user names.
- Make a tag to collect website visitors - Lets you build a list based on website visitors.
- Collect your mobile app users - Builds an audience based on who uses your app.
Click on Make a tag to collect website visitors.

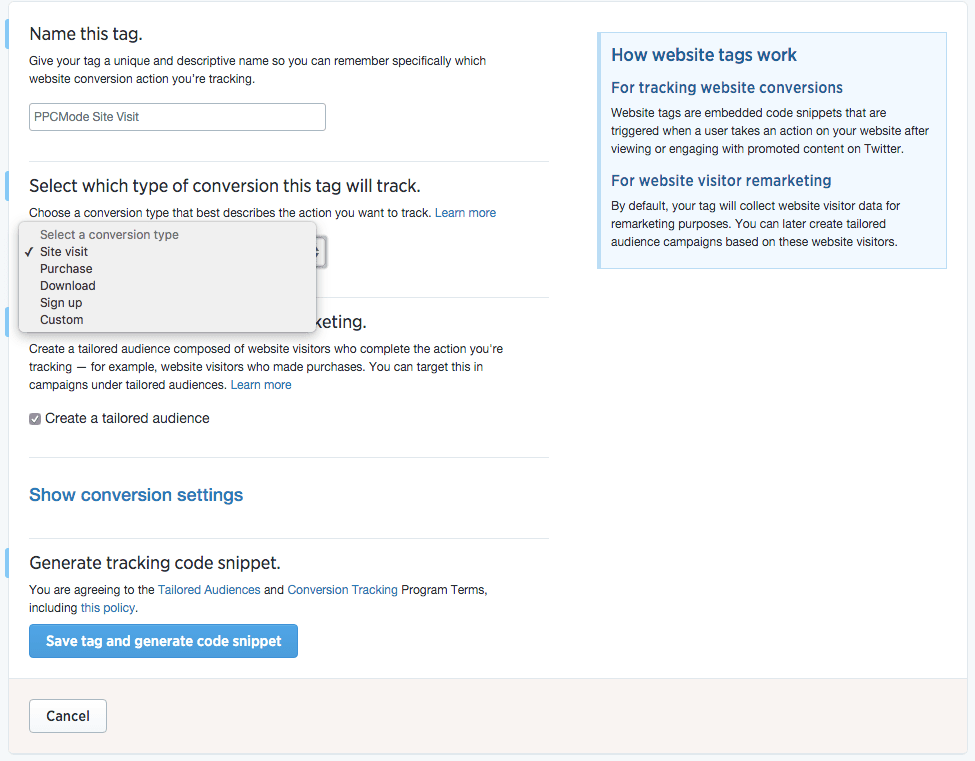
First off name your tag and be sure to make it descriptive.
Next select the type of conversion tag you want.
There are a few options:
- Site Visit - User visits a landing page on your site
- Purchase - User completes a purchase of a product or service on the your site
- Download - User downloads a file, such as a white paper or software package, from the your site
- Sign up - User signs up for the your service, newsletter, or email communication
- Custom - Allows you to make custom actions
In this example we'll be uses Site Visit.
Leave all other settings as default and click Save tag and generate code snippet
Now you have created your Twitter Pixel, be sure to place this code any landing pages or websites you want the pixel to fire.

Now your pixel will start tracking and building your Twitter audience!
Retargeting Burn CodeNow that you setup your first pixel and are collecting all visitors that have at least seen your site. It's important to setup pixels for any action a user can take on your site.
For example if someone visits PPCMode and doesn't download my PPC Checklist or join my email list, I can retargeting them and invite them to download it.
However, if someone does download my PPC Checklist it doesn't make much sense to advertise to them to download it again does it?
Instead, it would make much more sense to advertise to them my PPC Course or PPC Coaching calls.
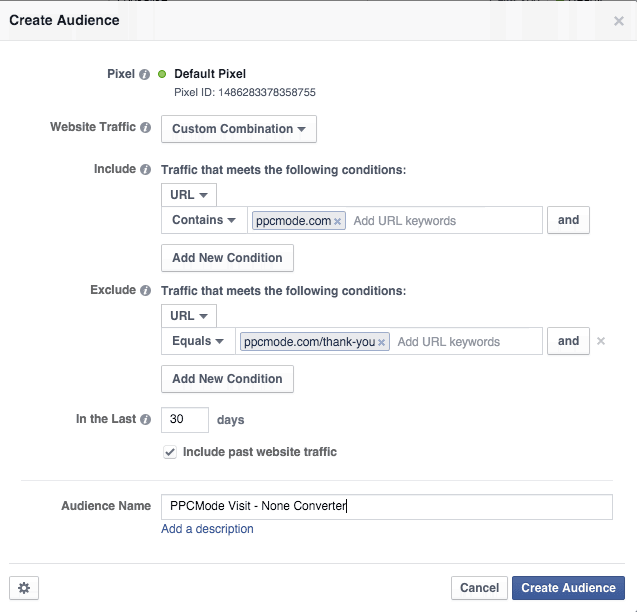
So to fix this we must build multiple lists based on the following criteria:
- All Site Visitors
- Downloaded PPC Checklist
- Coaching Call Clients
- Purchased PPC Course
We then setup conditional lists for example:
None Converting Visitors -
Would be a list of All Site Vistors but removing anyone who subscribed or made a purchase.
Course Purchase None Coaching -
Another list would be anyone that purchased my course but has yet to done a coaching call.
This list would be created by taking everyone in our course purchased list and not in our coaching client list.
By doing this, I could make a very custom tailor campaign inviting them to have a discounted call because they took my course.
Ad Preview:
Or better yet has a remarketing list for each module of the course.
So based on what section of the course they were on, I could make a custom creative/funnel to help them along.
Setting Up Custom Lists In Adwords
There are a few ways to setup these types of lists in Adwords.
Personally I like to setup custom combination lists as I feel it gives me more control.
If you have any questions about Custom Lists, leave a comment below with your question, and I'll add the answer to the post.
Here is a basic example of a custom list in Adwords.

To setup that same list in Facebook your custom audience would look like this:
At this point, you should already have an Adwords account and an Adwords remarketing list.
We will be setting up a Display Network Remarketing campaign.
First name your campaign and select your marketing objective.
In this example, I simply selected Visit your website.

Select which locations you want. I selected the United States, but if you want you can select all countries as your list may not be country specific.
Choose which languages you would like to target - I choose English since that is the only language my site is in.
Finally, select your daily budget that I set to $10/day.

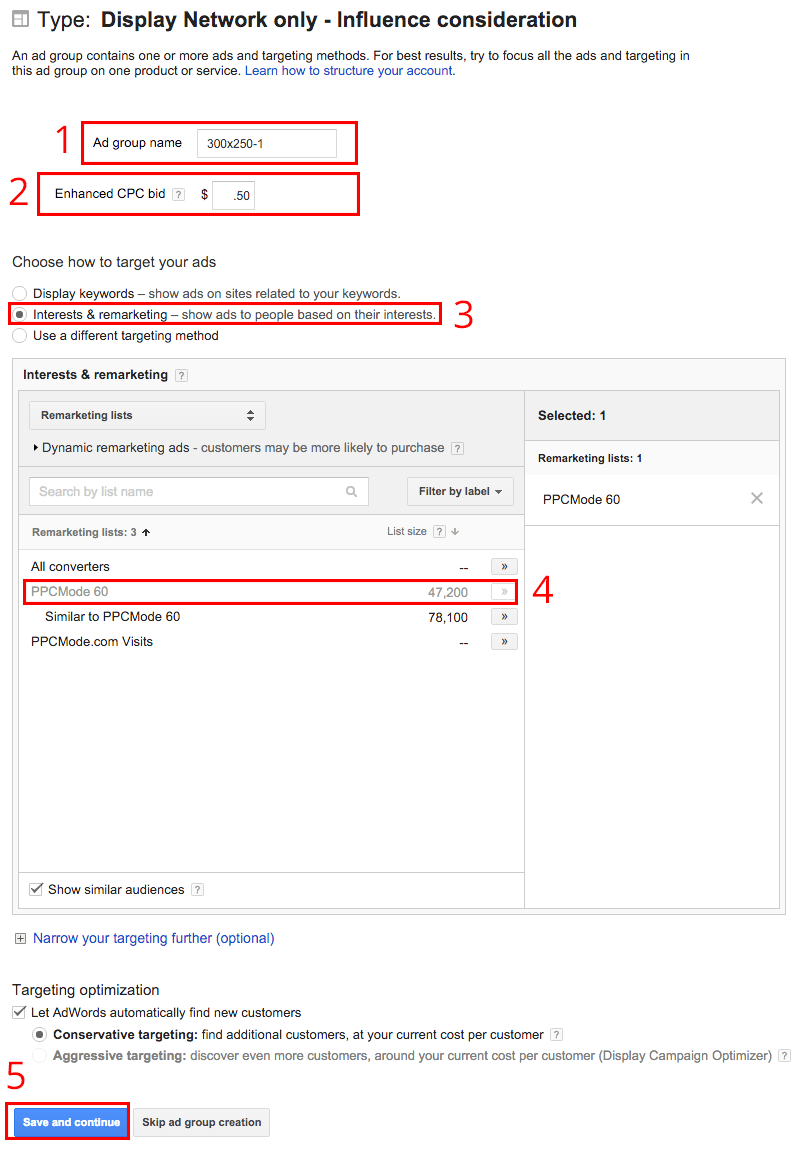
Now we need to setup our first Ad Group.
- Name the adgroup - I usually simply put the adsize and creative number.
- Select your desired CPC
- Under targeting choose Interests & Remarketing
- Choose which remarketing list you want to use for that adgroup.
- Click Save & Continue once complete.
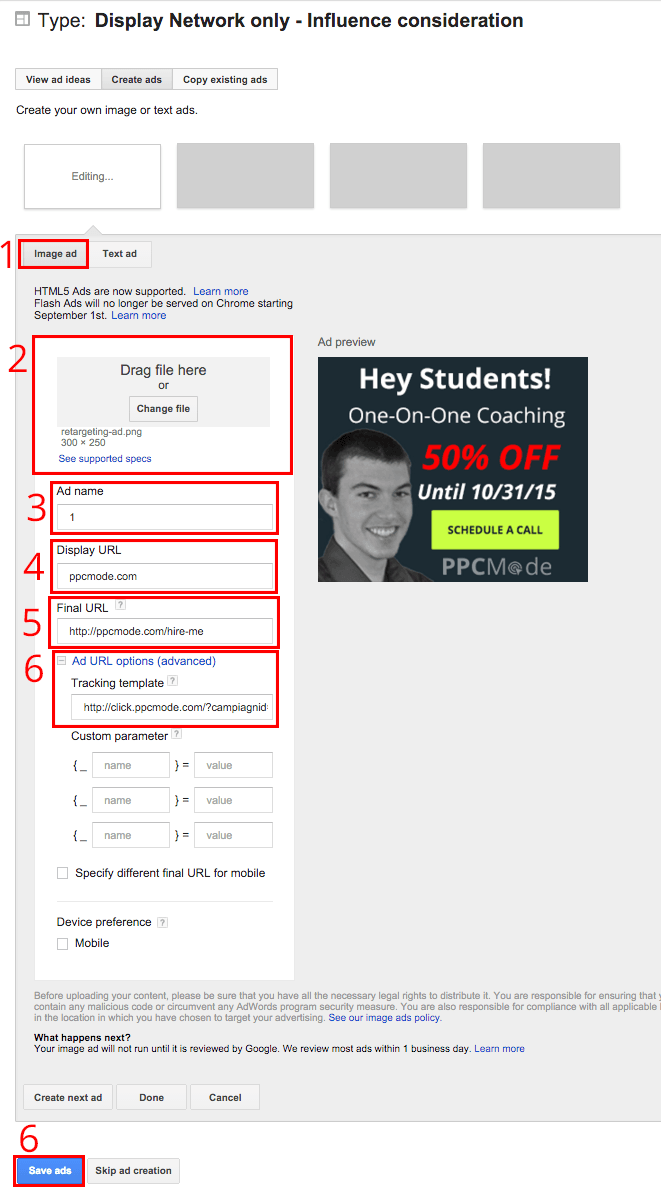
Next you'll want to setup your ad.
In this example, we'll be using the 300x250 ad shown earlier.
- Select image ad to show the options for image based ads.
- Upload your ad creative
- Name your ad
- Enter your root domain for your display URL. This isn't shown on images ads but is required.
- The final URL is the page the user will be brought too.
- I personally always use a front end tracker and if you are also be sure to add it to the tracking template.
- Save your ads
Repeat the above steps if you if you need to ad more ad-groups or creatives.
Once complete your campaign is setup!
*Pro Tip - Don't add any other targeting to remarketing campaigns. The other targeting will take priority and your ads will show to anyone who matches the other targeting settings.
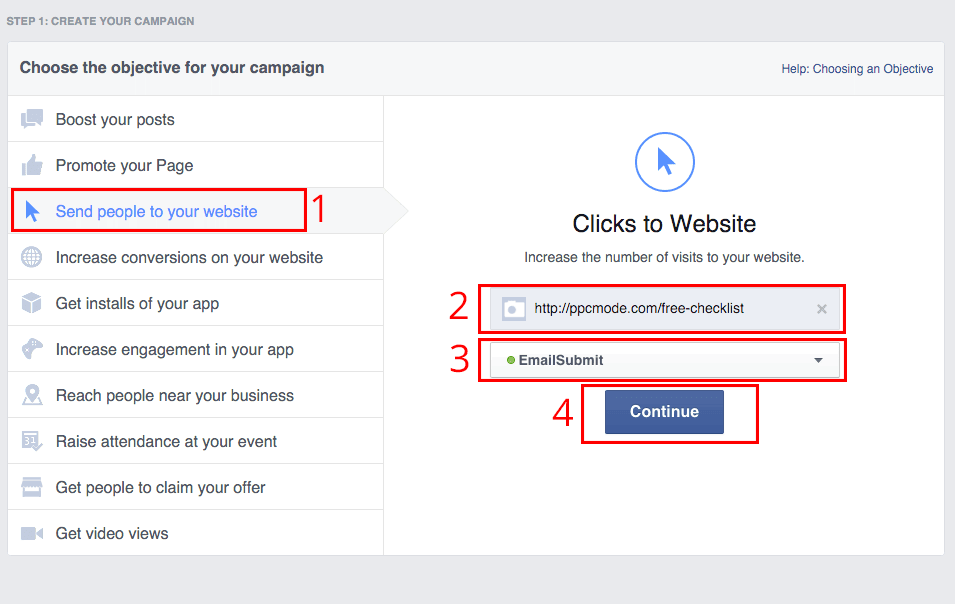
Setting A Facebook Remarketing CampaignAfter you've grown your Facebook audience large enough, it's time to create a campaign.
Once you've logged into your Facebook ads, account click on Create Ads.
- Select your marketing objective, in this example we're simply driving people to our website.
- Enter in the URL where you want to send the visitors - be sure to add your tracking URL if you're using one.
- Select which conversion pixel you're using with the campaign.
- Click Continue once complete.
Next we will create our ad and select our targeting options for this ad group.
- Click on custom audiences it'll open a drop down of all of your retargeting lists.
- Select your list that you want your ads to show too
Personally that is the only targeting I select on my ads.

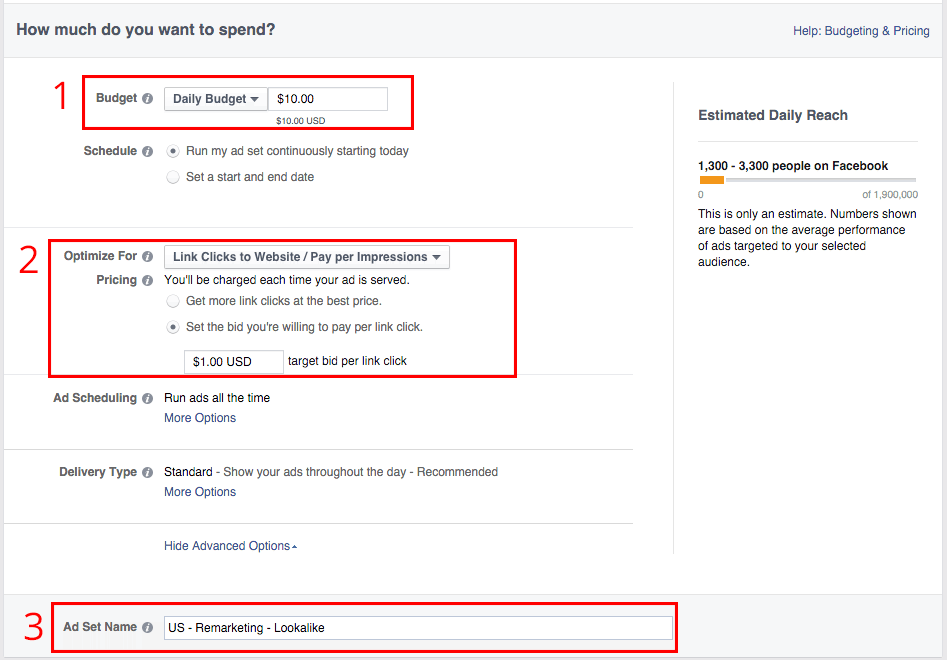
Now we will select our budgets and bids.
- Select how much you want to spend daily or for the entire campaign.
- Choose how you would like to optimize the campaign and how you would like to bid.
- Name your ad set.
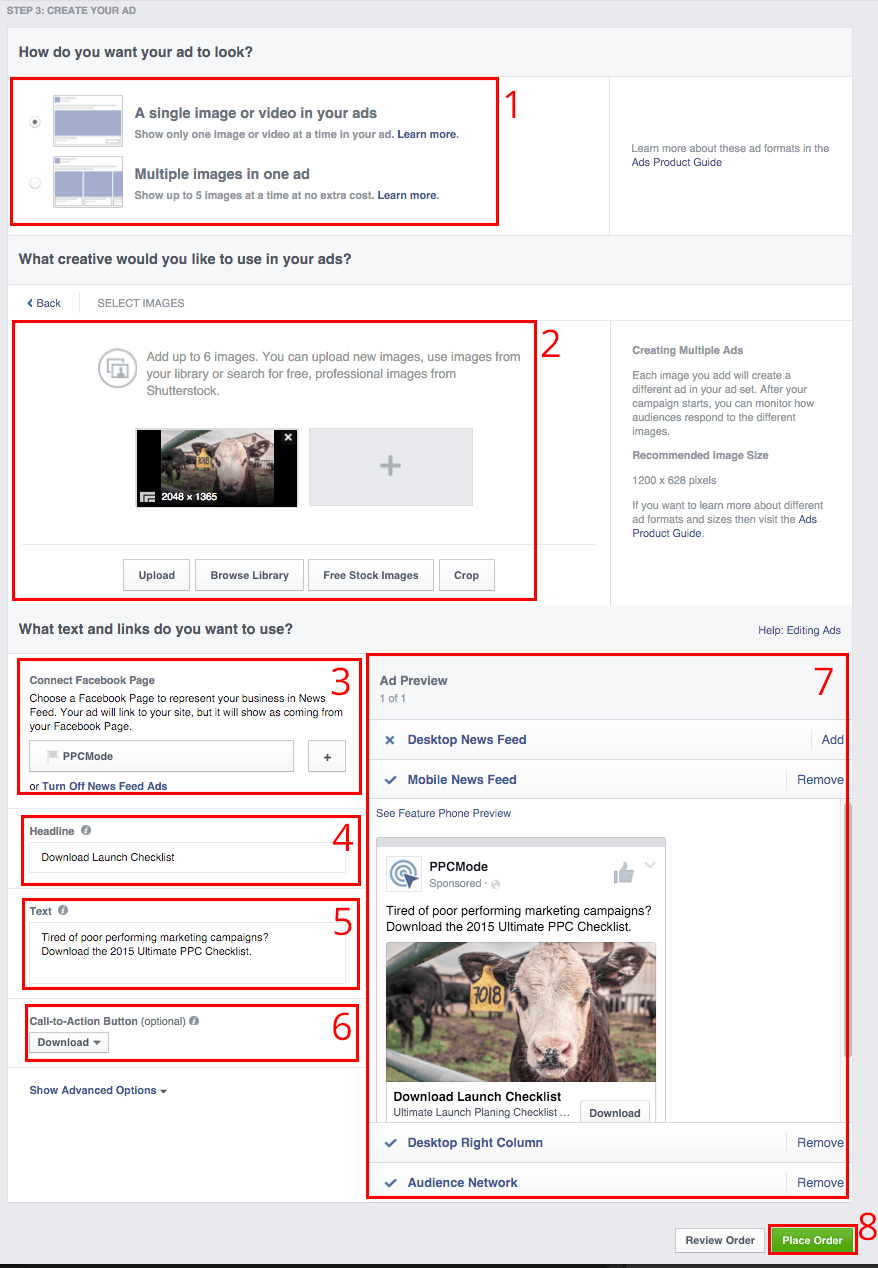
Finally, we'll want to create our actual ad.
- Select if you want to create one ad image or multiple - most cases I only use a single image.
- Choose which creatives you'll use be using in your ad.
- Select which Facebook page these ads will be Sponsored from.
- Write your ad headline keep it to 25 characters.
- Write your ad text that is shown above the ads.
- Choose your CTA button, it's optional but usually a good idea to select it.
- In the ad preview, you can add or remove which types of ads you'll be running.
- Place your order and complete your campaign.
You've successfully setup a Facebook Retargeting campaign!
Don't Forget Frequency CapsSince it's very likely with retargeting campaigns that your ads will be shown to the same user multiple times.
This is due to your ads being shown on sites they're visiting regardless of the type of site.
For example if you went to my site that is about PPC, and then you went to a site about gardening, you would still be shown my ad, because you're now on my list.
However, if you started to see my ad multiple times on every site you visited, it would most likely have a negative impact on what you thought of my brand.

Because of this it's very important to set frequency caps on your campaigns. Usually I'll set my frequency capping to 2-3 impressions per 24 hours. Or have a custom list that only targets that user for no more than a week, to not burn them out on my offerings.
[Tweet "Be sure to use frequency caps when running retargeting campaigns to not burn out your audience."]
Ninja Retargeting CodesTimer before your pixel
As promised at the beginning of this post here is a way to increase your retargeting ROI even further!
If you simply setup a retargeting pixel on your entire site, it will add everyone who visits your site. The only problem is not everyone who visits your site is a quality visitor.
For example, someone that spends 4-5 minutes on your site is much more interested in your content than someone who only visited for a few seconds. However, both of them are added to your list regardless of time on site.
But
With a little bit of jQuery, we can put all of our retargeting pixels on a timer. So they won't fire until someone has been on our site for a set amount of time.
Google Adwords Retargeting Code After 60 Seconds
The code below won't fire your Google Adwords pixel until after the user has been on your site for 60 seconds.
Simply replace YOURID with the correct ID found in your Adwords retargeting pixel.
[sourcecode] <script src="http://code.jquery.com/jquery-1.11.2.min.js"></script> <script> function Inject() { $('body').append("<img height='1' width='1' style='border-style:none;' alt='' src="https://googleads.g.doubleclick.net/pagead/viewthroughconversion/YOURID/?value=0&guid=ON&script=0"></script> <script> function Inject() { $('body').append("<img height='1' width='1' alt='' style='display:none' src='https://www.facebook.com/tr?id=YOURID&ev=PixelInitialized' />"); } // run script after 60 sec. window.setTimeout(Inject, 60000); </script> [/sourcecode]
Finally here is a code example with Adwords, Facebook & Twitter remarketing pixels all firing after the user has been on your site for 60 seconds.
[sourcecode] <script src="http://code.jquery.com/jquery-1.11.2.min.js"></script> <script> function Inject() { $('body').append("<img height='1' width='1' alt='' style='display:none' src='https://www.facebook.com/tr?id=YOURID&ev=PixelInitialized' /><img height='1' width='1' style='border-style:none;' alt='' src="https://googleads.g.doubleclick.net/pagead/viewthroughconversion/YOURID/?value=0&guid=ON&script=0" />"); } // run script after 60 sec. window.setTimeout(Inject, 60000); </script> [/sourcecode]Firing Retargeting Code Only To iPhone Users
Another way to modify your audiences with code is to remarket to them based on device.
Now you ask why would you want to do this?
Well, if you knew the user had an iPhone you could remarket to them to download your iOS app.
While Android users even while on desktop go remarketed to download your Android app.
[sourcecode] <script src="http://code.jquery.com/jquery-1.11.2.min.js"></script> <script> var isiPhone = /iphone/i.test(navigator.userAgent.toLowerCase()); if (isiPhone) { function Inject() { $('body').append("<img height='1' width='1' alt='' style='display:none' src="https://www.facebook.com/tr?id=YOURID&ev=PixelInitialized" /><img height='1' width='1' style='border-style:none;' alt='' src='//googleads.g.doubleclick.net/pagead/viewthroughconversion/YOURID/?value=0&guid=ON&script=0'/><img height='1' width='1' style='display:none;' alt='' src="https://t.co/i/adsct?txn_id=YOURID&tw_sale_amount=0&tw_order_quantity=0" />"); } window.setTimeout(Inject, 60000); // run script after 60 sec. } </script> [/sourcecode]
Retargeting is a great way to recapture otherwise lost visitors.
With 10x higher click-through rates and are 70% more likely to turn into a conversion, it's a retargeting is a no brainer.
- Be sure to segment your lists as much as possible
- Use old school marketing tactics such as urgency, scarcity & social proof
- Reach your audience across multiple channels - Social, Display, etc
- Upsell & Cross-sell with the use of retargeting
Please leave any questions or thoughts in the comments below.
Have a kick ass way to use retargeting? I'd love to hear about it!
If you found this post useful please share it! Takes a long time to make in-depth posts like these.
Share this insight
This conversation is happening inside the community.
Join free to continue it.The Internet Changed. Now It Is Time to Build Differently.
If this article resonated, the next step is learning how to apply it. Inside Wealthy Affiliate, we break this down into practical steps you can use to build a real online business.
No credit card. Instant access.