How to Take Screenshots on Apple Devices


Published on June 12, 2015
Published on Wealthy Affiliate — a platform for building real online businesses with modern training and AI.
I saw a fantastic training by ninjazrb on How to Take a Professional Screenshot. https://my.wealthyaffiliate.com/training/how-to-take-professional-screenshots He only described how to take one on a Windows 7 or 8, which will probably cover most computer users. But what about us Apple people with our iPads and our iPhones and our Macbooks? We don't have an easy "Print Screen" shortcut key like Windows people do. There are multiple ways to do this, but I'll tell you about the easiest ways to get what you want, and only what you want, in your screenshots.
Let me show you how to take Apple screenshots!

For Mac OSX (laptops and desktops):
1. Hit Command (⌘) + Shift + 4. Make sure you hold down ⌘ and Shift until you hit the 4, then release all at once.
2. Your cursor will turn into crosshairs. If it doesn't do this, don't worry, and do the ⌘+Shift+4 again.
Ready to put this into action?
Start your free journey today — no credit card required.
3. The crosshairs mean that you're going to be making a selection of what you want to screenshot. Imagine the square or rectangle that you want made into an image, bring your mouse to one corner of that rectangle, and drag across. It's very similar to the "crop" function at WA. Make sure to keep the mouse "clicked" while you make your screenshot! Otherwise it will be cut off.
4. Your screenshot will automatically be saved to the Desktop as "Screenshot (time) . png." Done!
For iPhones and iPads:
1. Get what you want screenshotted up onto your screen, then press both the Power button and the Home button at the same time. The screen should flash and the device will make a shutter snapping sound (if you have the sound on, of course). This image will be everything that your screen showed at the time.
2. The screenshot will be in your Photos > Camera Roll. If you'd like to crop unwanted bits out of the edges, hit "Edit" on the top right. You'll go into the Photo Editor.
3. On the bottom left, next to "Cancel," should be an image of two right angles overlapping.
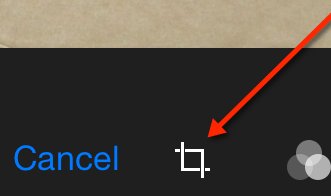
4. You'll see your image with a compass-type thing unerneath it. DON'T TOUCH THAT. You'll also see your image framed with bolded corners, similar to the button you pressed to get here. You can drag each of those corners inwards to crop the image. After a second, the image will automatically be cropped, and you can keep cropping it from there.
5. If you make a mistake and you cropped something that you still wanted, you can use the "Revert" or "Reset" button (you'll only have one, depending on how recent your phone/Pad is) to start over again. Be gentle so you don't have to keep starting over!
6. When you're ready, hit "Done."
Thanks for reading! Let me know if you have any questions in the comments!
Share this insight
This conversation is happening inside the community.
Join free to continue it.The Internet Changed. Now It Is Time to Build Differently.
If this article resonated, the next step is learning how to apply it. Inside Wealthy Affiliate, we break this down into practical steps you can use to build a real online business.
No credit card. Instant access.