Tips for Starter Members


Published on March 29, 2014
Published on Wealthy Affiliate — a platform for building real online businesses with modern training and AI.
Hello my fellow starter members!
Right, so as of the date of this blog, I've only been a member of WA for going on 5 days. However, I've really immersed myself in the journey of starting my own website and building up towards legitimate business potential. In the process, I've discovered a few things that might be tremendously helpful to you along the way. I'm certain this information is easily accessible as a premium member, but if you're like me, you simply can't afford to upgrade right now.
Hopefully I can save some of you a lot of extra time and energy tracking down this information, but please understand that I'm entirely new at this myself so am by no means claiming expertise. I'm sure there are various opinions out there, but this is what's helped me go from being entirely unranked in Google, to having all 3 of my keyword targeted posts moving up in the rankings to pages 4, 6, and 7 in one day's worth of work.
Now let's get on with those tips.
Here's what I'm going to cover in this post:
- Menus and how to link pages and posts
- How to use keywords in your content
- Using Tags to avoid 404 Page Not Found
- Google Webmaster Tools and getting ranked
Menus and how to link pages and posts
Before you get to creating content, my suggestion is that you think about how you want your site to function or you'll end up creating, deleting, moving, restarting, rinse and repeat until you make sense of it like me haha! Do you want most of your content to operate like a blog roll (e.g. the posts you make appear in chronological order on your home page)? Or do you want it all to be static? The answers to those questions are going to help you decide whether you want something to be a post or a page.
Obviously you don't need to envision the entirety of your site from the beginning, because it should always be a fluid, organic, ongoing project. That said, you should take a bit of time to consider at least the initial framework of what you want to build and the first few items of content you want to include. Based upon my research, I decided that it was best to build a site that incorporated both a blog roll style of posts and several pages.
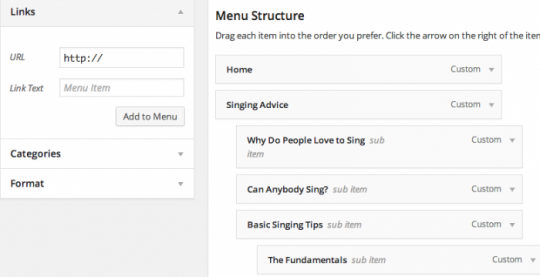
Once you've got a framework in mind, you should think about what belongs in drop down menus, and here I'm going to show you how to make those work with pages and posts, using my site as an example: UPDATE for new site! Singing Serenity.
Now if you mouse over the "Singing Advice" menu item, you'll get a drop down menu. Notice that you can't click on Singing Advice itself to get anywhere. Only the items in the drop down are linked items. If you scroll down that submenu to "Basic Singing Tips" you'll see that operates much the same way. You can't click on that title, but mousing over it gives you yet another submenu, which at the moment only contains "The Fundamentals."
You're probably cursing me to get on with it already (I'm long-winded *sigh* I know haha!), so here we go:
Creating a Non-Clickable Menu Title
- On your Wordpress dashboard side bar go to Appearance => Menus.
- On the left side you should see Pages, Links, Categories, Format and on the right side you should see Menu Structure (if, unlike me, you have more than one menu available for your theme, be sure to choose the main menu).
- Click the drop down arrow for Links on the left side. This is where you create your version of my non-clickable "Singing Advice."
- Put any random link in the URL box, we're going to be deleting it in a minute.
- Put your desired name for the menu item in the Link Text box.
- Click Add to Menu.
- Look on the right side now at the bottom of the Menu Structure list of items. Your new menu item should appear there. Click the drop down arrow for it and simply delete the URL. That's how you make it no clicky!
- Drag the menu item to where it should appear in your main menu on your site. For example, Singing Advice is placed right below Home, so it appears as the second item along the top of my site.
- Now click Save Menu, and voila!
Creating the Sub-Menu Items
Right, so now you've written some content and want to add it to your menu. The process for linking a post into a menu on your site is identical and most of it is the same as we've already done above.
Ready to put this into action?
Start your free journey today — no credit card required.
- Grab the URL for your specific post.
- Repeat steps 1-6 from above, except use the URL you grabbed for Step 1 here.
- Again, it will appear at the bottom of your Menu Structure list.
- Drag the menu item just as before, but this time drag it under the menu item you created above and to the right, as if indenting it under the main item.
- If dropped correctly it should appear indented and say "sub item" next to the title.
- Save Menu again, and hurray, you've got submenus!
Here's a screenshot just in case:
Rinse and repeat this process to create as many menus and submenus as you want!
If you're adding a page to a menu, rather than a post, it's even simpler. Just look above the links drop-down to the pages list on the left. Check off the page you want to add to the menu (if it's not already there), and add it. Then just follow the same drag and drop method as described above!
How to use keywords in your content
If you've completed the Getting Started training, you've got at least one list of keywords from Jaaxy ready to go, but have no idea how to incorporate them into your content. I was very anxious to start the meat and potatoes of my site, so I got to asking around (make FULL use of that live chat feature for those first 7 days you've got it).
The general answer is pick one of your keywords for a post or page. Use that keyword in the title, once or twice in the body (first paragraph I've heard a lot), and in an image name that you've added to the content. Make sure you put the keyword down below in your SEO section, along with the title and description. Additionally, use headings (available in the page/post formatting menu) or "h tags" (H1-H6) to highlight your keywords. So far, I've only utilized heading 1 and heading 2 (H1 & H2). If you're like me, and you have no clue what that is, here's a screen shot:
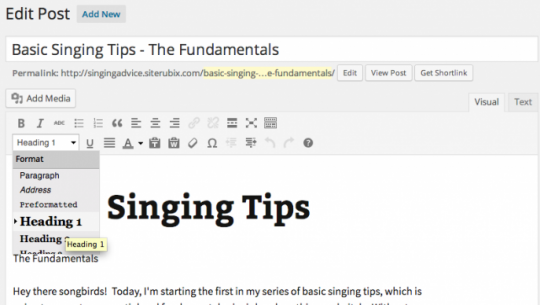
See that little drop down menu on the left there that says "Heading 1?" That's what you want to use. Take your title, particularly the keyword piece, drop it right at the start of your post, highlight it, then go to that drop down menu and select "Heading 1." Now, the default style is going to make that text GIGANTIC. Don't fret. Changing the default font size for your headings is easy peasy.
Steps to Changing to Heading Font Size
- On your Wordpress dashboard side bar, go to Appearance => Editor.
- Scroll all the way down the template links on the right side and select Stylesheet (style.css). BE VERY CAREFUL NOW. You don't want to break anything!
- In the body of the stylesheet, scroll down until you see the list of headers like this:
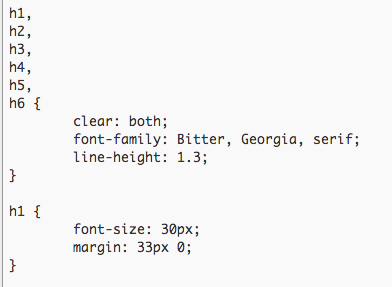
- The default font size for h1 is 48px. As you can see, I changed mine to 30px. Play around and see what size you like best.
Now if you have subheadings you can do that with in the body of your content, use h2. I'm sure H tag uses go far beyond this, but this is a darn fine start. Woohoo we're on our way!
Using Tags to Avoid 404 Page Not Found
Since we don't have access to the next levels of training as starter members, which covers content creation, we miss the memo on needing 2 tags for your page/post to actually appear where it belongs. I had to figure that out when much to my dismay my apparently published post came up with a 404 on direct link. Avoiding this is uber easy.
When you're creating or editing a post/page, scroll down the right side until you see the Tags box. Type whatever tag name you want to have in the box, Add, repeat one more time. Publish or Update. Done!
Google Webmaster Tools and Getting Ranked
Now this here was a crucial discovery for me. After my site content had been up for a day, I went to Google to see if the little spiders had found me yet. Alas, I was nowhere. Since I'm not the most patient person in the world and didn't want to wait longer only to still not see my site anywhere, I researched what to do.
Go here, sign up or sign in with an existing Google account.
http://www.google.com/webmasters/
Once you're in there, you can report your site to Google, have it fetch specific pages for indexing, and all sorts of other nifty stuff that I'm still learning. After I had Google fetch my home pages and 3 pieces of content, I started seeing it rank and move up to boot! By the way, I've read submitting a sitemap to through webmaster helps as well, but I haven't gotten that far just yet.
Phew, I hope I didn't bore you to tears here, but more importantly, I really hope this was useful to you!
Cheers,
Jen
Share this insight
This conversation is happening inside the community.
Join free to continue it.The Internet Changed. Now It Is Time to Build Differently.
If this article resonated, the next step is learning how to apply it. Inside Wealthy Affiliate, we break this down into practical steps you can use to build a real online business.
No credit card. Instant access.