How to Install "Snipping Tool" onto Your Taskbar

18
43
915 followers

Yesterday David (boucherda) posted a blog with the title “Snip it”. There he showed us how to use a small but very useful program called “Snipping Tool”.

https://my.wealthyaffiliate.com/boucherda/blog/snip-it/

To get to this tool he used the Windows search function. Now, I am sure you will use this tool frequently once you get to know its usefulness. To use the Windows search function every time you want to snipe something becomes laborious over time.

Therefore, I asked David, if he would allow me to blog on how to install this small tool onto your taskbar, which he kindly allowed me to do.

Now, before we install the Snipping Tool onto our taskbar, we need to make sure our taskbar is not locked. For this right click on your taskbar and on the appearing popup untick “Lock the taskbar”.


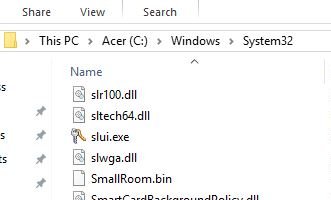
Then go and open your Windows Explorer (not the Internet Explorer) and move to “C: > Windows > System32 (see below).


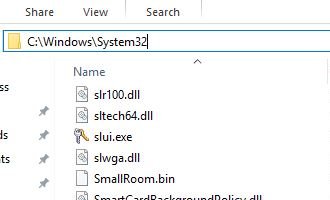
If you have problems finding System32, you may enter “C:\Windows\System32” into the address bar (see below).


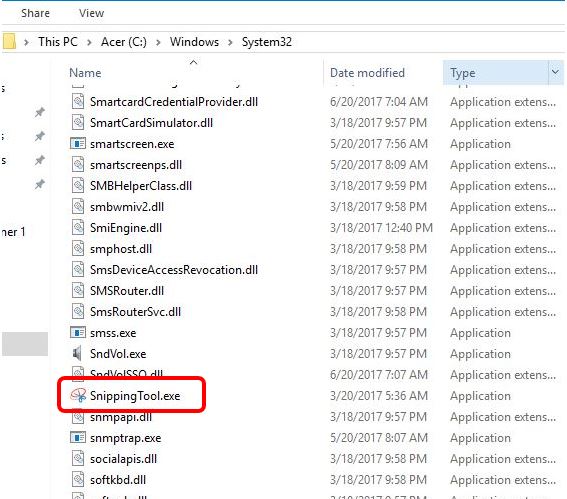
Once you are inside System32 scroll down till you find “SnippingTool.exe”. It is imperative that you find it by scrolling down. Any other way to find it will not let us attach it to the taskbar.


Once you found it, right click on it and a popup will appear (see below).
Click on “Pin to taskbar”.


And the Snipping Tool gets installed instantly to your taskbar (see below).


Now Snipping Tool is ready for use! Don’t forget to lock back the taskbar. Otherwise you might by accidently remove one of your program shortcuts.

I hope you had no problems following my explanations. Should you encounter any problems, please let me. Send me a PM and I will help you solve the problem.

18
43

Join FREE & Launch Your Business!

Exclusive Bonus - Offer Ends at Midnight Today

00

Hours

:

00

Minutes

:

00

Seconds

2,000 AI Credits Worth $10 USD

Build a Logo + Website That Attracts Customers

400 Credits

Discover Hot Niches with AI Market Research

100 Credits

Create SEO Content That Ranks & Converts

800 Credits

Find Affiliate Offers Up to $500/Sale

10 Credits

Access a Community of 2.9M+ Members

By continuing, you agree to our Terms of Service and Privacy Policy
No credit card required

Recent Comments

43

Hi Eric, a really good post. I use the tool a lot. Irv.

1

Hope my short explanation is useful to you!
Thanks for dropping by, Irv!

1

Great information. I will bookmark your tutorial for future reference Eric. Thank you

1

My pleasure, Paul! I'm sure you will like the snip tool.
Thanks for commenting!

Thank you very much

1

You're welcome, Pablo!
Thanks for passing by!

1

Excellent tutorial Eric. I bookmarked it!

1

My pleasure, Kaju! You will love that little tool!
Thanks for dropping by!

1

This was perfect! Thank you!! I have used the Snip tool before but didn't know how to add it to my taskbar. I just followed your steps and did it.

Jessica

1

Glad it worked! It's definitely more easy to use it this way.
Thanks for stopping by, Jessica!

Thanks for the information.

1

My pleasure, Chukuemeka!
Thanks for dropping by!

Awesome! That's a nice one, I will see to it first thing in the morning!

1

It's a nice little tool. I use it all the time. I don't understand, why Microsoft is not placing it more visible for everybody.
Thanks for stopping by, Loes!

1

I have a snipping tool in the toolbar now, but not as you did it, I added an extension

1

With some programs you can do it that way too. I don't know why it doesn't work with all programs. There are even programs which can't be added to the taskbar at all. That drove me several times almost crazy. Windows works in mysterious ways. :)

1

They sure do;)

1

Excellent!! I am glad I wrote the initial blog, otherwise I wouldn't have found out about this short cut. Thanks

1

I have to thank you. You gave me the idea of this post. Hope it will simplify your use of the snipping tool.
Thanks David for commenting!

1

Eric, Thank you! Very indebt. Bookmarked!

1

You're welcome, Louisa. Hope you can use it!
Thanks for stopping by!

Great Eric. Looks like you have to go into the core kernel to get it!

1

I don't know why Microsoft doesn't place this kind of tools in a more secure place. I normally wouldn't suggest to people to go to the system directory.
Thanks for commenting, Mike!

1

See more comments

Join FREE & Launch Your Business!

Exclusive Bonus - Offer Ends at Midnight Today

00

Hours

:

00

Minutes

:

00

Seconds

2,000 AI Credits Worth $10 USD

Build a Logo + Website That Attracts Customers

400 Credits

Discover Hot Niches with AI Market Research

100 Credits

Create SEO Content That Ranks & Converts

800 Credits

Find Affiliate Offers Up to $500/Sale

10 Credits

Access a Community of 2.9M+ Members

By continuing, you agree to our Terms of Service and Privacy Policy
No credit card required

2.9M+

Members

190+

Countries Served

20+

Years Online

50K+

Success Stories

The world's most successful affiliate marketing training platform. Join 2.9M+ entrepreneurs building their online business with expert training, tools, and support.

© 2005-2025 Wealthy Affiliate
All rights reserved worldwide.

🔒 Trusted by Millions Worldwide

Since 2005, Wealthy Affiliate has been the go-to platform for entrepreneurs looking to build successful online businesses. With industry-leading security, 99.9% uptime, and a proven track record of success, you're in safe hands.