My 12-Step Blog Publishing Workflow (SEO, EEAT & AI Optimized)


Published on March 3, 2026
Published on Wealthy Affiliate — a platform for building real online businesses with modern training and AI.

After publishing hundreds of blog posts and testing countless tools, I’ve developed a streamlined system that makes publishing faster, more consistent, and SEO-optimized from day one.
This is my exact blog publishing protocol — from content creation and EEAT checks to schema markup and social distribution.
If you're a blogger, affiliate marketer, or content creator, this checklist will (I hope) help you build authority while staying efficient.
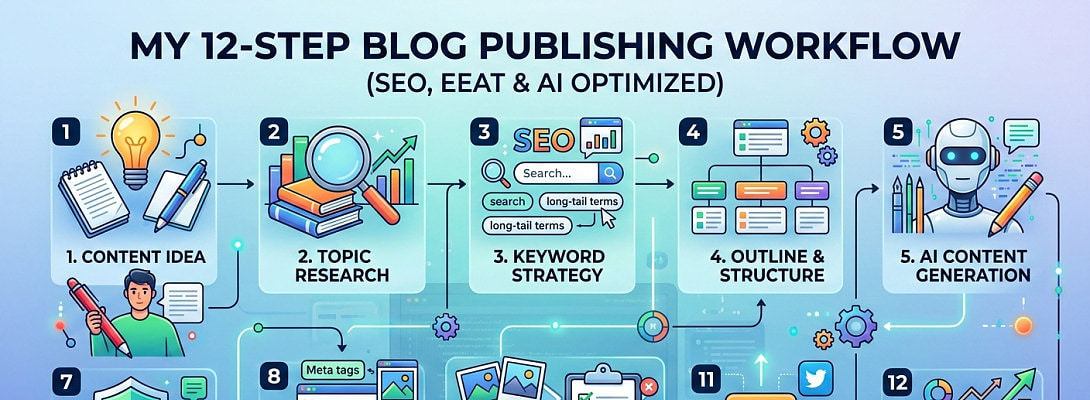
1. Decide on the Content
Content ideas now come naturally after years of blogging, but early on, I relied heavily on:
- Search intent research
- Keyword tools (Mostly Jaaxy)
- Google’s “People Also Ask”
- Questions from my audience
Once I decide on the topic:
- I write the post (sometimes with AI assistance).
- I edit everything manually.
- I structure the article into clean content blocks.
My Formatting Rule
I alternate background colours for sections (white/grey) to improve visual flow and readability. Each heading has its own clear section, making the content easy to skim.
Good formatting increases time on page — which supports SEO performance.
2. Add FAQs (Strategically)
FAQs serve two major purposes:
- Capture long-tail keywords
- Increase chances of rich results
I typically:
- Ask AI to generate relevant FAQs
- Cross-check with Google’s “People Also Ask”
- Add a “Related FAQs” section above the conclusion
I then insert the RankMath SEO FAQ block to ensure proper schema formatting.
This step alone has helped several posts earn expanded SERP visibility.
3. Add Images & Optimized Alt Text
Visual content improves engagement and reduces bounce rate.
My image process:
- Identify sections that would benefit from visual support.
- Create 500x500px images using Canva (Magic Media).
- Right-align certain images to sit alongside text where appropriate.
- Write descriptive alt text that naturally includes relevant keywords.
Sometimes I paste the full article into AI and ask for:
- Image suggestions by section
- Pre-written alt text
This saves time and keeps visuals aligned with the content theme.
Before uploading, I compress every image using TinyPNG to improve page speed.
4. Add Internal & External Links
Internal linking strengthens topical authority.
My approach:
- 1–2 relevant links per section
- Link to older related posts
- Add authority external sources where helpful
I sometimes use the Link Whisper plugin for suggestions, but I manually decide which links add real value.
I avoid over-linking — relevance always comes first.
5. Add Disclosure, Author Block & Reusable Blocks
Ready to put this into action?
Start your free journey today — no credit card required.
Trust matters.
On every post I include:
- Affiliate disclosure (if applicable)
- Author bio block
- Table of Contents
- Opt-in CTA blocks
I created custom reusable WordPress pattern blocks for these, so I can insert them instantly.
Consistency builds brand trust.
6. Perform SEO & EEAT Review
Before publishing, I do a final review focused on:
- Search intent alignment
- Keyword placement
- Headline clarity
- Internal linking depth
- Trust signals
- CTA positioning
Sometimes I paste the article into AI and ask for:
- SEO improvement suggestions
- EEAT strengthening ideas
- CTA placement optimization
This final review often increases clarity and conversion potential.
7. Add SEO Title & Meta Description
I either write these manually or refine them with AI.
Checklist:
- Primary keyword included
- Emotional trigger or benefit
- Under character limits
- Clear promise of value
Your meta title and description are your advertisement in search results — don’t rush this step.
8. Create the Featured Image (1200 x 630 px)
This is one of the last steps.
My process:
- Use Google Gemini to generate a 1200x630px featured image
- Provide:
- Blog post title
- Website name
- Note: be sure to select the “Banana” 🍌for Image generation.
After generating:
- Compress with TinyPNG
- Upload as featured image
Bonus: If the design works well, I ask Gemini to create a Pinterest version based on the same concept.

9. Add Schema Markup
I don’t add schema to every post — but I add it to 100% of product reviews.
After publishing:
- Run the URL through Google Rich Results Test.
- Fix any errors.
- Generate updated schema if needed.
- Add correct:
- Page URL
- Featured image URL
- Affiliate link (if required)
Schema improves search appearance and click-through rates.
10. Update Dates (For Older Posts)
If updating an existing post:
- Refresh the publish date
- Add new information
- Re-run SEO checks
- Improve internal linking
Content freshness can positively influence rankings.
11. Submit to Google Search Console
After publishing or updating:
- Request indexing in Search Console
- Monitor performance over time
This ensures Google crawls the page faster.
12. Distribute & Promote
Publishing is only half the job.
My distribution strategy:
- Share on X (Twitter) with featured image
- Share to Blogger & Flipboard
- Create 5–6 Pinterest pins (listicle-style designs perform well)
- Use AI to generate:
- Pin titles
- Descriptions
- Hashtags
- Alt text
I use a content scheduler (PaddyPost) for Facebook.
Future expansion plans include:
- Mastodon
- BlueSky
- Google My Business
Extra tip: Creating your own subreddit and automating posting via IFTTT can build long-term distribution assets.
Final Thoughts
Blogging doesn’t need to be complicated — but it does need to be systematic.
When you follow a repeatable workflow:
- Publishing becomes faster
- SEO becomes more consistent
- Authority builds over time
- Conversions improve naturally
This 12-step system is what works for me after years of trial and error.
If you have a publishing workflow of your own, I’d love to hear it.
Best regards,
Alex
Share this insight
This conversation is happening inside the community.
Join free to continue it.The Internet Changed. Now It Is Time to Build Differently.
If this article resonated, the next step is learning how to apply it. Inside Wealthy Affiliate, we break this down into practical steps you can use to build a real online business.
No credit card. Instant access.