HTML Attributes
Previously, much design was created directly via HTML. The design was accomplished with attributes in the corresponding HTML tags. Thus, for example, color, and alignment of text (left, right, center). This should be urgently refraining in the philosophy of HTML (also to avoid unnecessary work). The philosophy states that a separation between content structure and design should be made. HTML is responsible for the content and the structure and CSS to 100% for the design.
The good news is that by the separation of content (HTML) and design (CSS) you save yourself a lot of time learning HTML and CSS. It has become really easy. We have very few attributes.
Building attributes
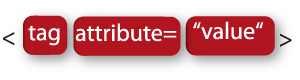
The attributes are built in two parts. First come the attribute name and then the attribute value. After the attribute name comes an equal sign and the attribute value is enclosed in quotation marks.
The closing tag is always without the attributes.
You can add more than one attribute to a tag, only separated by a space
The link attribute
As example I show you the construction of a link attribute. We start with a tag that needs always an attribute: <a> = anchor tag (link),
The attribute is href = hyper reference
The attribute value is the address were you want to be anchored (linked)
<a href=”address”> Text </a>
The address can be an internal or external link or a specific word(s) on the same page.
Internal link
You don’t need to write the whole URL address but only the page or post name with the first / (dash):
<a href=”/mypost/”> click here </a>
External link
Here you need to write down the whole URL:
<a href=”/http://website.com/thepost/”> click here </a>
To set an anchor link inside a page beside the link you must set the anchor place (word or sentence).
The anchor link to the anchor place "Chapter 2":
More information in <a href="#chapter2"> Chapter 2 </a>
The anchor place:
<a id="chapter2">Chapter 2<a/>
There are a lot of more attributes, but if you make your design with CSS, you probably don’t need those in WordPress.
If you want to learn more on HTML you can do it here: http://www.w3schools.com/html/
If you think that this tutorial is help- and useful, give me your comments. In the next tutorial I will treat CSS style codes.
Thank you for your attention.
Guy