How to add the google adsense verification code to your site!

113
629 followers

Hello and thank you for checking out my latest post!

First off we need to get some terminology straight when it comes to the adsense codes. When you first signup to adsense they say that you need to put some code in your page. In the head section after the <head> and before the </head> tag. This code is a one time thing that will be used to tell google adsense that the site is yours and to register the site with adsense.

The verification code is a one time thing. It IS NOT the ad code that you will use later on and it looks something like this...

GOOGLE ADSENSE VERIFICATION CODE

<script async src="//pagead2.googlesyndication.com/pagead/js/adsbygoogle.js"></script>
<script>
(adsbygoogle = window.adsbygoogle || []).push({
google_ad_client: "ca-pub-xxxxxxxxxxxxxxxxxx",
enable_page_level_ads: true
});
</script>

This is the code that needs to be inserted between the <head> and </head> tags of your site. There are about 2 different ways of doing this that I will discuss as I think these are the easiest ways. I have instructed people on how to actually manually alter their header file using FTP but that may have been a bit hard for some people to understand. The ways described below are a lot easier.

Method #1


Go to your wordpress dashboard and click appearance->editor, this will open a page that may look like this.

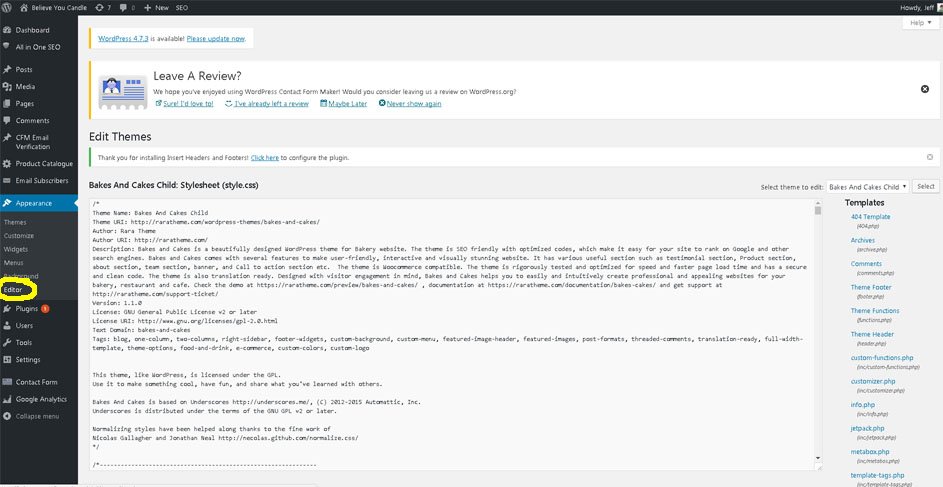
This area allows you to modify the theme files of your wordpress theme. I always recommend making a child of your theme and using that so that when you modify the files, they don't get wiped out by an update but that is for later! :)

Go to your adsense page, select all of the verification code, right click and select copy. Go back to your wordpress editor page

Click on the header.php file under template in the right hand menu. It may be called Theme Header (Header.php). Once that file is opened in the editor or center of the screen, locate the <head> tag. Click your mouse AFTER the > character of <head> and click enter. This will start a new line under the <head> tag. Either right click and click paste or hit ctl-v to paste the code here.

Your header.php should now look similar to this...

Once you have done this, click update file at the bottom of the page. The code has now been added to the header file. Now you need to go to adsense and tell them that you have added the code. It may take a few hours to a few days for them to see it. Once they do, you will then get access to creating your ad blocks which will generate totally different code that you will put in widgets of your wordpress.

This method is probably one of the best if you don't like plugins. The downside to this method is that if you alter your themes files without making a child theme, if you ever update your theme with a newer version, all your changes will be lost.


Method #2


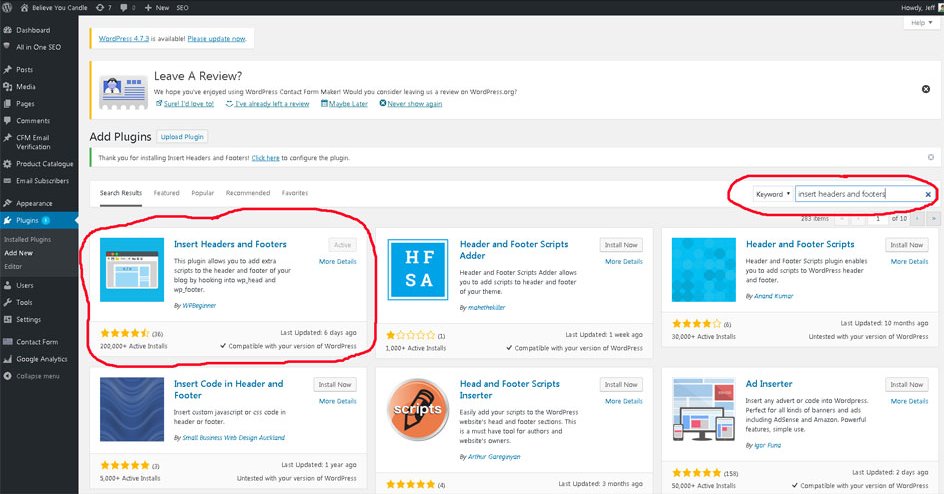
This method will use the plugin "Insert Headers and Footers", this plugin is pretty popular, has a 4+ rating and over 200k installs.

Go to your wordpress dashboard and click plugins. In the upper area of the screen click the ADD NEW button. In the right hand side is a search box, type "Insert Headers and Footers" in the box and the plugin should show up. Make sure its the one with over 200k installs.

Once you find it, click download, then click activate.

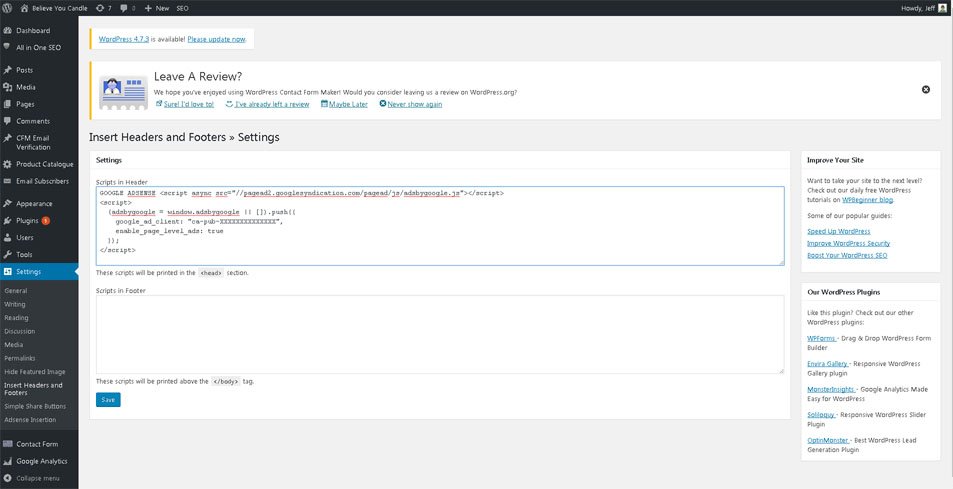
Now go to the left hand menu and go to settings->Insert Headers and Footers. This will bring up a screen showing 2 text boxes. The top box is for your header, the bottom box is for your footer.

Go to your adsense page, select all of the verification code, right click and select copy. Go back to your wordpress page, click in the top text box area, right click and select paste or CTL-V to paste the code in the box

Once you've done this, click the blue save button at the bottom.

You have now added the adsense verification code to your website. Now you need to go to adsense and tell them that you have added the code. It may take a few hours to a few days for them to see it. Once they do, you will then get access to creating your ad blocks which will generate totally different code that you will put in widgets of your wordpress.


I see this question getting asked almost daily so I figured I would help out and give people a place to go to get some help with this.

If you have any questions or need help, please leave a comment below!

Thank you!

:)

Login
Create Your Free Wealthy Affiliate Account Today!
icon
4-Steps to Success Class
icon
One Profit Ready Website
icon
Market Research & Analysis Tools
icon
Millionaire Mentorship
icon
Core “Business Start Up” Training

Recent Comments

124

I pasted the google Adsense code on my blog, now awaiting for the review result. Thanks for the easy tutorial.

Sorry for the delay, working like a mad man on my day job, lol.

That is awesome the post was able to help you!
:)

Thank you ,yesterday, i had added it in permanent link on a few pages but felt it wasn't right .I've changed it today to method two that you suggested. I hope it's OK. I've deleted it from the permalink on the pages now. I suppose I'll have to wait and see .
Thanks so much
J.w.Lewis.

Thank you so much.. I was stuck on this and wasn't sure what to do,, I was afraid to edit anything for fear of messing up.

So, I have added the verification code to my theme. No, I removed it until I get an answer to my nest question which is "How do I make a child theme of my theme? (Totally not a geek, yet).

Again, thanks for your help.

Hello Wayne,
The quick breakdown for creating a child theme would be
*You need FTP access to your website
*You need an FTP client to access your website
*You would then connect to your website using the FTP client
*Go to the wp-content Folder--->themes Folder, copy the folder with the name of the theme your currently using and rename it "PARENT_THEME_NAME-Child", where PARENT_THEME_NAME is the name of your theme. Basically your adding the suffix of Child to the theme name.
*You will need to open the Styles.css using a text editor like notepad++. You can right click the file in Filezilla FTP client and go to edit, it will open the file on your local machine and when you save and go back to the FTP client, you will be prompted to save the changes in the remote directory.
*In the Styles.css header you will need to change the name of the theme to PARENT_THEME_NAME-Child, basically just add Child to the theme name and save the file.
*Now when you go to your wordpress->Appearance->Themes, you should see your PARENT_THEME_NAME-Child listed there, click on it and click activate.

Now any changes you make to the themes files will be all yours!

*DISCLAIMER
I am not responsible if you break your wordpress, only take these steps if you are comfortable with FTP and file directories, lol.

:)

Here is a good breakdown of all the steps... Rob does it a tad bit different, but with the same effect. I like to totally copy the parent theme and just rename the folder, then edit the existing styles.css file, name section in the header.

Hi, Jeff. It all sounds very, well, High tech and I am getting the impression that I am nowhere near to your level of "competence" when it comes to the technical side of things.

So, I have opted to go with step 2 and have followed all the steps except the last one, go to AdSense and tell them that I have added the code. I will do that when I have sent this to you.

I do have one Q. You mentioned that when we make changes to the original theme, that anytime there are updates to that theme and we chose to implement them, those changes that we have made, disappear. Does this happen if we use step 2 as opposed to step 1?

Hello Wayne!
No, if you use Method 2, any thing you have added to the header or footer using the plugin will not get wiped out by theme updates.

Also, a theme update does not have to be incorporated right away. Just because a theme does an update doesn't mean you have to install it right away. You can do it at your leisure as long as it doesn't address any security issues.

Thank you!
:)

@jwlewis777 When you say "update" do you mean updates to wordpress or to your specific theme?

Hello!
I am talking about any updates to your theme. Periodically the author of your theme will release an update and you can either update the theme or ignore it. If you update the theme any changes to the themes files will be lost unless you made a child theme.

:)

Yesterday I did method one without making a child theme and did not knw that method 2 was an option. .I followed the steps shown by google ad sense when I first applied. I also did not know where to add the code and was told by another WA on the way to do it through Editor. Does this mean that if there is ever an update on my theme, the changes will be lost? Yesterday, I applied for adsense so I have not even been approved yet.
Is there a way to avoid my changes being lost?
Can I apply for a new code and re-apply?

Hello!
Yes, if you update your theme any changes you made to the theme files will be lost.

You can still follow the instructions for method #2, you would just need to undo the changes you made to the header.php file through the editor first. Basically erase the script code from the header.php, then follow method #2.

You don't need a new verification code from adsense. That CA-PUB-XXXXXXXXXX number is your unique identifier and will always stay the same.

Thanks!
:)

Hi Jwlewis,
So I delete everything between <head> and </head>? Thanks for your help! If I did it correctly I want to leave it.
Thanks,
Debbie
<head>
<?php wp_head(); ?>
[removed][removed]
[removed]
(adsbygoogle = window.adsbygoogle || []).push({
google_ad_client:
enable_page_level_ads: true
});
[removed]
</head>

Don't delete everything between <head> and </head>, just the script code you added from google which will look like this.
[script async src="//pagead2.googlesyndication.com/pagead/js/adsbygoogle.js">[/script>
[script>
(adsbygoogle = window.adsbygoogle || []).push({
google_ad_client: "ca-pub-xxxxxxxxxxxxxxxxxx",
enable_page_level_ads: true
});
[/script>

okay got it! I deleted and went and did method 2. So easy!
Thank you for your EXCELLENT tutorial up above. Very well presented!

Awesome! Thank you!
:)

Thank you for this info!

You bet!
Thank you!
:)

Wow, perfect explanation! Thank you so much. I followed your directions and it worked perfectly. Very happy to have gotten over another bump in the road for me.

Again, thanks.

Awesome! That makes me happy I was able to help someone!
Thank you!
:)

Excellent! I'll be getting to this soon and this information will be quite helpful. Thank you for posting it.
Sue

You bet!
Thank you!
:)

Good lessons...

Thank you!
:)

See more comments

Login
Create Your Free Wealthy Affiliate Account Today!
icon
4-Steps to Success Class
icon
One Profit Ready Website
icon
Market Research & Analysis Tools
icon
Millionaire Mentorship
icon
Core “Business Start Up” Training