Using Image Studio to Monetise My Website with Digital Assets


Published on February 26, 2026
Published on Wealthy Affiliate — a platform for building real online businesses with modern training and AI.

Hello, lovely WAers!
I hope you are all well. The sun came out here today briefly, which was a very welcome change to the almost biblical more than 40 days of rain we all seem to have had since Christmas!
Still, whilst I can't get out into my garden and tend my growing 'sticks' as much as I'd like, the rain has given me an opportunity to look into how I can monetise my site, and I've been using Image Studio to do just that.
One of the things I’ve been exploring is how to turn creative work into a small but scalable income stream directly from my website. I'm a very visual person, and I love creating images and adverts, which are so much easier now we have access to Image Studio here at Wealthy Affiliate.
Instead of relying a lot on ads or affiliate links, I decided to experiment with digital assets - specifically printable wall art, and I've been having a lot of fun with it too..
I wanted something simple, low risk, and repeatable, and with help from Sparky (my ChatGPT assistant), I now have a new mini digital shop on my first niche site, selling downloadable artwork. Last year I tried to install WooCommerce on this site, but it ended up shutting my site down for nearly a week, and it was only recovered by Carson, who had to personally intervene to help. Thank you, Carson!
I didn't want to risk that again, so here's exactly how I used Image Studio to move from creating images… to monetising them.
Why digital assets?
Digital products have a few big advantages over having to ship actual products:
- You create them once and they can work for you forever
- There’s no physical stock to store or track
- No postage or packaging
- Delivery is automatic
- I can scale it easily, although I have found it takes quite a concentrated amount of time to initially set it up
I know that some members of WA are already selling work like this, and if you’re already creating visuals for blogs, Pinterest, or social media, you may already be sitting on products that you could sell without realising it.
Here's what I did.
The tools I used
My set-up is intentionally simple:
- Image Studio (Wealthy Affiliate) – create the original artwork
- Canva – final edits and add a copyright notice (I use this because it's easier to get the placement exactly where and how I want it.
- Stripe – payment processing (I already had an account with Stripe for my tutoring work, but I discovered I can create separate accounts and brand them in much the same way I have different Facebook and Pinterest accounts under one main account
- WordPress – product information pages (my shopfront) and download pages to deliver the artwork
- AIOSEO – used to control which pages are indexed - for example, I don't want the download pages to be discoverable
Although there is an investment in time setting it up, there are no complicated ecommerce system like WooCommerce, and I'm only adding pages to the site.
Step-by-step explanation of what I did
Step 1: Create the artwork in Image Studio
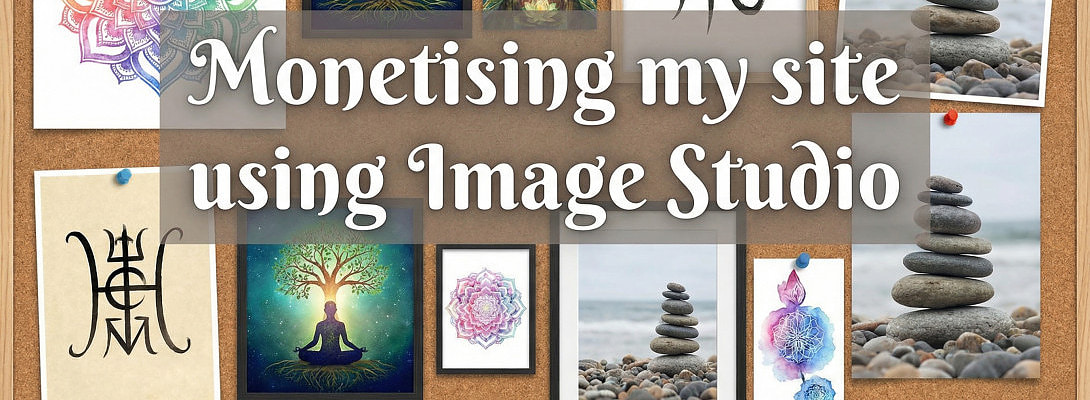
I designed some inspirational wall art using Image Studio. Sometimes this takes a few goes to get exactly what I want, but I've got better and using prompts and editing the images. I currently have 3 categories that I'm working on that fit into my spirituality niche site. These are:
- Seasonal images
- Spiritual and inspirational quotes
- Elementals
Here are a few I've already set up - these are in the 'Spiritual quotes' section.

I really wanted to create something that I thought people might like to print off and keep.
Step 2: Finalise the design in Canva
Ready to put this into action?
Start your free journey today — no credit card required.
I uploaded the image into Canva to:
- Add a subtle copyright notice
- Check spacing and layout and add any text that I feel was not working in Image Studio
- Prepare it for print
I'm hoping that this stage gives the artwork a finished, professional feel and I think the copyright notice is important.
Step 3: Export as a printable product
Once I'm happy with the designs, I export the final version as a high-quality PDF for print, so customers can print at home or professionally, and I use a low file size image to use on my site.
Step 4: Upload the pdf file to WordPress
The PDF is then uploaded into my WordPress Media Library, and I've created an Excel log sheet as I find there are several links that I need to set up and remember, so using a spreadsheet means I can save and copy the page and payment links easily in one place.
This pdf file then becomes the secure file link that buyers use to download their images after purchase.
Step 5: Create the product pages
In this system, I need to create three simple pages:
1. Sales page (public)
- Product description
- Preview image
- Features and benefits explained (sales pitch)
- Buy button that links to a Stripe payment page
2. Thank-you/download page (private)
- This appears automatically when someone buys an image
- Stripe directs the buyer to the download page after purchase
- The page contains the download link to the image and is marked as a "No index" page in AIOSEO so that people don't stumble upon it by mistake
3. Shop/category page (optional)
- As I've set up 3 distinct categories, I have also created 3 category pages, where people can browse all the designs in that category easily
Step 6: Set up a way to pay in Stripe
Inside Stripe, I then need to:
- Create a product page which has the information and price (You an set this to a one off payment which works for my artwork at the moment, but you can set up subscriptions too if that works for you)
- Generate a payment link that is linked from the "Buy now" button on the product page
- Added the redirect to the pdf page after payment
So the buying process becomes:
Product page → Buy now button→Stripe checkout and payment→ Instant download
I then go back and test the links to make sure they are working. I even bought the first image to see if it worked, and yes - the first test purchase working was a very satisfying moment!
A few lessons I learned along the way
Here are a few things I learned in setting this up
- It always takes longer than I anticipate - there are quite a few links to be made, which take time, even though the process is the same for each piece of art - I'm still working on adding the "Elementals" section
- I need to be very organised with links - hence my Excel spreadsheet
- I've been using Sparky to help me write alt text and descriptions that read well
- It really is scalable and since I love creating images, there's no reason why I can't create a lot more products this way
- None of my artwork is expensive - I did some research about digital downloads and the images are reasonably priced (well I think they are)
- I've also been combining some images to make montages - mostly I do this in Canva as I have more control over the placement.

Next steps
I also realised that I can add all these images to Pinterest, Facebook and Instgram and link back to the product page from all those sites too, so that's the next part I need to do. I could also sell on other sites like eBay and Etsy too.
I could also create some physical products such as calendars, mugs and swag, but that's further down the line!
Why I think this works well for WA members
As I've said, I'm a very visual person, and I love creating images, but I think this system is a simple one to set up on your own site, too. If you have a shop already, it might be easier, but I didn't want to risk having my site offline for another week, so I was understandably cautious. But if you are already:
- Creating blog graphics
- Designing pins
- Making quote images
- Building brand visuals
... then you can potentially turn those skills into digital products with only a few extra steps. I have done a similar thing for my drama teachers site, but currently, those are free giveaways and lead magnets. However, now I know what I'm doing, I'll be selling those as well.
You don’t need a big shop or hundreds of products. As Sparky said to me at the start of this: "One good digital asset is enough to start learning the process."
I wish you luck creating your own products.
Gail
Here are some of my images that I'm using. I hope you like them.

Share this insight
This conversation is happening inside the community.
Join free to continue it.The Internet Changed. Now It Is Time to Build Differently.
If this article resonated, the next step is learning how to apply it. Inside Wealthy Affiliate, we break this down into practical steps you can use to build a real online business.
No credit card. Instant access.