AI Image Prompts - Composition Part 2


Published on August 6, 2026
Published on Wealthy Affiliate — a platform for building real online businesses with modern training and AI.


Introduction
In Composition Part 2 of this series, we'll move beyond placing your subject and explore how to guide your viewer through an image. You'll discover composition techniques that create movement, depth, and visual flow, including:
- Rule of Space – Give subjects room to look, move, or breathe.
- Leading Lines – Direct the viewer's eye exactly where you want it to go.
- Framing Within the Frame – Use natural elements to emphasize your main subject.
- Golden Triangle – Create energy and balance with diagonal compositions.
- Center Eye Dominance – Learn when placing the subject in the center creates the strongest impact.
- Foreground, Middle Ground, and Background – Build depth and make AI images feel more immersive.
These techniques will help you create AI images that feel more dynamic, cinematic, and professionally composed.
Starting Image
 This is one of my favorite memories from Bella Vista. My husband Mel enjoyed kayaking, and our Giant Schnauzer, Bo, loved swimming alongside him. Looking back, I realized this photograph is also a wonderful example of the Rule of Space. The open water ahead gives both the kayak and Bo room to continue their journey, inviting the viewer to imagine what lies beyond the frame.
Bo is actually helping teach the Rule of Space.
If it were only Mel in the kayak, the lesson would still work. But Bo swimming slightly ahead reinforces the direction of travel. Your eye moves from Mel to Bo and then into the open water beyond. It's almost like Bo is acting as a visual guide, leading both Mel and the viewer farther into the scene.
1 Rule of Space
What is the Rule of Space
The Rule of Space is simply giving your subject somewhere to go. If a kayaker, cyclist, runner, or bird is moving across your image, leaving open space in front of them makes the scene feel natural and inviting. Our eyes instinctively want to follow movement, so that empty space becomes part of the story, encouraging us to imagine what happens next.
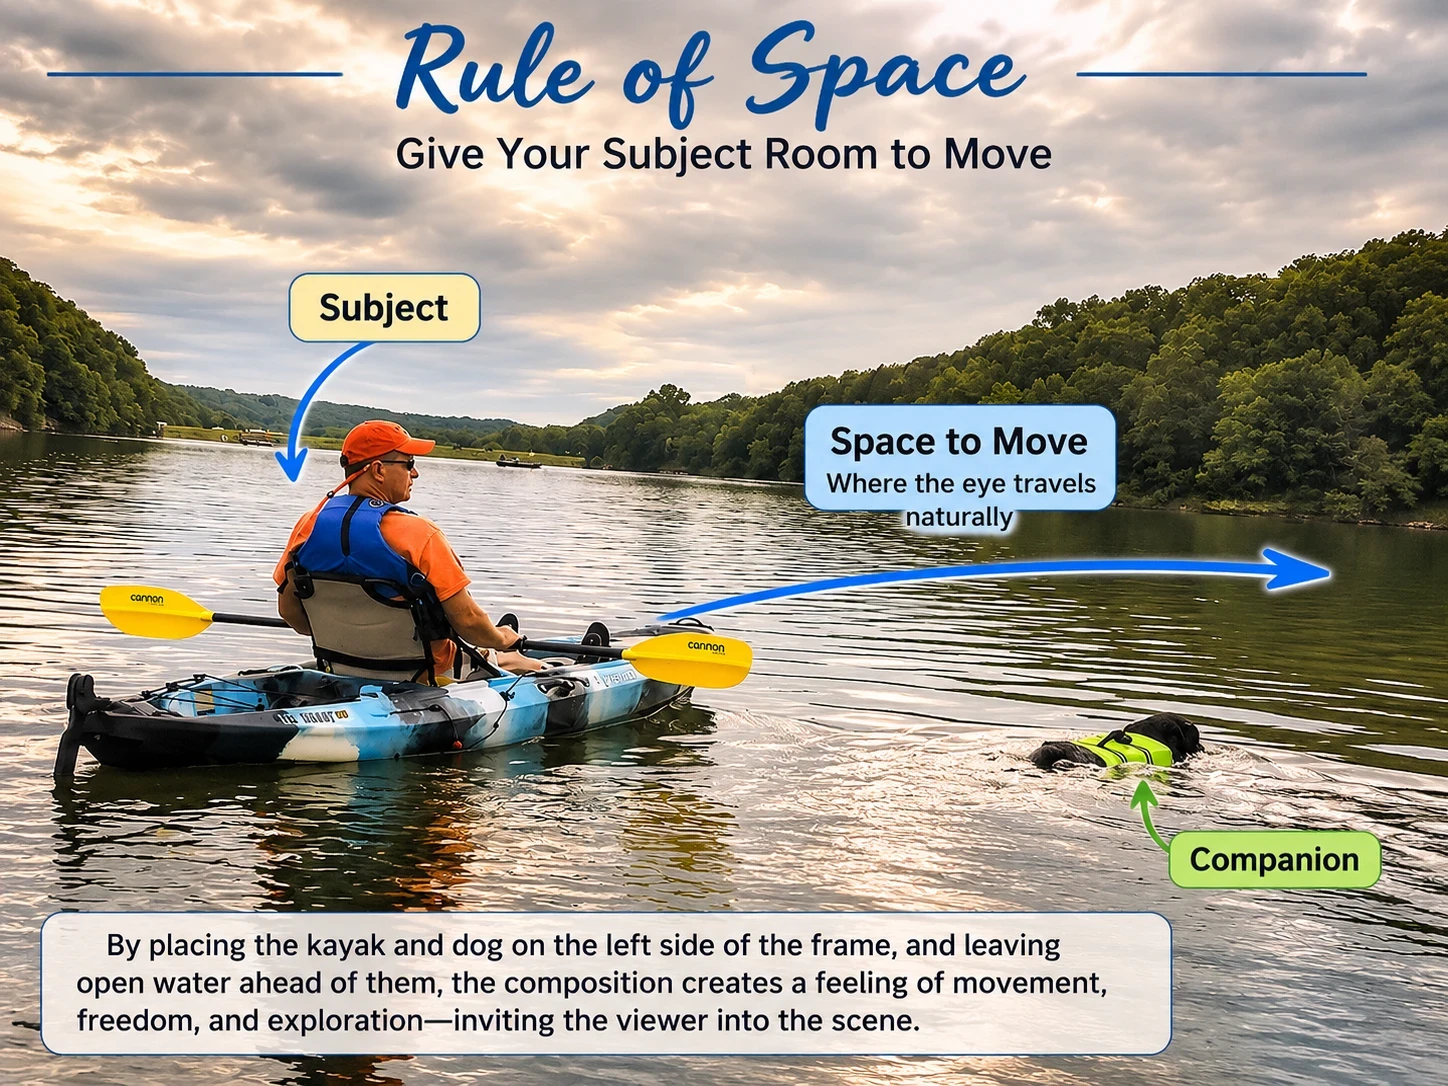 Rule of Space in Action. Mel and Bo (dog) are positioned with plenty of open water ahead of them. That empty space invites the viewer to continue the journey, creating a feeling of movement, freedom, and exploration. If they were placed against the right edge of the frame, the image would feel cramped and much less natural.
Why Does it Work
This image works because.
- Your eye naturally follows Mel to Bo and then into the open water.
- The empty space ahead creates a sense of movement and anticipation.
- The scene feels relaxed and inviting because the subjects have room to "travel."
Using the Rule of Space in AI Prompts
Prompt Template
Instead of simply asking AI to create a kayaker on a lake, tell it how the composition should guide the viewer's eye.
Prompt
"Position the kayak on the left third of the frame with the dog swimming slightly ahead. Leave generous open water in front of both subjects to create a strong Rule of Space composition that conveys movement and exploration."
What to Notice
"See the difference?"
It becomes almost impossible for the reader not to understand the Rule of Space.
Common Mistake
A common mistake is placing a moving subject too close to the edge of the frame with little or no space ahead. Unless you're intentionally trying to create tension, this often makes the image feel cramped and interrupts the viewer's natural eye movement.
Incorrect Example
 Incorrect use of the Rule of Space. By placing the kayak against the right edge with virtually no room ahead, the composition feels confined. The viewer's eye has nowhere to continue, making the scene feel less natural and less inviting.
Pro Tip
Before pressing the shutter—or generating an AI image—ask yourself one simple question: "Where is my subject going?" Leave more space in that direction than behind the subject. Even a small adjustment can transform a composition from feeling cramped to feeling open, natural, and full of possibility.
Challenge Yourself
Create the same scene three different ways:
- Leave lots of room ahead.
- Leave almost none.
- Put the kayaker in the center.
Which image feels like the greatest adventure?
2 Leading Lines
What are Leading Lines
Leading lines are natural or man-made lines within an image that guide the viewer's eye toward the main subject. They help create a visual path through the photograph, making the composition feel organized and intentional.
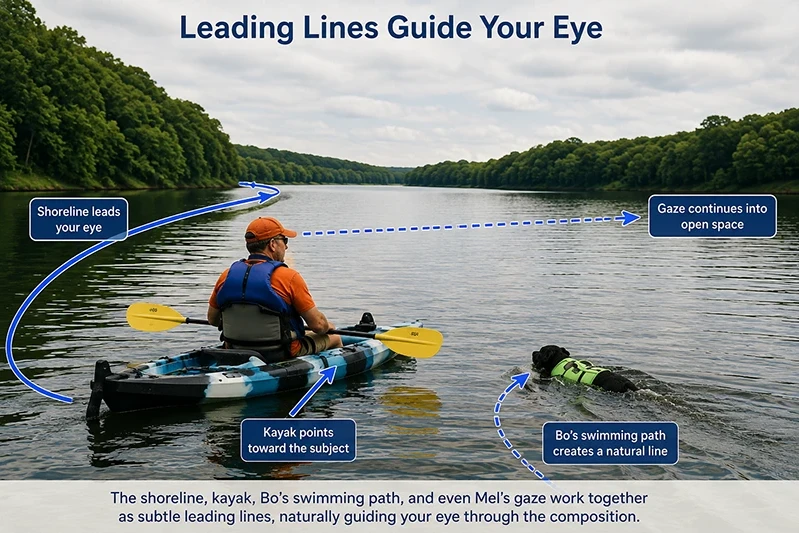
Leading lines can be obvious, like a road, bridge, or fence, or much more subtle, such as a shoreline, the curve of a river, rows of trees, ripples in the water, or even the direction a person is looking. The goal isn't simply to include lines—it's to use them to lead the viewer where you want them to look.
Why Does it Work?
Our eyes naturally follow lines. When those lines point toward the main subject, they gently guide our attention without us even realizing it. Instead of wandering around the image, the viewer's eye follows a visual journey, making the composition easier to understand and more engaging.
Strong leading lines also add depth, movement, and a sense of direction, helping transform a flat image into one that feels immersive.
Using leading lines in AI Prompts
AI won't automatically know which elements should guide the viewer's eye. If you want a road, shoreline, trail, fence, river, or row of trees to strengthen your composition, tell the AI exactly how those lines should direct attention toward your subject.
Prompt Template
Instead of simply asking AI to create a kayaker on a lake, describe how the natural lines in the scene should guide the viewer's eye.
Prompt
"Create a peaceful lake scene with a kayaker positioned near the left third of the frame. Use the shoreline, gentle ripples on the water, and the curve of the lake to create subtle leading lines that naturally guide the viewer's eye toward the kayaker. Maintain a calm, realistic composition with a sense of depth and exploration."
What to Notice
- Notice how the shoreline naturally draws your eye toward the kayaker.
- The gentle ripples on the water continue that visual path through the scene.
- Bo's swimming path and Mel's gaze reinforce the direction of travel.
- Several subtle leading lines work together, making the composition feel natural instead of forced.
Comment Mistake
A common mistake is adding lines that lead the viewer away from the subject instead of toward it. Roads, trails, fences, or shorelines that point out of the frame can pull attention away from your main focal point and weaken the overall composition.
Pro Tip
Look for lines that already exist in the scene before creating new ones. A winding shoreline, reflections on the water, rows of trees, or even cloud formations can become natural leading lines. Often the strongest compositions come from recognizing the lines nature has already provided.come from recognizing the lines nature has already provided.
Challenge Yourself
Create the same scene three different ways:
- Use the shoreline as your leading line.
- Use a winding trail or dock leading toward the subject.
- Remove all obvious leading lines.
Which version guides your eye most naturally to the subject?
3 Framing Within the Frame
What is Framing Within the Frame?
Framing Within the Frame is a composition technique that uses objects in the scene to surround or "frame" your main subject. Trees, doorways, windows, bridges, arches, rock formations, and even overhanging branches can all create a second frame inside the photograph. This natural border draws the viewer's attention toward the subject while adding depth and a stronger sense of place.
 Natural framing draws the viewer into the scene. The two tree trunks and overhanging branches create a second frame within the photograph, naturally directing your attention to Mel and Bo while adding depth and a stronger sense of place.
Why Does it Work
A frame within the frame narrows the viewer’s attention and makes the main subject easier to find. The surrounding trees act like a visual doorway, guiding your eye past the foreground and into the scene.
Framing also creates depth. Instead of feeling as though you are simply looking at Mel and Bo on the lake, you feel as though you are standing beneath the trees and quietly watching the moment unfold.
Using Framing Within the Frame in AI Prompts
AI may place your subject in an attractive setting without using the surroundings to strengthen the composition. To create a frame within the frame, describe both the subject and the foreground elements that should surround it.
You can use tree trunks, overhanging branches, windows, doors, bridges, arches, cave openings, or other nearby objects to create a natural border around the focal point.
Prompt Template
Instead of simply asking AI to create a kayaker on a lake, describe what should surround the subject and how those elements should direct attention toward it.
Prompt
“Create a peaceful Ozark lake scene with a kayaker and a black dog swimming nearby. View the scene from the shoreline through two mature oak trees, using the trunks and overhanging branches to form a natural frame around the subjects. Keep the foreground trees slightly soft while the kayaker, dog, and lake remain clear, creating depth and a quiet sense of discovery.”
What to Notice
- The two tree trunks form the sides of the natural frame.
- The arching branches complete the frame across the top.
- The darker foreground contrasts with the brighter lake, helping Mel and Bo stand out.
- The framing makes you feel as though you are observing the scene from a hidden spot along the shoreline.
- The frame adds depth without covering or competing with the subjects.
Common Mistake
A natural frame should support your subject, not overpower it. If tree branches, doorways, or other foreground elements cover too much of the scene or become the first thing people notice, the composition loses its impact.
Pro Tip
A natural frame does not need to surround the subject completely. Even one overhanging branch, a doorway, or two objects along the edges of the image can guide attention toward the focal point. Keep the frame supportive and subtle so it enhances the subject rather than overpowering it.
Ready to put this into action?
Start your free journey today — no credit card required.
Challenge Yourself
Create the same scene three different ways:
- Frame the kayaker with two large trees and overhanging branches.
- View the scene through a rustic boathouse, bridge, or dock opening.
- Remove the foreground frame entirely.
Which version makes you feel most connected to the scene?
4 Golden Triangle
What is the Golden Triangle?
The Golden Triangle is a composition technique that uses diagonal lines instead of the horizontal and vertical divisions of the Rule of Thirds. The frame is divided into a large triangle and two smaller triangles, encouraging you to place important subjects and visual elements along these diagonal lines.
This approach creates a stronger sense of movement, energy, and visual flow, making it especially effective for action scenes, landscapes, wildlife, and dynamic AI-generated images.
 The Golden Triangle encourages you to organize important subjects and visual elements along strong diagonal lines. Notice how Mel, Bo, and the shoreline naturally follow the diagonal flow, creating a composition that feels balanced while adding movement and energy.
Why Does it Work
Our eyes naturally follow diagonal lines. Unlike horizontal or vertical compositions, diagonals create a feeling of movement and direction. The Golden Triangle helps organize those diagonals into a balanced composition that feels both dynamic and intentional.
It's an excellent technique whenever you want an image to feel active rather than static.
Using the Golden Triangle in AI Prompts
Most AI image generators won't automatically compose a scene using the Golden Triangle. If you want this effect, describe diagonal placement and ask the AI to arrange the main subject and supporting elements along strong diagonal lines.
This works especially well with mountain ridges, shorelines, rivers, roads, fallen trees, or the direction of travel of a person or animal.
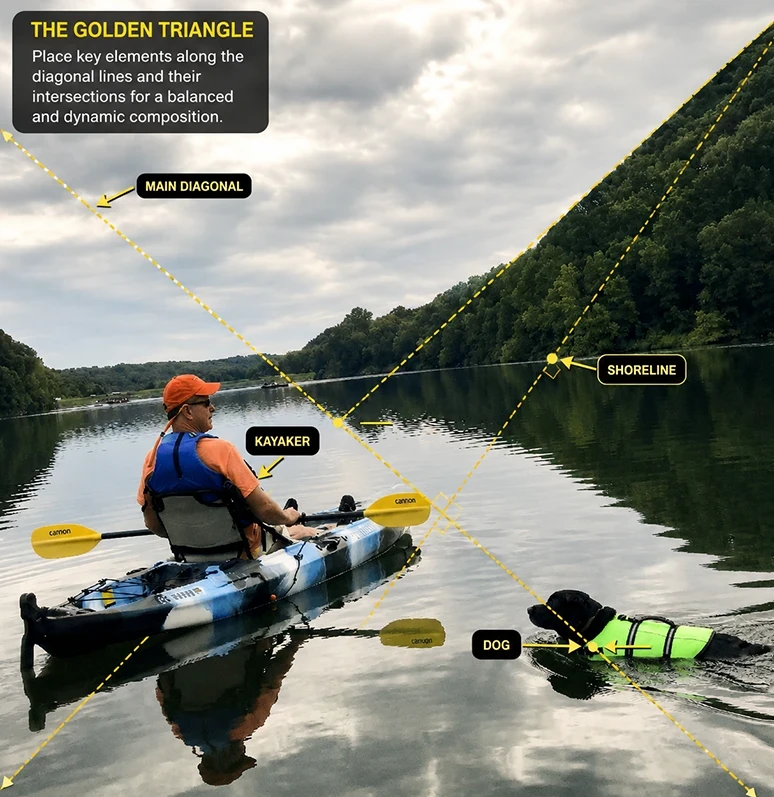 The Golden Triangle overlay shows how the kayaker, shoreline, and Bo naturally align along strong diagonal lines, creating a composition that feels balanced while adding movement and visual energy.
Prompt Template
Instead of simply asking AI to create a kayaker on a lake, describe how the diagonal elements should organize the composition.
Prompt
Create a peaceful Ozark lake scene with a kayaker and a black dog swimming nearby. Arrange the composition using the Golden Triangle, placing the kayaker along a strong diagonal while the shoreline and reflections reinforce the triangular flow. Create a balanced image that feels dynamic while maintaining a calm, natural atmosphere."
What to Notice
- The main subject follows a strong diagonal instead of sitting flat across the image.
- Supporting elements reinforce the same directional flow.
- Your eye naturally travels across the composition.
- The image feels balanced while still conveying movement.
Common Mistake
A common mistake is forcing diagonal lines where they don't naturally belong. Too many competing diagonals can make an image feel confusing instead of balanced. Use one dominant diagonal supported by a few secondary elements.
Pro Tip
Don't worry about drawing the Golden Triangle every time you compose an image. Instead, look for natural diagonals already present in the scene and use them to guide the placement of your subject. Often you'll discover you've used the Golden Triangle without even realizing it.
Many successful photographs naturally contain Golden Triangle compositions without the photographer consciously planning them. Learning to recognize these diagonal relationships can help you strengthen both your photography and your AI prompts.
Try It Yourself
Create the same scene three different ways:
- Use the Rule of Thirds.
- Arrange the composition around a strong diagonal (Golden Triangle).
- Center the subject.
Which composition feels the most dynamic?
5 Center Eye Dominance
What is Center Eye Dominance?
While the previous examples focused on landscape composition, Center Eye Dominance is most commonly used in portraits. Since the eyes naturally become the focal point of a portrait, this close-up image provides a clearer example of the technique.
Center Eye Dominance is a composition technique that places one or both of the subject's eyes near the center of the frame, making them the strongest visual focal point. Because people naturally look at another person's eyes first, this approach creates an immediate emotional connection between the subject and the viewer.
While it is most often used in portrait photography, Center Eye Dominance also works beautifully with wildlife, pets, and any close-up image where the eyes tell the story.
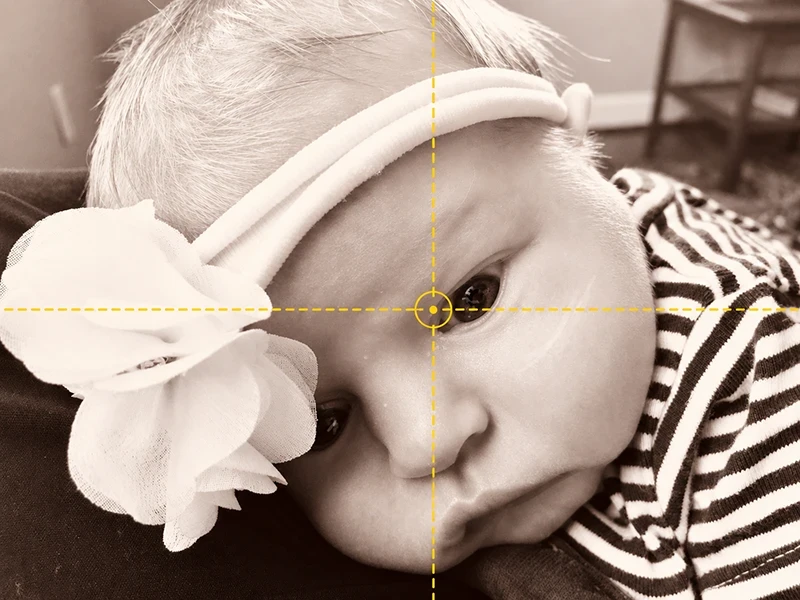 When the eyes tell the story, let them become the focal point. Placing the dominant eye near the center of the frame creates an immediate visual and emotional connection between the subject and the viewer.
Why Does it Work
Our eyes are naturally drawn to other eyes. When a subject’s dominant eye is placed near the center of the frame, the viewer’s attention goes there almost immediately. That creates a strong emotional connection and makes the portrait feel direct, intimate, and engaging.
This technique works especially well when the subject’s expression is an important part of the story.
Using the Center Eye in AI Prompts
AI may create a beautiful portrait without placing the eyes where they will have the strongest impact. To use Center Eye Dominance, tell the AI exactly where the dominant eye should appear in the frame.
This technique works best with close-up portraits, animals, wildlife, and expressive characters where the eyes are meant to become the main focal point.
Prompt Template
Instead of simply asking AI to create a portrait, describe how the eyes should be positioned to create a stronger connection with the viewer.
Prompt
Create a close-up portrait of a baby girl resting her head on a soft surface. Position her dominant eye near the exact center of the frame so it becomes the strongest focal point. Use soft natural light, a shallow depth of field, and a simple background to create a calm, intimate, and emotional portrait.
What to Notice
- Notice how your attention immediately goes to the centered eye.
- The close crop removes distractions and strengthens the emotional connection.
- The soft background keeps the focus on the expression.
- The centered eye makes the portrait feel calm, intimate, and intentional.
- After noticing the eye, your attention naturally moves through the rest of the face.
Common Mistake
A common mistake is centering the entire face rather than the dominant eye. TThe technique works best when the dominant eye becomes the visual anchor of the composition. Placing the eye too high, too low, or too far to one side can weaken the immediate connection unless that off-center placement is intentional.
Pro Tip
Use Center Eye Dominance when the subject’s eyes carry the emotion of the image. Keep the background simple, crop closely, and avoid competing details that pull attention away from the expression.
Challenge Yourself
Create the same portrait three different ways:
- Place the dominant eye in the center.
- Place the eyes along the upper third of the frame.
- Position the face and eyes noticeably off-center.
Which portrait feels the most engaging or emotionally powerful?
6 Foreground, Middle Ground, and Background
What is Foreground, middle ground and background?
The difference between a good image and a great image often comes down to depth. Images with distinct foreground, middle ground, and background elements feel more immersive because they guide the viewer through the scene.
Think of the image as three layers:
- Foreground – The objects closest to the viewer that immediately capture attention.
- Middle Ground – The main subject or action where the story unfolds.
- Background – The distant scenery that provides atmosphere, context, and a sense of place.
When all three layers work together, the result is an image with greater depth, realism, and visual interest.
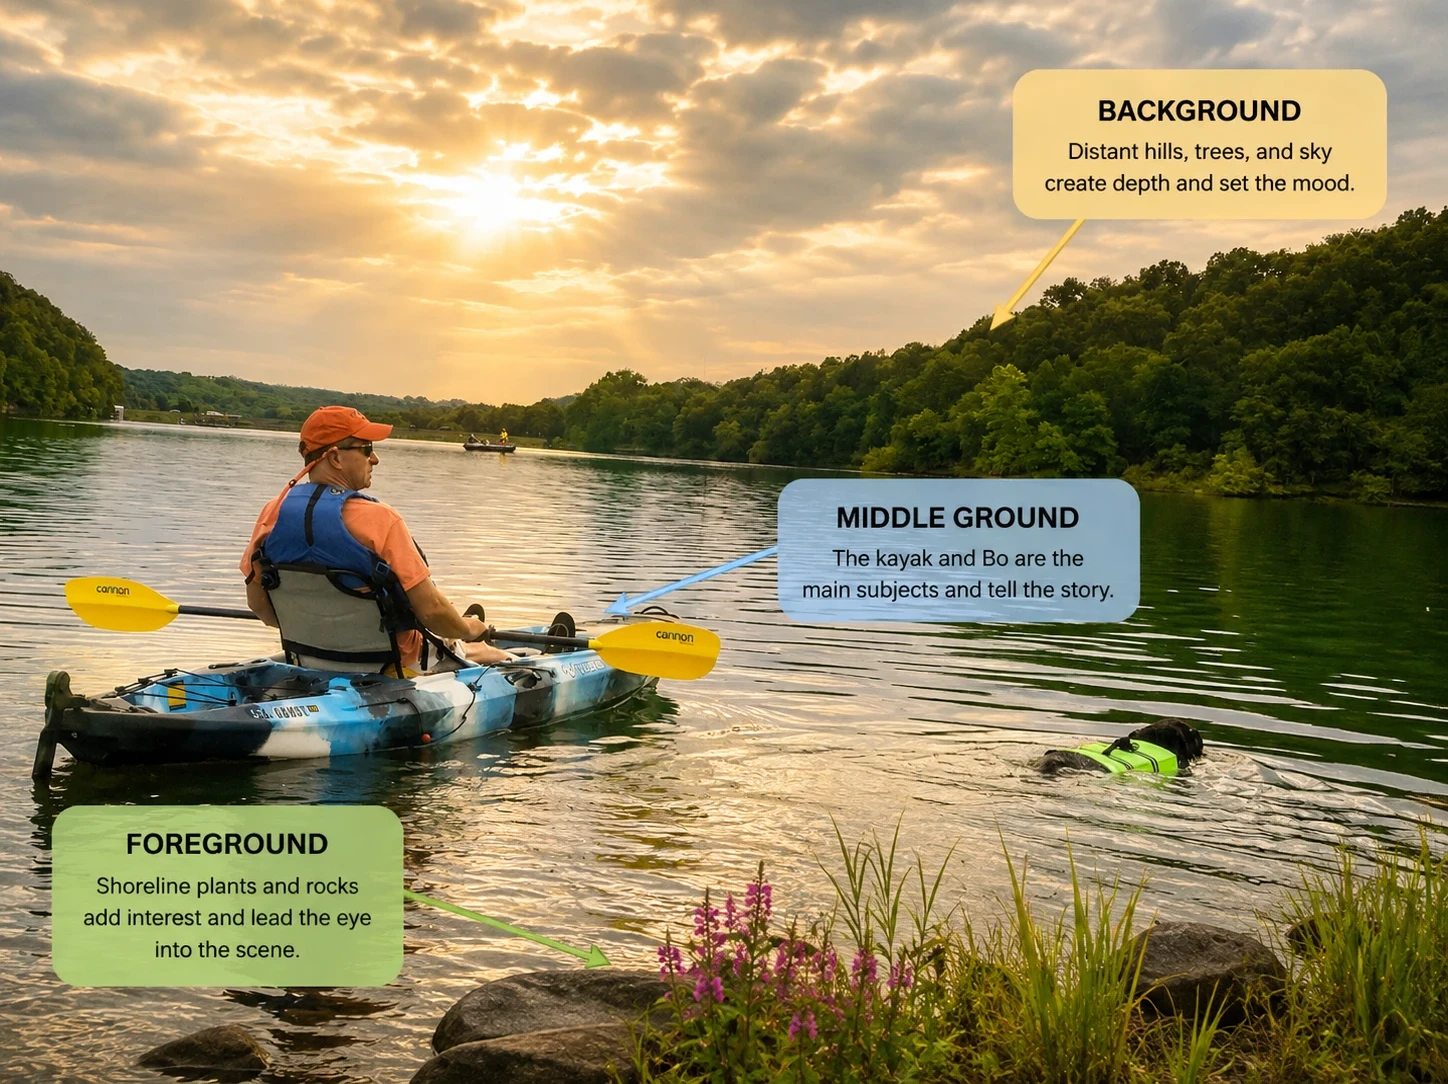 In this Bella Vista kayaking scene, the foreground, middle ground, and background each play a role in creating depth and guiding the viewer's eye through the story.
Why Does it Work
Our eyes naturally explore a scene from front to back. A thoughtfully layered composition creates the illusion of three-dimensional space, even in a flat image.
Instead of looking at a picture, the viewer feels as though they could step into it.
AI responds surprisingly well when you describe these layers individually rather than asking for "a beautiful landscape."
Using Foreground, MiddleGround and Background in AI Prompts
Prompt Template
Instead of simply asking AI to create a kayaker on a lake, describe each layer of the scene.
Prompt
Create a peaceful early morning lake scene. In the foreground, include colorful wildflowers and smooth shoreline rocks with gentle reflections in the water. In the middle ground, place a lone kayaker paddling quietly across the mist-covered lake. In the background, show forested Ozark hills fading into soft morning fog beneath a golden sunrise, creating depth and a peaceful atmosphere.
Notice how each layer has its own purpose.
What to Notice
After generating your image, ask yourself:
- Does the foreground add interest without distracting from the subject?
- Is the main subject clearly positioned in the middle ground?
- Does the background enhance the story and provide depth?
- Do the three layers naturally lead your eye through the image?
- Does the scene feel immersive rather than flat?
Pro Tip
One of the easiest ways to improve AI-generated landscapes is to describe all three layers separately.
Instead of saying:
"A kayaker on a lake."
Try:
"Foreground: wildflowers and shoreline rocks. Middle ground: a lone kayaker crossing the misty lake. Background: rolling Ozark hills beneath a colorful sunrise."
The AI has much more information to build a balanced composition.
Common Mistake
One of the most common mistakes in AI image prompts is describing only the main subject while ignoring everything around it.
For example:
Weak Prompt
A kayaker on a lake at sunrise.
This tells the AI what to create, but not how to build the scene. A kayaker on a lake at sunrise. For example:One of the most common mistakes in AI image prompts is describing only the main subject while ignoring everything around it.
Improved Prompt
Create a peaceful sunrise over a quiet Ozark lake. In the foreground, include smooth shoreline rocks, colorful wildflowers, and gentle ripples reflecting the morning light. In the middle ground, place a lone kayaker paddling calmly across the mist-covered lake, creating the main focal point. In the background, show rolling forested hills fading into soft morning fog beneath a glowing golden sunrise with dramatic clouds, adding depth and atmosphere.
Challenge Yourself
Create two versions of the same prompt.
Version 1: Simply describe the subject.
"A kayaker on a peaceful lake at sunrise."
Version 2: Describe the scene using foreground, middle ground, and background.
Compare the two images.
- Which one feels deeper?
- Which one tells a stronger story?
- Which one invites you into the scene?
Final Thoughts
The six techniques you've learned in this article are used every day by photographers, painters, filmmakers, and AI artists. Once you begin recognizing them, you'll start seeing them everywhere—from magazine covers to movie scenes to your own favorite photographs.
The exciting part is that AI gives you the freedom to practice these compositional ideas in minutes instead of waiting for the perfect weather, location, or subject. The more intentionally you compose your prompts, the more intentionally you'll begin seeing the world around you.The real power of composition isn't following a checklist of rules. It's understanding how each choice changes your viewer's experience. The same lake, the same sunrise, and the same kayaker produced completely different images simply by changing the composition.
That's the real lesson. As you continue creating AI art, don't ask only: "What do I want in the picture?"
Also ask:
"How do I want people to experience this scene?"
When you begin thinking that way, you'll stop writing prompts like a beginner, start composing images ...
and start thinking like a visual storyteller.
Up Next in this series
Composition teaches us where to place the elements in an image.
Next: Learn how color shapes emotion and transforms ordinary images into memorable works of art.
Coming Soon: We'll bring everything together with one of my favorite topics—Storytelling—where your prompts begin creating images that connect with people on an emotional level.
-Shirley
TIPS:
Many of the images and examples you’ll see throughout the series are created using Kre8or.ai, the AI image creation tool available here at Wealthy Affiliate. If you’d like to experiment with your own AI images, you can try Kre8or here: you can try out Kre8or.ai now for FREE: https://kre8or.ai Check out my profilfe there under my handle "windswepttale".
Comments
I enjoy receiving questions and comments from site visitors, you can leave yours below. - Shirley
Share this insight
This conversation is happening inside the community.
Join free to continue it.The Internet Changed. Now It Is Time to Build Differently.
If this article resonated, the next step is learning how to apply it. Inside Wealthy Affiliate, we break this down into practical steps you can use to build a real online business.
No credit card. Instant access.