Author bothewebguy
2012
5
Premium
Rank 1032

This is a follow up to the email training video tutorial that Kyle Provided

https://my.wealthyaffiliate.com/training/creating-email-accounts-email-forwards-for-your-website

You can actually use your current Gmail account to check domain email.

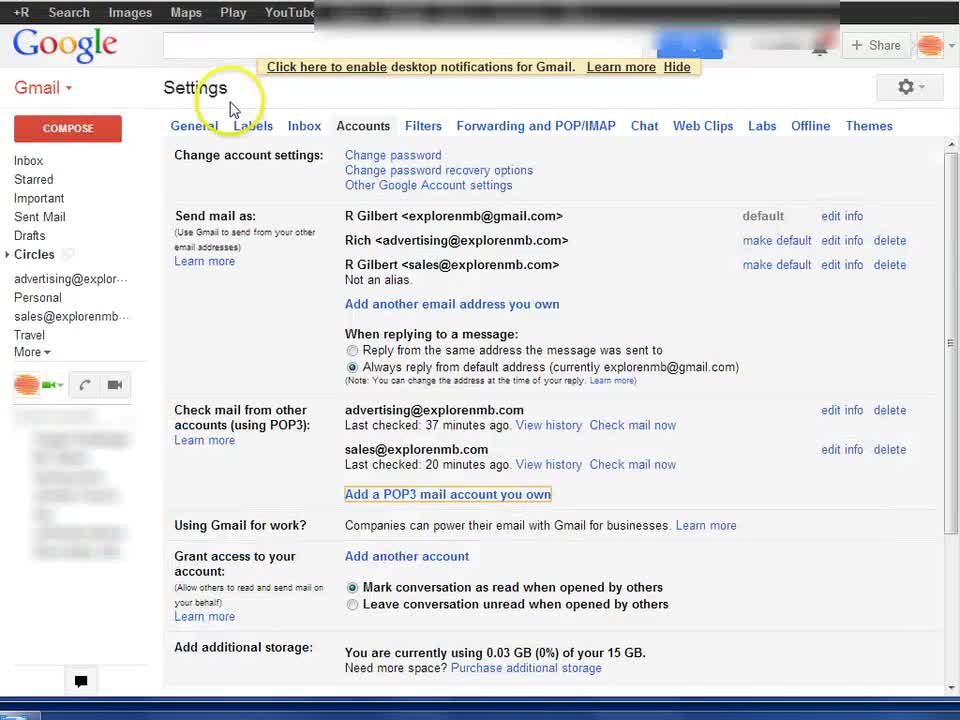
In this video you will see me add an email account and then add that account to my gmail account so I can send and receive email for the domain through my preferred Gmail browser. This basically allows me to use all of gmail's features for my domain email account.

The pop address for WA email accounts is webmail dot (yourdomain.com). This address will be used in the video tutorial and you will see where to add it.

Please let me know if you use this feature on gmail and if you have any questions.

Update: 5-25-15

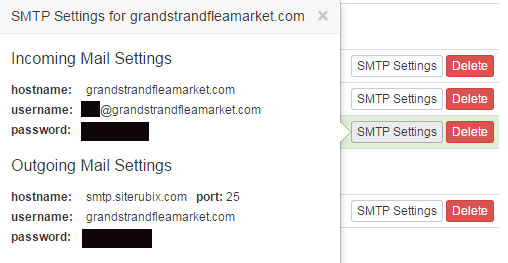
The send settings are slightly different than what they were back in 2013 when I did this video. You can find your info on the email page. notice in the outgoing, it is simply your domain and not your full email address. plus the hostname is different than your domain.


Thanks,

Bo the Webguy

Join the Discussion
Write something…
Recent messages
Timea Premium
Can you tell me how to do this in outlook?
Cheers!
Reply
Tim1953 Premium
Hi Timea do you have a gmail account ?
Reply
Timea Premium
no I have Outlook. My problem is the very first step. I can't find and open File button and account settings. When I click ribbon on Outlook, I have "Onedrive-Calendar-World Online...."
I don't find "File"
Reply
Tim1953 Premium
Timea you need to first create a Gmail account

Open Outlook search for Gmail .open a new account , I have already been using Gmail , so i then went through the process that bothewebguy did .He already had a Gmail account and then added his WA site into Gmail ...you need Gmail first ..Cheers Tim
Reply
Tim1953 Premium
This is how we do it – step by step:
Create your Gmail account. Go to http://mail.google.com/mail/signup.
Fill in the details for the form presented. When it comes to the recovery email, don’t use the email address that you are planning to use with your Gmail account, otherwise you’ll never retrieve your password if you need to. Choose the email address that comes with your ISP perhaps or some other account you have access to. Or you can leave it blank.
You should be ready to login to your account at this point. If you are new to Gmail, take note of some of the functions you will come to appreciate that are explained on the welcome page. E.g. Labels instead of folders (sort of the same but better – being able to assign multiple labels to an email helps you to really tightly define what an email is about), archive, built-in chat and video chat, and best of all…Google powered search! If you’ve ever suffered through Outlook’s painfully slow search function, just let Google power through your emails and sort them into the most relevant for your query. Heaven!
Click the “Show me my account” button and you are automatically logged in.
Now we are going to set up your account to import any emails that might be sitting around in your webmail inbox and then to have it connect regularly to this account to import mail, and lastly ensure that any emails you send with Gmail come from the “from address” that you have connected to from Gmail.

Disclaimer: this article is not designed to teach you how to use Gmail. You will need to find your own way with that. This is purely to help people connect their domain name email accounts to use through Gmail.

Now that you are into the account follow these steps:
Click Settings at the top right corner of the page, and open the Accounts and Import tab.
Ignore the “import mail” and “send mail as” options right now. Instead in the Check mail using POP3 section, click Add POP3 email account.
Enter the full email address of the account you want to access, then click Next Step.
Gmail will populate some sample settings, but check with your hosting provider to learn the correct server name and port. As a guide, if you use Outlook, check your username, login and POP3 (incoming) mail server settings (usually under Tools/Accounts depending on the version of Outlook you have) and use these. If Technology Matters is your hosting provider, your username needs to be your full email address (not just the bit before the @). The mail server is often mail.yourdomainname.com.au (as per Google’s example) and the Port number suggested will usually be OK. If this does not work, talk to your hosting provider or web developer for help. The password you enter is not the Gmail password, but the password for that original email account.
Decide what options you want to select here:
>If the point is to clear some space for your hosting account then don’t “leave a copy of retrieved messages the server”
>Using a Secure Connection (SSL) is a good idea if the host supports it. We suggest you check it. If it is not supported you will get a message when you click and you’ll need to uncheck the box.
>Give incoming messages a label if you wish to. This is useful if you import other accounts into this Gmail (and the labeling helps you identify which accounts they came from), but not so useful if you use it exclusively for the one email account.
>If this account is low activity and mainly historic you might want to have incoming emails archived automatically. Otherwise leave it unchecked.
Click . If at this point you get an error message saying there was a problem connecting to the mail server, try un-checking the “Always use a secure connection” box and try again. If you still cannot connect, there is a problem with the account login, password or mailserver details. Check all these and try again. Note: you might need to re-enter your password if you get an error message.
If all is well, you will be told “Your mail account has been added”. And you will be asked if you want to be able to send email with your domain name email address. Select that option and click <Next Step>
Confirm the name of the email account that will appear in the “From” details <Next Step>
When you send email, you can send it through your own SMTP server, if you have one. If you are a client of Technology Matters check with us about what applies for your hosting setup. Otherwise just choose to send through Gmail. <Next Step>
Nearly done. Gmail just needs to send a verification email to the account you are wanting to channel through it. Why? Otherwise anyone who knew your email password could get access to your emails and send them “on your behalf” without your knowledge.
If the connection to your POP email account is OK, the verification email should soon arrive in your Gmail account. Find that verification email. Click on the link or copy and paste the code into the box provided. If the verification email is late arriving, you can verify it later. You only need it to send emails with your own domain name, you can still receive emails into Gmail without it.
One last step. Once you have “verified”, go into “Settings” again. Select the “Accounts and Import” tab and in the “Send Mail As” section, click on the “make default” link next to the email address you have just set up. If you miss this step you will still be sending email from your Gmail address which is not the point of this whole exercise.
You are good to go. You will still need to login to Gmail using your Gmail email and password that you set up originally, but any emails you send will be labelled as your domain name email. You might like to bookmark your Gmail login page for easy access (or just enter Gmail into Google search).
Gmail will now be checking your POP3 account every 2 or 3 minutes and moving the emails into Gmail for you.

Note: If you have a lot of emails stored under webmail and they were sorted into folders, Gmail will not import the emails that are in folders until they are moved into the main body of the inbox. You might like to do this in batches so you can label the incoming emails appropriately.

If you are having any problems getting the “send” address to work as it should, have a look at this help page from Google.

- See more at: http://www.technologymatters.com.au/set-up-gmail-to-sendreceive-emails-using-your-own-domain-name/#sthash.9LPsNznG.dpuf
Reply
Timea Premium
Waow! Thanks!
Reply
Tim1953 Premium
haha that should keep you busy . relax have a stiff drink lol
Reply
Shawn Martin Premium
Thanks, nice job!
Reply
bothewebguy Premium
Thanks Shawn!
Reply
lauradews Premium
Thanks Bo, this is good to know, great info
Reply
okydoky Premium
Thanks Bo. That was a great and useful video and very easy to follow.
Reply
bothewebguy Premium
Thanks and glad to help!
Reply
Steve R Premium
Thank you.
Reply
coolcity Premium
Pretty cool feature indeed, I didn't know you could do that. Very useful, thank you.
Reply
bothewebguy Premium
Your Welcome!
Reply
Top