With the target ID in place, we now need to tell WordPress where it can find the ID, so that it jumps there. Once again, we have to customize the code for the link from page 1 of this tutorial.
In the dummy post titled “Page Jump Test” I want HERE in the sentence “Jump from HERE to another post/page” to be clickable and the starting point for the jump. I have to wrapHERE into the link code.
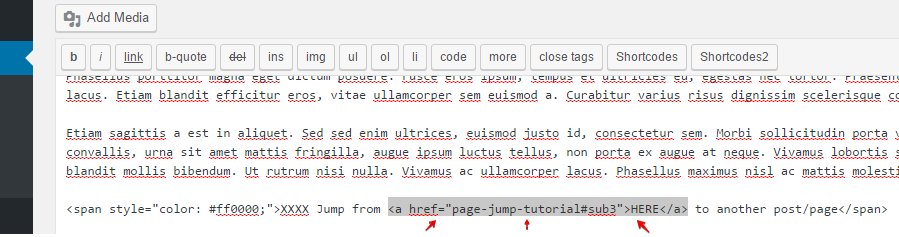
For that to work I replace “#unique-name” and “Your Link Text”. Now the link code looks like this.

Notice that I’ve added the post slug (title of article in the URL) to the ID. Since you’re jumping from one article to another, you need to tell WordPress where it’s going to find the ID. Since it’s within the same website, you don’t need your domain. Just the slug after the domain ends.
For example, my full URL for the post (where I set the target ID) is:

I only use page-jump-tutorial and add the ID (sub3) with a hashtag (#) right after it. Do not put a space between the URL and the ID. It won’t work then.
The URL slug tells WordPress the post/page you want to jump to and the ID tells WordPress the exact landing spot of that post/page. For example, the feature list in a product review.
And that’s how it’s added to the post/page.
1) Go to the post you want to link from and click on “Edit” to open the Editor. Mark the sentence or word with “XXXX” to find it better in the HTML code. You do this in the same way as on page 2 of this training. Click “Save Draft” or “Update”.

2) Click on the “Text” tab to switch into HTML mode and find the spot you’ve marked.
3) Copy your code from the notepad or any text file you typed it in. Highlight the code snippet, right mouse click and then “copy”.
Find the spot (look for XXXX if you added those) and highlight the word (or sentence) you want to use. Right click on the highlighted text and click “paste”. This wraps the word/sentence into the code and turns it into a clickable “Hyperlink”.
Before pasting:

After pasting:
4) Click “Save Draft” or “Update”, if the post/page is already published.
5)Go back to “Visual” to check if the code has been placed correctly. As you can see, “HERE” has been converted into a link on my website. You can also “Preview”your post to see if the link shows up.

6) Delete “XXXX” or any other stuff you’ve added to help you find the right spot. It’s not needed anymore. Click “Save Draft” or “Update” again.
Now test the page jump. Go to the post you’ve set the link code and click on the visible link. If done correctly and you’ve exactly copy and pasted your codes, you’ll notice that it will jump to the targeted spot in the other article.
The page jump works as supposed to? Congratulations, you’ve successfully created a page jump from one post/page to another! :)