The two things I found most irritating while experimenting with the block editor were resizing the image and being unable to position the image where I wanted it on the page or post. By default it positioned the image on the first line if the paragraph. Whether this has changed in updated versions of the block editor I don't know, as I don't use it.
Unless you are using the Gutenberg Block Editor, it's easier to change the size of the image in the text editor rather than keep clicking on the actual image and scaling it. Just make sure you increase or decrease the width and height by the same number of pixels to keep the perspective. Also you can position the image wherever you want it on your page or post.
Below is an image of the actual HTML code you will see after you have inserted the image into your page or post and the image as it appears on my site: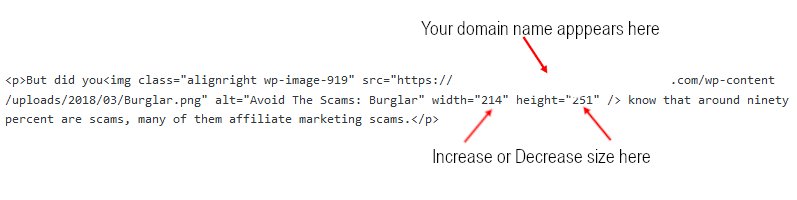

And this is how it would appear after I reduced the width and height by 100 pixels:
That's about it for editing site content images. I hope you found it helpful or enjoyable, if you diid a comment/like, good or bad, would be much appreciated
If you have any questions regarding this tutorial I will do my best to answer them wherever possible. Thank you once again for taking the time to view the tutoorial

Thank you very much! Your tutorial was very helpful and I have it bookmarked.
I chose the 2nd method for now... but I am going to do the 1st method too.
A couple of years ago, I found a mini free Photoshop software... I'm sure I saved it. I'll look for it...
How are you doing? I hope you had a good summer.
Have a blessed weekend, Brian!
Regards,
Monica