Handy Tip #3 - Create Cover Images That Pop!


Here's a quick tip on how to create cover images that pop!
I use Canva almost exclusively for creating my cover images. So first stop, is to log in to Canva and create a template. Wealthy Affiliate blog cover images are 545 pixels by 200 pixels.
In Canva, click on the 'Create a design' button in the top-left. Now click the 'Custom dimension' button in the top-right. Enter 545 in the first box and 200 in the second box, and leave the default scale as 'px'. Click the 'Create new design' button.
Now you have your correctly sized design template.
There are three essential elements to a great cover image.
Choosing the Right Background
The background should be relevant to the subject. In my case, I want to post a quick tip. I looked in the Images folder of Canva for 'Teaching'. There I found an image I was happy with and stretched it out to fit the design dimensions. Otherwise, I would have looked elsewhere, and imported the image into Canva.


I recommend that you stretch the image beyond the borders of your design template. Sizing the image larger than the design template allows you some wiggle room when moving all your elements around inside your custom dimensions.
Add a Background for Your Text
Adding a background to your text is one step that was missing in my previous blogs. In my earlier blogs, I tended to layer my text directly on top of the background image, which is not a good idea, as is usually the case the background is far too 'busy' and different colours react differently with your text.
To overcome this, add a background on which to place your text, and this will give your message an even coloured background, ensuring your text pops out and doesn't blend into the underlying picture.
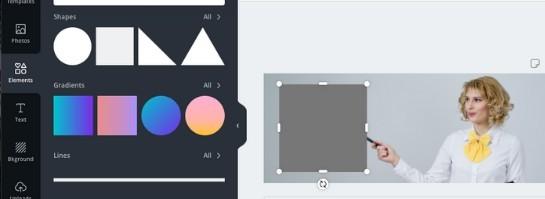
For this, I use a plain square from the Shapes in Canva Elements and resize as necessary; this becomes your text box or container. You can change the colour of this container to suit the underlying image, and give the maximum contrast to your text.
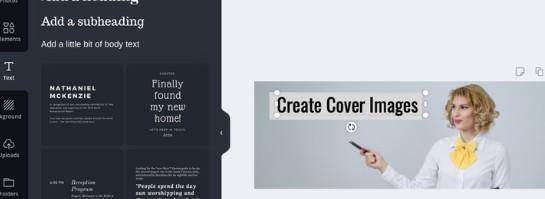
Inserting Your Message
The third step is to insert your message. We do this by placing the text over the text box or container, sizing both the container and text until you are happy with the results. Remember, you can alter the colours of both the containing and your text. You can also choose a different font to the default font displayed.
What you can also do in Canva is to 'Group' elements together so that you can move and resize them as one element. To do this, click and drag the area adjacent to your elements and include the elements to highlight, then click on the 'Group' option in the top menu. The 'Group' option becomes and 'Ungroup' option if you want to break your elements apart.
Conclusion
I used a fourth option, by inserting an explosion element and using that to highlight my text 'That Pops!'
I hope you find this quick tip useful and that you make your blog cover images stand out.
You can have a lot of fun with Canva. It's free, use it!
A bonus tip! If you find you have your text element behind your container element and you want to bring your text forward. You can quickly correct this by clicking on the text element, them using the menu option at the top - 'Position'. You can then select 'Forward' or 'Backward' as required, and this will move your active element forward one or backward one. The layering order is generally referred to as the 'z-order'.
If you have any further questions on this, then please comment below.


Recent Comments
22


Hi Paul,
Thanks for sharing this great tip! It's highly appreciated.
Much success to you!
Kind regards,
Nichola

I love Canva and use the paid version. I'd be totally lost without it and create all my pins, instagram posts, and lots more. The paid version allows you to import fonts

Paul this is brilliant. I really like Canva but only ever use it very basically. I've just used some of this technique for my latest post. Thank you.

Hi Paul
Great share!
I am a big fan of Canva - great tool and free too!
I love the design you did for this blog - I've not used the "pop" yet, but will now I see how amazing it looks ☺️
Blessings
Louise

I have just gone in and changed my image that I used for my blog I posted a few hours ago, to one using a canva design, and it is far more eye catching, and personal. Thanks again for reminding me to do this.


Love using Canva, and always good to get tips on improving how I can use it, thanks for sharing.
Thank you for this, it certainly makes your images personal and unique. Easy to follow blog, thanks, have a great day, Denise.

See more comments
Thank you, Paul, very useful popping tip.